MICROWAVE OVEN Instruction Manual Important Safeguards..........................................................................3 Setting Up Your Oven..........................................................................7 Operation..............................................................................................9 Troubleshooting..................................................................................20 One Year Limited Warranty.......................................................
PRECAUTIONS TO AVOID POSSIBLE EXPOSURE TO EXCESSIVE MICROWAVE ENERGY (a) Do not attempt to operate this oven with the door open as this can result in harmful exposure to microwave energy. It is important not to tamper with the safety interlocks. (b) Do not place any object between the oven front face and the door or allow soil or cleaner residue to accumulate on sealing surfaces. (c) Do not operate the oven if it is damaged.
IMPORTANT SAFEGUARDS CAUTION WARNING To reduce the risk of burns, electric shock, fire,injury to persons or exposure to excessive microwave oven energy when using your appliance, follow basic safety precautions, including the following: • Read all instructions before using the appliance. • Read and follow the specific:"PRECAUTIONS TO AVOID POSSIBLE EXPOSURE TO EXCESSIVE MICROWAVE ENERGY" found on page 2.
• Do not let cord hang over edge of table or counter. • When cleaning interior or exterior surfaces, used only mild, nonabrasive, soaps or detergents applied with a sponge or soft cloth. • Liquids, such as water, coffee, or tea may overheat beyond the boiling point without appearing to be boiling. Visible bubbling or boiling when the container is removed from the microwave oven is not always present.
1. A short power-supply cord is provided to reduce the risks resulting from becoming entangled in or tripping over a longer cord. 2. Longer cord sets or extension cords are available and may be used if care is exercised in their use. 3. If a long cord set or extension cord is used: 1) The marked electrical rating of the cord set or extention cord should be at least as great as the electrical rating of the appliance.
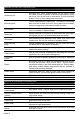
Materials you can use in microwave oven Materials Comments Aluminum foil Shielding only. Small smooth pieces can be used to cover thin parts of meat or poultry to prevent overcooking. Arcing can occur if foil is too close to oven walls. The foil should be at least 1 inch (2.5cm) away from oven walls. Browning dish Follow manufacturer's instructions. The bottom of browning dish must be at least 3/16 inch (5mm) above the turntable. Incorrect usage may cause the turntable to break.
SETTING UP YOUR OVEN Names of Oven Parts and Accessories Remove the oven and all materials from the carton and oven chamber. Your oven comes with the following accessories: Glass tray Turntable ring assembly Instruction Manual Pizza Baking Tray Grill rack 1 1 1 1 1 A.Pizza Oven Door B.Pizza Baking Tray C.Door D.Control Panel E.Door Button Grill Rack( Only for Grill series ) Turntable Installation Hub (underside) a. Never place the glass tray upside down. The glass tray should never be restricted. b.
Before Installation Remove all packing material and accessories. Examine the oven for any damage such as dents or broken door. Do not install if oven is damaged. Cabinet: Remove any protective film found on the microwave oven cabinet surface. Do not remove the light brown Mica cover that is attached to the oven cavity to protect the magnetron. Installation 1. Select a level surface that provide enough open space for the intake and/or outlet vents.
OPERATION Control Panel and Features (1) (2) (3) (4) (5) (6) (7) (8) (9) (1) Microwave (2) Grill/Combi. (3) Weight Defrost (4) Clock/Kitchen Timer (5) Time Defrost (6) Stop/Clear (7) Pizza (8) Start/+30Sec.
OPERATION 1.Clock Setting When the microwave oven is plugged in, the LED will display "0:00", buzzer will beep once. Press"Clock/Kitchen Timer" once to select clock function, the hour figures will flash, and " " will appear.Turn " " to adjust the hour. Press"Clock/Kitchen Ti m e r " , t h e m i n u t e figures will flash.Turn" " to adjust the minutes. Press"Clock/Kitchen Timer"to finish clock setting.
Example: If you want to use 80% microwave power to cook for 20 minutes, you can operate the oven as the following steps. Press "Microwave" once, the screen display "P100". Press "Microwave" once again or turn" "to choose 80% microwave power. Press"Start/+30Sec. /Confirm" to confirm, and the screen displays "P 80". Time adjustments are in increments shown below. Power Levels Press"Start/+30Sec. /Confirm" to start cooking .
3.Grill or Combi. Cooking Press "Grill/Combi " the LED will display"G",and press "Grill/Combi" or turn the " " to choose the power you want, and "G","C-1" or "C-2" will display.Then press "Start/+30Sec./Confirm"to confirm, and turn " "to set cooking time from 0:05 to 95:00. Press "Start/+30Sec./Confirm" again to start cooking. Example: If you want to use 55% microwave power and 45% grill power(C-1) to cook for 10 minutes, you can operate the oven as the following steps.
4. Quick Start Press "Start/+30Sec. /Confirm". Oven will start cooking at 100% power for 30 seconds. Each added press will increase 30 seconds cooking time up to 95 minutes. To cancel, press "Stop/Clear "twice. Or turn " " left to set cooking time with 100% microwave p o w e r, t h e n p r e s s "Start/+30Sec./ Confirm" to start cooking. Microwave,Grill,Combi or Time Defrost, each press of "Start/+30Sec./ Confirm" will increase 30 seconds of cooking time. 5.
6. Defrost By Time Press"Time Defrost" once, the oven will display "dEF2". Turn " " to select the defrost time. The MAX time is 95 minutes. Press "Start/+30Sec. /Confirm" to start defrosting. The defrost power is P30 , and it cannot be changed. 7. Kitchen Timer Press"Clock/Kitchen Timer" twice, LED will display 0:00, " " will light. Turn " " to enter the correct time.(The maximum cooking time is 95 minutes.) Press"Clock/Kitchen Ti m e r " t o c o n f i r m setting, " " will flash.
8. Auto Menu 1) Turn " " right to choose the menu, and "A-1" to "A-6" will display. 2)Press "Start/+30Sec./Confirm" to confirm. 3) Turn " " to choose the default weight as the menu chart. 4) Press "Start/+30Sec./Confirm" to start cooking. Example: If you want to use "Auto Menu" to cook 8.0 oz Frozen Vegetables. Turn " " clockwise till "A-4" display. Press"Start/+30Sec. /Confirm" to confirm. Turn " " to select the weight until "8.0" is displayed. Pess "Start/30Sec. /Confirm" to start cooking.
9. Multi-Function Cooking At most 2 functions can be set for cooking in multi-function cooking. Note: If defrosting, it will automatically be placed as the first function. Example: If you want to defrost food for 5 minutes and then cook with 80% microwave power for 7 minutes, operate it as the following: Press "Time Defrost" once, and the oven will display "dEF2". Press "Start/+30Sec. /Confirm" to confirm, and the screen displays "P 80".
10. Pizza function Open the pizza oven door, put the pizza on the baking tray, then close the door. Press "Pizza" once, " " will light and the oven display "P-1". Press "Pizza" three times or turn " " to select different menu, "C-1","C-2","C-3" or "P1" . Press "Start/+30Sec. /Confirm" to confirm. Turn " " to choose the weight if "C-1" or "C2" has been chosen; to choose diameter if P-1 has been chosen. Turn " " to choose the cooking time if "C-3" has been chosen. Press "Start/+30Sec.
Menu chart: Program/Display Pizza/ P-1 Chicken Wings/C-1 Chicken Nuggets/C-2 Custom time/C-3 Weight 8 inch 9 inch 8 Oz 16 Oz 8 Oz 16 Oz The preset cooking time 13:00mins 15:00mins 20:00mins 25:00mins 20:00mins 25:00mins Enter the time by " "Max.cooking time is 95 minutes. Note: If door is opened,baking and timer stop.Press "Start/+30Sec./Confirm" to resume. 1) Pizza function can not work with the microwave or grill at the same time. 2) In programs C-1 and C-2,an alarm will sound at the half way point.
12. Lock-out Function for Children Lock: Press "Stop/ Clear " for 3 seconds, there will be a long " beep" denoting entering the child-lock state . The lock icon will light. Lock Cancel: Press "Stop/Clear" for 3 seconds, there will be a long "beep" denoting that the lock is released.
Troubleshooting Check your problem by using the chart below and try the solutions for each problem. If the microwave oven still does not work properly, contact the nearest authorized service center. TROUBLE POSSIBLE CAUSE POSSIBLE REMEDY Oven will not start a. Electrical cord for oven is not plugged in. b. Door is open. c. Wrong operation is set or not confirmed. a. Plug into the outlet. b.Close the door and try again. c.Press"Start/+30Sec./Confirm" or check instructions. Arcing or sparking a.
ONE YEAR LIMITED WARRANTY This product carries a warranty that it will be free from defects in material and workmanship for a period of one year from the date of purchase. This warranty is valid for the original retail purchaser from the date of initial retail purchase and is not transferable. Keep your original sales receipt.
Made in China PN: 26180031****
HORNO MICROONDAS Manual de Instrucciones Medidas de Seguridad .........................................................................3 Montaje del Horno ................................................................................7 Funcionamiento .................................................................................9 Solución de Problemas .....................................................................20 Un Año de Garantía Limitada ......................................................
PRECAUCIONES PARA EVITAR POSIBLES EXPOSICIONES EXCESIVAS A LA ENERGÍA DE MICROONDAS (a) No intente hacer funcionar este horno microondas con la puerta abierta ya que podría suponer una exposición perjudicial a la energía de microondas. Es importante no forzar los cierres de seguridad. (b) No coloque ningún objeto entre la parte frontal del horno y la puerta, y evite que se acumule suciedad o restos de detergentes limpiadores en las superficies sellantes.
MEDIDAS DE SEGURIDAD ATENCIÓN ADVERTENCIAS Para reducir el riesgo de quemaduras, electrocución, incendio, lesiones o exposición excesiva a la energía del horno microondas al usar el electrodoméstico, siga las precauciones básicas de seguridad, incluidas las siguientes: • Lea todas las instrucciones antes de usar el aparato. • Lea y tenga en cuenta “PRECAUCIONES PARA EVITAR POSIBLES EXPOSICIONES EXCESIVAS A LA ENERGÍA DE MICROONDAS” de la página 2.
• No permita que el cable cuelgue del borde de la mesa o mostrador. • Cuando limpie las superficies interiores y exteriores, utilice jabones o detergentes suaves, no abrasivos, y aplicados sobre una esponja o un paño. • Los líquidos, tales como agua, café o té pueden sobrecalentarse más allá del punto de ebullición sin que parezca que están hirviendo. No siempre se verán burbujas hirviendo cuando se retire el recipiente del horno microondas.
1. Se incluye un cable de alimentación corto para reducir los riesgos de tropiezos o enredo con un cable más largo. 2. Están disponibles juegos de cable más largos o cables alargadores y pueden utilizarse si se tiene cuidado en su uso. 3. Si se utiliza un juego de cables largos o un alargador: 1) La capacidad eléctrica nominal del cable o el cable alargador debe ser por lo menos tan grande como la capacidad eléctrica nominal del electrodoméstico.
Materiales que se pueden utilizar en el horno microondas Materiales Comentarios Papel de aluminio Protección solamente. Pueden usarse piezas lisas pequeñas para cubrir partes más delgades de carnes y aves para evitar la cocción excesiva. El papel de aluminio puede provocar chispas si está muy cerca de las paredes del horno. El papel debe estar al menos a 2,5 cm (1 pulgada) de distancia de las paredes del horno. Bandeja para dorar Siga las instrucciones del fabricante.
MONTAJE DEL HORNO Nombre de las piezas del horno y accesorios Saque el horno, todos los elementos de la caja de cartón y la cámara de horno. El horno viene con los siguientes accesorios: Bandeja de cristal Placa giratoria Manual de instrucciones Bandeja de grill para la pizza Parrilla grill 1 1 1 1 1 A.Puerta del horno para pizza B.Bandeja para cocción de la pizza C.Puerta D.Panel de control E.
Antes de la Instalación Retire todo el material de embalaje y los accesorios. Fíjese que el horno no tenga ningún daño, como abolladuras o la puerta rota. No continue con la instalación si el horno si está dañado. Horno microondas: retire la película protectora que se encuentra en la superficie del electrodoméstico. No retire la cubierta de la luz marrón Mica que está acoplada en la cavidad del horno para proteger el magnetrón. Instalación 1.
FUNCIONAMIENTO Panel de control y características (1) (2) (3) (4) (5) (6) (7) (8) (9) (1) Microondas (6) Parar / Borrar (2) Grill / Combi. (7) Pizza (3) Descongelar por Peso (8) Iniciar /+30 seg.
FUNCIONAMIENTO 1. Configuración del Reloj Cuando el horno está conectado a la red, el LED mostrará “0:00”, se emitirá un pitido. Pulse el botón “Clock / Kitchen Timer ”(Reloj / Temporizador) una vez para seleccionar la función reloj. Las cifras de la hora parpadearán y aparecerá el símbolo . Gira la rueda para ajustar la hora. Pulse el botón “Clock / Kitchen Timer ” (Reloj / Temporizador), las cifras de los minutos parpadearán. Gira la rueda para ajustar los minutos.
Ejemplo: Si desea utilizar el 80% de potencia del microondas para cocinar durante 20 minutos, puede utilizar el horno siguiendo estos pasos. Pulse el botón “Microwave”(Microondas) una vez, la pantalla mostrará P100. Pulse el botón “Microwave”(Microondas) una vez o gire la rueda para elegir el 80% de potencia de microondas. Pulse el botón “Start /+30 sec./Confirm ” (Iniciar /+30 seg./Confirmar) para confirmar y la pantalla mostrará P 80. Niveles de Potencia Pulse el botón “Start /+30 sec.
3. Grill o Combi. Cocinar Pulse “Grill / Combi ” (Grill / Combi.) el LED mostrará “G”, y pulse “Grill / Combi ” (Grill / Combi.) o gire la rueda para elegir potencia que quiera, y aparecerá “G”, “C-1” o “C-2”. A continuación pulse “Start /+30 sec./Confirm ” (Iniciar /+30 seg./Confirmar) para confirmar y gire la rueda para ajustar el tiempo de cocción de 0:05 a 95:00. Pulse “Start /+30 sec./Confirm ” (Iniciar /+30 seg./Confirmar) de nuevo para empezar a cocinar.
4. Inicio Rápido Pulse el botón “Start /+30 sec./Confirm ” (Iniciar /+30 seg./Confirmar) para que el horno empiece a cocinar a una potencia del 100% durante 30 segundos. Cada vez que pulse aumentará en 30 segundos el tiempo de cocción hasta 95 minutos. Para cancelar, pulse “Stop / Clear ”(Parar / Borrar) dos veces. O gire la rueda a la izquierda para ajustar el tiempo de cocción a una potencia del 100%. A continuación, pulse el botón “Start /+30 sec./Confirm ” (Iniciar /+30 seg.
6. Descongelar por Tiempo Pulse el botón “Time Defrost ”(Descongelar por Tiempo) una vez y el horno mostrará dEF2. Gire para seleccionar el tiempo de descongelación. El tiempo máximo es de 95 minutos. Pulse el botón “Start /+30 sec./ Confirm ” (Iniciar /+30 seg./Confirmar) para comenzar la descongelación. La potencia de descongelación es P30, y no se puede cambiar. 7. Temporizador Pulse el botón “Clock/Kitchen Timer ” (Reloj/Temporizador) dos veces, y la luz LED mostrará 0 00, aparecerá un .
8. Menú Auto 1) Gire la rueda a la derecha para elegir el menú, y se mostrará “A-1” a “A-6”. 2) Pulse “Start /+30 sec./Confirm ” (Iniciar /+30 seg./Confirmar) para confirmar. 3) Gire para elegir el peso predeterminado como en el cuadro de menú. 4) Pulse “Start /+30 sec./Confirm” (Iniciar/+30 seg./Confirmar) para empezar a cocinar. Ejemplo: Si desea utilizar “Auto Menu” para cocinar 8 oz (225 gramos) de verduras congeladas. Gire la rueda hacia la derecha hasta que aparezca “A-4”.
9. Cocinar en Modo Multifunción Se pueden configurar al menos 2 funciones en el modo multifunción. Nota: si se trata de descongelación, automáticamente se colocará como primera función. Ejemplo: si desea descongelar alimentos durante 5 minutos y luego cocinar con una potencia de microondas del 80% durante 7 minutos, opere de la siguiente manera: Pulse el botón “Time Defrost ” ( Descongelar por Tiempo ) una vez, y el horno mostrará dEF2. Pulse el botón ”Start /+30 sec. /Confirm ”(Iniciar /+30 seg.
10. Función Pizza Abra la puerta del horno de pizza, coloque la pizza en la bandeja del horno y cierre la puerta. Pulse el botón “Pizza” (Pizza) una vez, se iluminará el icono de pizza y la pantalla mostrará P-1. Pulse el botón “Pizza” (Pizza) tres veces o gire la rueda para seleccionar un menú diferente: C-1, C-2, C-3 o P-1. Pulse el botón “Start /+30 sec./ Confirm ”(Iniciar /+30 seg./Confirmar) para confirmar.
Cuadro gráfico: Programa / Pantalla Pizza/ P-1 Alitas de pollo/C-1 Nuggets de pollo/C-2 Tiempo personalizado/C-3 Peso Tiempo de cocción preestablecido 8 pulgadas 13:00 minutos 9 pulgadas 15:00 minutos 8 onzas 20:00 minutos 16 onzas 25:00 minutos 8 onzas 20:00 minutos 16 onzas 25:00 minutos Introduzca el tiempo con la rueda , el tiempo máximo de cocción es 95 minutos. Nota: Si se abre la puerta, se detendrá la función de horneado y el temporizador. Pulse “Start / +30 sec./Confirm ” (Iniciar /+30 seg.
12. Función de Bloqueo para Niños Bloqueo: presione “Stop/Clear ”(Parar/Borrar) durante 3 segundos. Habrá un “bip” largo indicando que ha entrado en el estado de bloqueo parar niños. El icono de bloqueo se encenderá. Cancelar bloqueo: presione “Stop/Clear ” (Parar/Borrar) durante 3 segundos. Habrá un “bip” largo indicando que ha salido del estado de bloqueo.
Solución de Problemas Compruebe si su problema aparece en la siguiente tabla y pruebe las soluciones mostradas para cada problema. PROBLEMA POSIBLE CAUSA POSIBLE SOLUCIÓN a. El cable eléctrico del horno no está enchufado b. La puerta está abierta. c. Configuración incorrecta o no confirmada. a. Enchúfelo a la toma de corriente. b. Cierre la puerta y vuelva a intentarlo. c. Pulse “Start/+30Sec./Confirm” (Iniciar /+30 seg./Confirmar) o consulte las instrucciones. Descargas o chispas a.
UN AÑO DE GARANTÍA LIMITADA Este producto tiene una garantía de que estará libre de defectos en materiales y mano de obra por un período de un año desde la fecha de compra. Esta garantía es válida para el comprador minorista original a partir de la fecha de compra inicial y no es transferible. Guarde el recibo de compra original.
Hecho en China PN: 26180031****