
Installation Guide


Please read this guide carefully prior to installation. Wear appropriate safety goggles,
gloves to prevent abrasions, proper clothing and footwear.
Prior to installation, ensure that:
• The installation will be in compliance with all applicable Federal, State and Local build-
ing codes and regulations.
• The unit is the correct size model and color for the application.
• There has been no shipping or handling damage.
• The interior of the pan will be covered and protected during installation.
Shower Base Preparation:
1. Measure the base thickness - To achieve a level entry shower you will need to
check the thickness of the shower base prior to installation. Shower bases vary in
thickness so measure your rst.
2. Measure the shower base dimensions - Check the external and internal dimen-
sions of the shower base. You may need to adjust the amount of recess into the stud to
achieve the desired results.
3. Check your waste outlet position to make sure the waste outlet aligns perfectly
with the shower base.
4. Plan the installation relative to the nished wall surfaces. Take into consideration
the dimensions of the base and the door to be installed. Be sure the opening in the
sub-oor is around 5” and the stub of the waste pipe is central in it, and projects at
least 1” above the oor.
5. Dry t the shower base in the opening. Mark a line along the front edge of the
shower base sub oor for reference.
6. DO NOT STEP ON THE PAN. Drill 3/16” holes through the ange at each stud.
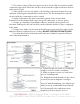
Drain and Shower Base Installation:
1. The hole in the Shower Base is 3-3/4” in diameter to accommodate the 2” sch
40 plastic or brass drain body. Remove the metal grate from the drain and retain the
installation Key. Remove the locknut, ber washer, and rubber washer from the drain
body. Apply a 1/4” bead of silicone seal to the upper surface of the drain hole in the
shower base and insert the drain assembly. Place rst, the rubber washer against the
underside of the base. Then the ber friction washer against the rubber washer. Then
tighten the locknut hand tight. Clean pan thoroughly.
NOTE: Some plumbers will put a small amount of silicone seal where
the nut threads onto the body to prevent loosening with time.