
Installation Guide


2. The entire bottom of the shower pan needs to sit on a at, level surface and be
completely supported. Check the sub oor area from left to right and front to back to
make sure it is level.
3. If the sub oor is not level, apply a self-leveling compound designed for your
substrate, following the manufacturers instructions. The line drawn previously will
show how far the compound needs to extend.
4. Apply a lubricant to the inner seal rubber gasket of the shower drain.
Common household liquid dish soap is the perfect lubricant, or silicone grease.
5. Using a good quality polyurethane adhesive, bond the shower pan to the
substrate, making sure the pan sits ush on the substrate and the 2” pipe is engaged
in the drain.
6. Using a level, make sure the pan sits ush front to back and left to right. Let the
adhesive dry thoroughly before proceeding. DO NOT STEP ON THE PAN TILL DRY.
7. Use drywall screws to fasten the tub to the studs. Shim if required to ll space
caused by warped lumber.
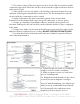
8. Tighten Compression nut on Sch 40 pipe
using provided tool and screwdriver.
9. Water test pan to ensure no leaks exist
prior to installing walls.
10. Bring the nish wall surface to the show-
er pan as shown in diagram. Seal edges.
Note: As with all plumbing, especially in wet
walls; licensed, certi ed and insured install-
ers following all codes with inspections
might be your best way for success.
WESTBRASS • 2429 E. Olympic Blvd., Los Angeles, CA 90021
(213)-627-8441
• fax:(213) 627-2844 • orders@westbrass.com • www.westbrass.com