
WireSpeed ADSL Modem User Guide


WireSpeed ADSL Modem
User Guide
030-300166A 40 Advanced Configuration
Creating a New VPN Phonebook Entry for Windows NT
The following procedure tells how to create a VPN Phonebook entry for use with a corporate LAN or dial-up transport. A
VPN connection contains the IP address of a PPTP server and the user account information for that server. WebShare
allows you to create and store up to eight accounts for VPN and other types of connections.
To create a VPN connection to a server on your corporate LAN:
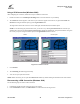
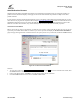
1. Click
My Computer
>
Dial-Up Networking
.
2. The
Dial-Up Networking
window appears. The Phonebook entry selection box lists all existing PPTP connections.
Click
New
to create a new connection.
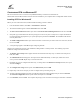
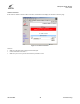
3. The
New Phonebook Entry
Wizard
opens.
4. Enter a name for the tunnel you are creating. The PPTP tunnel will be saved in the phonebook under this name. Click
Next
.
5. The
Server
window opens. Activate all the options that apply to your tunnel. Click
Next
.
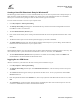
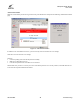
6. The
Phone Number
window opens. Enter the Phone Number of the dial-up server you are calling. (The IP address or
DNS host name of the PPTP server on your corporate LAN.)
7. Click
Next
.
NOTE: Multiple Numbers. You can assign more than one phone number (IP address or DNS host name) to each entry. This
can be useful if you have a pool of host names and addresses to connect to. To do this, click
Alternates
.
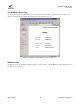
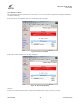
8. The
New Phonebook Entry Wizard
informs you that the new tunnel was successfully created. Click
Finish
. The
tunnel definition is saved and added to the Phonebook entries.
Logging On to a VPN Server
After the connection to your VPN server has been created, proceed as follows to log on:
1. Click
My Computer
>
Dial-Up Networking
.
2. The
Dial-Up Networking
window opens. In the
Phonebook Selection
box, select the tunnel you want to set up and
click
Dial
.
3. The
Connect To
window appears. Enter your password for the VPN server. To save your password, click the
Save
Password
check box.
4. Enter the optional information in the
Domain
box. (This is only required for some Microsoft NT VPN servers.) Click
OK
.
5. The
Connecting to
<connection name> window appears and displays the status of the connection process. Once the
connection is established, the window is minimized to the taskbar.