
User's Manual Part 1


030-300419 Rev. A
Draft 8– 11/30/04
030-300419 Rev. A 10 November 2004
User Guide
Verizon One Telephone Subsystem
7. INSTALLING THE VERIZON ONE BASE UNIT
To install the Verizon One Base Unit, please follow the instructions provided in this section.
7.1 Choosing a Location to Install Verizon One
For optimal performance of Verizon One, please find a location that is:
• Away from electrical and interferences such a televisions, radios, microwave ovens
• Away from water or moisture, excessive dust, or extreme cold
• In a central location that has no obstructions – this will optimize cordless performance
• Away from heat sources and sunlight
• In locations where there are multiple cordless telephones, separate the base units as much as possible
7.2 Installing the Base Unit on a Desktop or Flat Surface
1. Snap-on the Base Unit swivel support stand onto the back of the Verizon One Base Unit.
2. Locate a sturdy, flat surface, table or desktop that is near an active wall AC power outlet and a provisioned
telephone jack, and position the Verizon One Base Unit.
3. Connect the included phone cable from the jack marked DSL on the rear panel of the Base Unit to the telephone
wall jack provisioned for DSL and phone service. This connection will provide dial tone for voice services in
addition to providing DSL to your Verizon One. (Note: The Verizon One has a convenience/Fax jack that can
be used to connect additional telephone equipment such as a fax machine).
4. Connect the AC 12V power supply cord to the power connector marked 12V AC on the rear panel of the
Verizon One Base Unit. Plug the other end of the power supply into an AC wall socket, and then turn on the
power switch (if it is not already on).
5. Check the Base to see if the Power LED is solid green. If the Power LED is solid green, the Verizon One Base
is powered up.
6. Verify telephone operation by pressing the <Speakerphone> button found on the front of the Base Unit. Once
pressed, the In-Use LED lights solid blue and dial tone should be heard from the speaker.
7.3 Wall Mounting on a Hollow Drywall Surface (Optional)
Follow the steps below to mount Verizon One on a wall:
NOTE: The hardware needed to wall mount Verizon One is not included with the product.
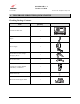
1. Obtain two #8 pan-head screws and two #8 wall anchors.
2. Place the Verizon One Base Unit stand against the wall where it is to be mounted. Using a pencil, mark one of
the two corresponding screw locations. Mark the other at the appropriate distance vertically.
3. Drill a 3/16” hole for the wall anchors and insert. Screw in the #8 screws until the face of the screws are
approximately 1/8” from the wall.