
User's Manual Part 1
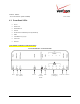
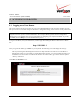
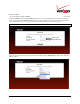
Table Of Contents
- 1. PRODUCT DESCRIPTION
- 2. REGULATORY INFORMATION
- 3. NETWORKING REQUIREMENTS
- 4. HARDWARE FEATURES
- 5. INSTALLING THE ROUTER
- 6. ACCESSING YOUR ROUTER
- 7. CONFIGURING YOUR BROADBAND CONNECTION
- 8. CONFIGURING YOUR DEVICE FOR DHCP
- 9. BASIC CONFIGURATION
- 10. MAIN (HOME PAGE)
- 11. WIRELESS
- 11.1 Wireless Status
- 11.2 Basic Security Settings
- 11.3 Advanced Security Settings
- 11.3.1 SSID Broadcast
- 11.3.2 Wireless MAC Authentication
- 11.3.3 802.11b/g Mode
- 11.3.4 Other Advanced Wireless Options
- 11.3.5 Configuring the Stations Security Type
- 11.4 Device List
- 12. MY NETWORK

03/24/09 - DRAFT
030-300554 Rev. C 15 March 2009
Verizon FiOS Router
(
Model 9100EM
)
User Guide
Now that you have connected your Router to your broadband service and turned on the Router, you can connect
Ethernet and Wireless devices to the Router, allowing for Internet connection throughout your home without
disrupting your cable or satellite television services. Refer to the following sections for instructions on connecting
networking devices to your Router:
• Section 5.2 explains how to connect Ethernet devices to your broadband Router.
• Section 5.3 explains how to connection Wireless devices to your broadband Router.
5.2 Connecting Ethernet Devices to Your Router
To connect PCs to your Router using 10/100-BaseT Ethernet installation, please follow the steps below:
1. Connect your Router to your broadband service as explained in section 5.1.
2. Conn
ect the yellow Ethernet cable (provided with your kit) from any one of the four Ethernet jacks marked 1, 2,
3, 4 on the back of the Router to the Ethernet port on your computer. Turn on the computer.
NOTE: Use any of the four LAN Ethernet jacks on the Router’s rear panel; each jack serves as an Ethernet
switch. Repeat this step to connect up to three additional PCs to the Router.
3. Check to see if the Router’s Power LED is solid green. This indicates that the Router is powered on.
4. Check to see if any of the Router’s LAN Ethernet LEDs (1,2,3,4) are solid green. Solid green indicates that the
Ethernet connection is functioning properly. Check the LAN Ethernet LED for each Ethernet jack to which
you are connected at the rear of the Router.
5. Check to see if the Router’s WAN Coax LED is solid green (or flashing amber). This means the Coax
connection is functioning properly.
6. After you have logged on to you account and established an Internet connection, as explained later in this
document, check to see if the Router’s Internet LED is solid green. Solid green indicates that the Internet link
has been established.
Congratulations! You have completed the steps to connect Ethernet devices to your Router. Now proceed to section 6 to
access your Router’s
Web pa
ges.