
Installation manual


ENGINE
OIL
CHANGE
Engine
Oil
Change
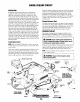
1.
Draining
the
Oil
Sump.
Discharge the used oil through
the
sump
drain hose (attached
to
the fronl
of
the eogine)
while the engine
is
warm. Drain thc used oil completely,
replace the hose
in
its bracket, and replace the end cap
securely.
NOTE:
Thread size for the luhe oil drain hose capped end
is 1/4 NPT.
Always observe the used
oj
I as
it
is
removed. A
yellow/gray emulsion indicates the presence
of
water
in
the oiL Although this condition
is
rare,
it
does require
prompt attention to prevent serious damage. Call a com-
petent mechanic should water
be
prescnt
in
the oil. Raw
water present
in
the oil can
be
the result
of
a fault
in
the
exhaust system attached
to
the engine and/or a siphoning
of
raw
water
through the raw water cooling circuit into
the exhaust, filling the engine. This problem
is
often
caused by the poor location,
of or
the lack of,
an
anti-
siphon valve.
SUMP
DRAIN
HOSE
2.
Replacement
of
the
Oil
Filter. When removing the used
oil filter, you may find
it
helpful and cleaner to punch a
hole
in
the upper and lower portion
of
the old filter
to
drain the oil from
it
into a container before removing
it.
This
helps to lessen spillage. A small automotive filter
wrench should
be
helpful
in
removing the old oil filter.
NOTE:
Do
not
punch this hole without first loosening the
filter
to
make certain it can be removed!
Place
some
paper towels and a plastic bag around the
fil-
ter when unscrewing
it
to catch any oil left
in
the filter.
(Oil
or
any other fluid
on
the engine reduces the engine's
cooling ability.
Please keep your engine clean.) Inspect
the old oil filter as
it
is removed to make sure that the
ruhber sealing gasket comes off with the old oil filter.
If
this rubber sealing gasket remains sealed against the
engine block, gently remove it.
When
installing the new oil filter element, wipe the filter
gasket's
sealing surface on the engine block free
of
oil
and apply a thin coat
of
clean engine oil to the rubber
gasket on the new oil filter. Screw the filter onto the
threaded oil filter nipple. and then tighten the filter firmly
by hand.
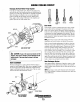
Oil
COOLER
OIL
COOLER
OIL
FILTER
(25
KW
•
32
KW)
_
NOTE:
DO
NOT
OVER
TIGHTEN
I Oil
FilTER
OIL
FILTER
(20
KW)
3. Filling
the
Oil
Sump.
Add new oil through
Ihe
oil
liller
cap
on
the top
of
the engine or through the side
oil
fill.
After refilling, run the generator for a
few
moments while
checking thc cngine's oil pressure. Make surc there
is
nn
leakage around the new oil filter or from the
oil
drain
S~iS~
tern, and stop the generator. Then check the quantity
of
oil
with the lube oil dipstick. Fill to, but not over
thc
high mark
on the dipstick, should the engine require additional oil.
Immediately after an oil filter
change
and
oil
fill.
run the
engine to
make
sure the oil pressure
is
nOlmal and that
there are no oil leaks around the new oil
flltcr.
NOTE:
Generic filters ore
flot
recommended.
(IS
the
Ill(l/e-
rial standards
or
diameters
of
irnportanf
items
Oil
gell('I"i("
parts might be entirel\' different from genuine parts.
A
WARNING:
Used
engine
oil
contains
harmful
contaminants.
Avoid
prolonged
skin
contact.
Clean
skin
and
nails
thoroughly
using
soap
and
water.
Launder
or
discard
clothing or
rags
containing
used
oil.
Discard
used
oil
properly.
Oil
Pressure
The engine's oil
pres..'mre,
during opcratioI1,
is
indicated hy thc
oil pressure gauge
on
thc instrument panel. During normal
operation, the oil pressure will range between 50 and
60
psi.
NOTE:
A newly started, cold engine can have
an
oil pressure
reading upwards
of
60
psi. A warmed engine can have an oil
pressure reading as low
as
35 psi. These readings will vary
depending upon the temperature
of
the engine alld the load
placed on the generator.
WESTERBEKE
Engines & Generators
19