
Technical data
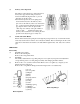

(d)Check fuel injection timing. For adjustment procedure, refer to Adjustment in the GENERAL section.
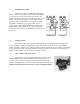
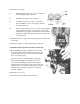
(5)Partial Reassembly of Nozzle and Nozzle Holder Assembly
CAUTION:
THOROUGHLY CLEAN ALL PARTS WITH DIESEL OIL. DO NOT WIPE THEM WITH RAGS.
WHEN TIGHTENING THE RETAINING NUT ON THE NOZZLE .HOLDER BODY, BE SURE
TO TIGHTEN IT TO THE SPECIFIED TORQUE. INSUFFICIENT TORQUE WILL CAUSE POOR
COMPRESSION. IF TORQUED EXCESSIVELY, THE NOZZLE NEEDLE WILL DRAG,
AFFECTING INJECTION CHARACTERISTIC.
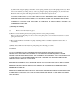
(a)Install the nozzle assembly, spacer and pressure pin in the retaining nut.
(b)Install the shim, spring and flange to the body. Install the retaining nut on the body and tighten to the
specified torque.
(6)Adjustment and Installation of Nozzle Holder
Assembly
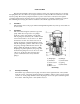
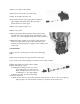
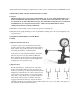
(a)Injection Start Pressure Test
1) Using a nozzle tester, measure the injection start
pressure. If the pressure is different from the standard
value, adjust to the specified pressure by increasing or
decreasing the thickness of adjusting shim.
2) Increasing or decreasing shim thickness by 0.1mm
will vary the pressure by approximately 10kg/cm2.
When replacing the shim, hold the retaining nut in the
vise and remove the body with a wrench. Tighten the
retaining nut to the specified torque.
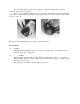
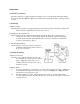
(b)Injection Test
For the chattering test, operate the lever of the tester
slowly. If the nozzle makes a spasm of injection, the
nozzle is considered good. The nozzle should inject fuel
straight in its axial direction. A nozzle is defective if it
injects fuel in a wrong direction or in several separate
strips. Also, a spray in the form of particles indicates a
defect. These defects may be sometimes caused by
clogging with dust and, therefore, all parts should be
carefully cleaned before reassembly. (Care should be taken not to expose one's skin to this spray as it
may penetrate the skin and cause infection.)