
Technical data

c. Remove water connectors from the ends of the manifold and the end plates. Be sure to note
the proper location and arrangement of each for proper replacement.
d. Examine all parts lor defects, corrosion and wear and replace as a needed..
REASSEMBLY
a. If the manifold was removed as an assembly and left intact, it can be replaced on the cylinder
head in the reverse order of removal. Do not reuse the gaskets; install new ones and torque the
bolts or nuts to the proper specification (10-12 lb-ft).
If the manifold has been disassembled, follow the steps below.
1. Loosely attach the elbows to the cylinder head and the manifold using new gaskets. Do not
use any gasket sealant.
2. Gradually tighten each fitting to make sure of proper alignment of all the parts.
Torque to 10-12 lb-ft. This should be done in three steps.
3. Reassemble the end plates, connectors on the manifold. Be sure to use new gaskets and coat
the gasket surfaces with a suitable gasket cement such as "High Tack". Torque the nuts to
8-10 lb-f t .
4. Reinstall the exhaust connections and plug into the manifold using "Locktite-Anti-Seize" on
the threads.
5. Reconnect all hoses, replacing them as needed.
6. Refill the system with coolant as detailed above.
7. Pressure test system and check for leaks.
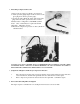
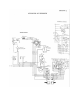
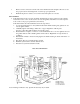
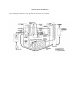
TWO PASS MANIFOLD
Note: Drawing is indicative only. Specific models may vary in detail.