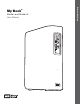
® Studio™ and Studio LX User Manual My Book Studio and Studio LX User Manual External Desktop My Book
WD Service and Support Should you encounter any problem, please give us an opportunity to address it before returning this product. Most technical support questions can be answered through our knowledge base or e-mail support service at support.wdc.com. If the answer is not available or if you prefer, please contact WD at the best telephone number shown below. Your product includes 30 days of free telephone support during the warranty period.
MY BOOK STUDIO AND STUDIO LX USER MANUAL Table of Contents WD Service and Support . . . . . . . . . . . . . . . . . . . . . . . . . . . . . . . . . . . . . . . . . . . . . . . . . . . ii Accessing Online Support . . . . . . . . . . . . . . . . . . . . . . . . . . . . . . . . . . . . . . . . . . . . . . . . . . . . . ii Contacting WD Technical Support. . . . . . . . . . . . . . . . . . . . . . . . . . . . . . . . . . . . . . . . . . . . . . . ii 1 About Your WD Drive . . . . . . . . . . . . . . . . . . .
MY BOOK STUDIO AND STUDIO LX USER MANUAL 5 Locking and Unlocking Your Drive . . . . . . . . . . . . . . . . . . . . . . . . . . . . 30 Password Protecting Your Drive. . . . . . . . . . . . . . . . . . . . . . . . . . . . . . . . . . . . . . . . . . . . . 30 Unlocking Your Drive . . . . . . . . . . . . . . . . . . . . . . . . . . . . . . . . . . . . . . . . . . . . . . . . . . . . . 31 Unlocking Your Drive with the WD SmartWare Software. . . . . . . . . . . . . . . . . . . . . . . . . . . . .
MY BOOK STUDIO AND STUDIO LX USER MANUAL Uninstalling the WD SmartWare Software . . . . . . . . . . . . . . . . . . . . . . . . . . . . . . . . . . . . . 59 Uninstalling on Windows XP Computers . . . . . . . . . . . . . . . . . . . . . . . . . . . . . . . . . . . . . . . . . 59 Uninstalling on Windows Vista or Windows 7 Computers . . . . . . . . . . . . . . . . . . . . . . . . . . . . 59 Getting Started Without the WD SmartWare Software. . . . . . . . . . . . . . . . . . . . . . . . . . . .
MY BOOK STUDIO AND STUDIO LX USER MANUAL 11 About Your WD Drive Welcome to your My Book® Studio™ or Studio LX external hard drive. My Book Studio and Studio LX external drives are the high-performance answer to your storage needs with WD SmartWare software for automatic, continuous backup, an innovative e-label system to personalize your drive and easily archive media collections, and a blazing-fast FireWire 800 interface.
MY BOOK STUDIO AND STUDIO LX USER MANUAL Pure performance—Save and access data at top speeds with the high-performance FireWire 800 interface. A USB 2.0 interface is also provided for maximum flexibility. Power miser—My Book external drives are designed to save energy. WD GreenPower Technology™ lowers internal drive power consumption by up to 30%, a sleep mode reduces power during idle times, and a power-saving feature turns the drive off and on with your computer.
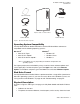
MY BOOK STUDIO AND STUDIO LX USER MANUAL Quick Install Guide AC Adapter USB Cable My Book Studio or Studio LX Drive FireWire 400 Cable FireWire 800 Cable Figure 1.
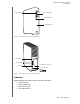
MY BOOK STUDIO AND STUDIO LX USER MANUAL Capacity Gauge Customizable Label Lock Indicator LED Power/Activity LED Figure 2. Front of My Book Studio and Studio LX Drive Power Button FireWire 800 USB 2.0 Kensington® Security Slot Power Connector Figure 3.
MY BOOK STUDIO AND STUDIO LX USER MANUAL Capacity Gauge. The capacity gauge has ten segments that fill from bottom to top (if the drive is vertical) or from right to left (if the drive is horizontal) to indicate space used on the drive during the power-on state.
MY BOOK STUDIO AND STUDIO LX USER MANUAL Drive Interfaces As shown in Figure 3 on page 4, My Book Studio and Studio LX drives have three interface ports: • Two FireWire 800 ports • One USB 2.0 port FireWire 800. The FireWire 800 ports support data transfer rates of up to 800 Mb/s and are backward-compatible with FireWire 400 using the included FireWire 400 cable. Connection to a FireWire 400 device transfers data at FireWire 400 speed (up to 400 Mb/s). Hi-Speed USB (USB 2.0). The USB 2.
MY BOOK STUDIO AND STUDIO LX USER MANUAL 12 Connecting the Drive and Getting Started This chapter provides step-by-step instructions for connecting the drive and installing the WD SmartWare software on your computer.
MY BOOK STUDIO AND STUDIO LX USER MANUAL 2 4 3 1 Figure 4. Connecting the My Book Drive 5.
MY BOOK STUDIO AND STUDIO LX USER MANUAL 6. Double-click the WD SmartWare virtual CD, and then double-click the WD SmartWare icon on the VCD file listing: Note: Mac OS X Leopard and Snow Leopard only: A message asks whether you want to use the My Book drive to back up with Time Machine: WD SmartWare software is fully compatible with Apple's Time Machine software.
MY BOOK STUDIO AND STUDIO LX USER MANUAL 7. The Welcome to WD SmartWare screen displays: If a flash video player is installed on your computer, the screen is animated. 8. Continue to “Getting Started with the WD SmartWare Software” in the next section. Getting Started with the WD SmartWare Software After you select either Back Up Files, Set Up Drive, or Retrieve a backup, the software guides you through a simple two-step WD SmartWare software installation process.
MY BOOK STUDIO AND STUDIO LX USER MANUAL Figure 5. Initial Backup Screen Figure 6.
MY BOOK STUDIO AND STUDIO LX USER MANUAL Figure 7. Home Screen WD SmartWare Software Overview WD SmartWare software is an easy-to-use tool that gives you the power to: • Secure your drive—In drive settings, create a password to protect your encrypted drive from unauthorized access or data theft. • Protect your data automatically—Automatic, continuous backup instantly makes a copy whenever you add or change a file.
MY BOOK STUDIO AND STUDIO LX USER MANUAL WD SmartWare Home Screen The WD SmartWare Home screen (available after installation and the initial backup and security setup) provides four tab-selected options: • Home—Provides a Content Gauge that shows the capacity and content of each hard drive in or connected to your computer (see Figure 7 on page 12) • Backup—Manages existing backups or creates new backups of your important data, including movies, music, documents, e-mail, and pictures (see Figure 8 on page 1
MY BOOK STUDIO AND STUDIO LX USER MANUAL Viewing the Info/Online Help Topics Each WD SmartWare screen provides easy access to online help information to quickly guide you through your backup, retrieve, and settings tasks. Whenever you are uncertain about what to do, just click the info/online help icon in the upper-right corner of any screen: To close the info/help screen after reading the online help, click the red X button in the upper-left corner of the screen.
MY BOOK STUDIO AND STUDIO LX USER MANUAL 3. Double-click the Virtual CD Manager file on your desktop to display the WD SmartWare Virtual CD Manager utility screen: 4. Click Continue. 5. Read the license agreement and click Accept to continue. The WD SmartWare Virtual CD Manager utility locates your drives and asks you to select the one you want to configure: 6. Select your My Book drive, and the WD SmartWare Virtual CD Manager utility displays its current and target VCD settings: 7.
MY BOOK STUDIO AND STUDIO LX USER MANUAL 8. Click Exit to close the WD SmartWare Virtual CD Manager utility and check your desktop display to confirm the change. 9. If you think you might later want to move your My Book drive to another computer, show (enable) the VCD there, or install the WD SmartWare software, then use the copy/paste or drag/drop function to copy the Virtual CD Manager folder from your desktop to your My Book drive.
MY BOOK STUDIO AND STUDIO LX USER MANUAL 4. Read the license agreement and click Accept to continue. The WD SmartWare Virtual CD Manager utility locates your drives and asks you to select the one you want to configure: 5. Select your My Book drive, and the WD SmartWare Virtual CD Manager utility displays its current and target VCD settings: 6. Click Configure Drive to continue. 7. As prompted, for your change to take effect, you must power cycle your My Book drive: a.
MY BOOK STUDIO AND STUDIO LX USER MANUAL 13 Backing Up Your Computer Files This chapter includes the following topics: About Backing Up Your Computer Files Backing It All Up Advanced Backup Capabilities About Backing Up Your Computer Files The WD SmartWare software automatically and continuously backs up all of the content (music, movies, photos, documents, e-mail, and other files) on your computer to your My Book drive.
MY BOOK STUDIO AND STUDIO LX USER MANUAL Figure 8. Backup Screen In the Content Gauges for your computer’s disk drives, the categories of files that would be included in the backup if you click Run Backup are shown: • Light blue background in the Content Gauge for your computer’s hard drive represents the original files that are available for backup. • Gray background in the Content Gauge for your My Book drive represents the potential backup copies of the original files.
MY BOOK STUDIO AND STUDIO LX USER MANUAL Note that: • The System category, shown against a dark gray background, includes all of your operating system files that are not available for backup. Files that are not backed up include system files, program files, applications, and working files. • The Retrieved category, also shown against a dark gray background, shows the files that you have retrieved from a prior backup. They, too, are not available for backup.
MY BOOK STUDIO AND STUDIO LX USER MANUAL Important: Appearance of a Caution message indicating that your drive is full means that there is not enough free space on the drive to complete the backup. The best long-term solution would be to relegate the drive to longterm archive storage and: a. Click the Home tab to display the Home screen. b. Click the WDStore link in the WD Online box to view the Western Digital Online Store website. c.
MY BOOK STUDIO AND STUDIO LX USER MANUAL 2. In the backup files content box: • Select the check boxes for the categories of files that you want to include in the backup • Clear the check boxes for the categories of files that you want to exclude from the backup Changing the selections activates the Apply and Revert buttons: 3. Click Apply to refresh the Content Gauge for your My Book drive. 4. Click Run Backup to back up the selected categories of files.
MY BOOK STUDIO AND STUDIO LX USER MANUAL Changing the Backup Software Settings To optimize your backup, you can: • Specify the number of backup versions to keep for each file • Pause backups until your computer is idle To configure these backup options: 1. Click the Settings tab to display the Settings screen (see Figure 9). Figure 9. Settings Screen 2. Click Set Up Software to display the Software Settings screen (see Figure 10 on page 24).
MY BOOK STUDIO AND STUDIO LX USER MANUAL Figure 10. Software Settings Screen Specifying the Number of Backup Versions. The WD SmartWare software enables you to keep up to 25 older versions of each file. If you overwrite or delete a file by mistake, or want to see the file a couple of versions ago, the WD SmartWare software has a copy for you. You will always have the most-recent specified number of versions of each file available for retrieves, and you can choose to keep between 1 and 25 versions.
MY BOOK STUDIO AND STUDIO LX USER MANUAL 2. Specify the number of file versions that you want to keep (from 1 to 25) in the Enter the number of backup versions to keep for each file box. 3. Click Apply to save and implement the new number of backup versions. Pausing Backups Until Your Computer is Idle. A large backup can take a lot of time, and can consume a lot of your system processing resources.
MY BOOK STUDIO AND STUDIO LX USER MANUAL 14 Retrieving Backed Up Files This chapter includes the following topics: About Retrieving Files Retrieving a File Retrieving a Folder Retrieving an Earlier Version of a File or Deleted Files Retrieving All Your Content About Retrieving Files The WD SmartWare software makes it easy for you to retrieve files that have been backed up on your My Book drive and either: • Restore them to their original locations on your computer • Copy them to a special retrieve folder
MY BOOK STUDIO AND STUDIO LX USER MANUAL Figure 11. Retrieve Screen Figure 12.
MY BOOK STUDIO AND STUDIO LX USER MANUAL Figure 13. Select Content to Retrieve Screen 4. On the Select content to retrieve... screen, select Retrieve Some Files to display the retrieve files selection box (see Figure 14). Figure 14.
MY BOOK STUDIO AND STUDIO LX USER MANUAL 5. Navigate through the folder structure to find the content you want. Also, you can use the search box by typing the name (or partial name) of the file or folder you are looking for: • Click the appropriate file category button to list the files by category: - Pictures Music Movies Documents Other Mail • Select the view icon to list individual files.
MY BOOK STUDIO AND STUDIO LX USER MANUAL 15 Locking and Unlocking Your Drive This chapter includes the following topics: Password Protecting Your Drive Unlocking Your Drive Turning Off the Drive Lock Feature Changing Your Password Password Protecting Your Drive You should password protect your drive if you are worried that someone else will gain access to your drive and you do not want them to be able to access your content on the drive.
MY BOOK STUDIO AND STUDIO LX USER MANUAL Figure 15. Drive Settings Screen 4. Type your password in the Choose a password box. 5. Retype your password in the Verify password box. 6. Type a hint to help remind yourself of your password in the Password hint box. 7. Read the warning about the possibility of data loss if you forget your password. 8. Click the I understand check box to signify that you accept the risk. 9.
MY BOOK STUDIO AND STUDIO LX USER MANUAL Unlocking Your Drive with the WD SmartWare Software Whenever you shut down and restart your computer, or disconnect and reconnect the drive to your computer, the WD SmartWare software displays the Please provide your password prompt: To unlock your drive: 1. Type your password in the Password box. If you provided a password hint when you created your password, click the Password hint pointer to see the hint. 2.
MY BOOK STUDIO AND STUDIO LX USER MANUAL 2. Type your password in the Password box. If you provided a password hint when you created your password, click the Password hint pointer to see the hint. 3. Click Unlock to unlock your drive. Note: If you click Exit, you will not be able to access the files on your drive. 4. At the Your drive is now unlocked prompt, click Exit to close the WD SmartWare Drive Unlock utility screen.
MY BOOK STUDIO AND STUDIO LX USER MANUAL 16 Managing and Customizing Your Drive This chapter includes the following topics: Using the WD SmartWare Icon Opening the WD SmartWare Software Dismounting the Virtual CD Safely Dismounting the Drive Displaying the Drive Serial Number and Status Unlocking the Drive Manually Safely Dismounting the Drive Customizing Your Software Settings Customizing Your Drive Settings Uninstalling the WD SmartWare Software Using the WD SmartWare Icon After you have installed the
MY BOOK STUDIO AND STUDIO LX USER MANUAL • In Finder, double-click WD SmartWare in the Applications list: The WD SmartWare Home screen displays: MANAGING AND CUSTOMIZING YOUR DRIVE – 35
MY BOOK STUDIO AND STUDIO LX USER MANUAL Dismounting the Virtual CD To be sure all data has been written to the drive before you physically disconnect it, dismount the Virtual CD as well as the drive or volume. Note: There are other reasons you might want to dismount a VCD. If, for example, you have more than one My Book drive with the same software connected to your Mac, multiple My Book VCD icons display on your desktop. To clean up your desktop, you can dismount duplicate VCDs. 1.
MY BOOK STUDIO AND STUDIO LX USER MANUAL Using the My Book Icon To safely dismount the drive using the My Book icon: 1. Right-click the My Book icon on the desktop and select Eject “MY BACKUPS” where “MY BACKUPS” is the name you assigned to the volume: You might hear the drive power down as the Power LED flashes 2. Wait for the drive icon to disappear from the desktop before disconnecting the drive. Using the Drive Power Button To safely dismount the drive using the drive power button: 1.
MY BOOK STUDIO AND STUDIO LX USER MANUAL Unlocking the Drive Manually Two situations require you to unlock the drive manually: • The WD SmartWare software is not available • Your computer exits sleep mode When the WD SmartWare Software Is Not Available You will need to unlock the drive manually if: • You uninstalled the software and left the drive locked • You moved your drive to another system, and need to unlock it without installing the software To unlock the drive using the virtual CD: 1.
MY BOOK STUDIO AND STUDIO LX USER MANUAL When Your Computer Exits Sleep Mode If your computer goes into sleep mode, an unlock screen might not display when you reactivate it. To unlock the drive, you can either: • Use the VCD as described in “When the WD SmartWare Software Is Not Available” on page 38 • Use the WD SmartWare icon To unlock the drive using the WD SmartWare icon: 1. Click the WD SmartWare icon . 2. Select the drive, and then select Unlock Drive: 3.
MY BOOK STUDIO AND STUDIO LX USER MANUAL To customize your WD SmartWare software settings for the best possible performance with your drive, on the Software Settings screen (see Figure 10 on page 24): IF you want to . . . THEN click . . . AND see . . . Change the number of backup versions to keep for each file, Set File History “Specifying the Number of Backup Versions” on page 24.
MY BOOK STUDIO AND STUDIO LX USER MANUAL Setting the Preferences Options When enabled, the Preferences options: • Display the WD SmartWare Home screen whenever you reconnect your drive to your computer This is the default configuration of the WD SmartWare software, and it is recommended when you routinely leave your drive connected to your computer.
MY BOOK STUDIO AND STUDIO LX USER MANUAL To customize your drive settings for the best possible performance with the WD SmartWare software, on the Drive Settings screen (see Figure 15 on page 31): IF you want to . . . THEN click . . . AND see . . . Create a custom name (label) that appears in the “spine” area of your My Book drive, Label “Specifying a Name for Your Drive” in the next section.
MY BOOK STUDIO AND STUDIO LX USER MANUAL 2. Type your label in the Label box. 3. Select or clear the Invert label check box to establish the label presentation that you want—dark text against a light background, or vice versa. 4. Click Save Label Settings to apply the label to your drive. Registering Your Drive The WD SmartWare software uses your computer’s Internet connection to register your drive. Register your drive to be kept up-to-date on the latest WD products: 1.
MY BOOK STUDIO AND STUDIO LX USER MANUAL Setting the Drive Sleep Timer The drive sleep timer turns off the power to your drive after a certain period of inactivity to conserve power and minimize long-term wear on the drive. To specify the inactivity period for the sleep timer: 1. On the Drive Settings screen (see Figure 15 on page 31), click Sleep Timer to display the Set Sleep Timer dialog: 2. In the Sleep Timer box, select the inactivity time interval at which you want to turn off the drive. 3.
MY BOOK STUDIO AND STUDIO LX USER MANUAL Showing or Hiding the Virtual CD Icon Each WD SmartWare drive that you connect to your computer adds its own virtual CD icon to your desktop display. Use the Virtual CD Settings dialog to enable (show) or disable (hide) the virtual CD icon for your drive. Note: Hiding the virtual CD icon also disables password protection for your drive. If you disable (hide) the VCD, you will not be able to create a password to protect your drive.
MY BOOK STUDIO AND STUDIO LX USER MANUAL Uninstalling the WD SmartWare Software Important: You can easily uninstall the software. However, you will need to restart the backup job manually after reinstalling the software as uninstalling deletes all existing backup job configurations. (See “Backing Up Your Computer Files” on page 18.) To uninstall the WD SmartWare software: 1.
MY BOOK STUDIO AND STUDIO LX USER MANUAL 17 Checking Drive Health The data files on your My Book drive are important to you. The WD SmartWare software has several built-in diagnostic tools to help make sure that your drive is performing well. Run one of the following tests if you are concerned that your drive is not operating properly: Diagnostic Tool Description Quick S.M.A.R.T. Status Check S.M.A.R.T.
MY BOOK STUDIO AND STUDIO LX USER MANUAL 2.
MY BOOK STUDIO AND STUDIO LX USER MANUAL 18 Using the Drive with Windows The My Book drive is preformatted as a single HFS+J partition for compatibility with Mac OS X operating systems. You can reformat it to NTFS for compatibility with Windows operating systems. (You can also reformat a Windows drive to HFS+J.
MY BOOK STUDIO AND STUDIO LX USER MANUAL Installing on Windows XP Computers To install your My Book Studio or Studio LX drive on a Windows XP computer: 1. After physically connecting the drive as shown in Figure 4 on page 8, click Cancel to close the Found New Hardware Wizard: Note: WD SmartWare will install the driver for this drive. 2. One or two screens might appear, depending on your computer setup: IF AutoRun (AutoPlay) is . . . on your computer, THEN . . . Enabled Proceed to step 3.
MY BOOK STUDIO AND STUDIO LX USER MANUAL 5. AutoRun (AutoPlay) disabled—Open Computer. 6. Double-click the WD SmartWare virtual CD that is listed under Devices with Removable Storage: Note: WD SmartWare software is provided in the form of a virtual CD (VCD) drive on your My Book drive. The VCD displays on your desktop and behaves just like a physical CD. To view the contents of the VCD, such as the documentation and some extra programs, right-click and select Open.
MY BOOK STUDIO AND STUDIO LX USER MANUAL Installing on Windows Vista or Windows 7 Computers To install your My Book Studio or Studio LX drive on a Windows Vista or Windows 7 computer: 1. After physically connecting the drive as shown in Figure 4 on page 8, click Cancel to close the Found New Hardware screen: Note: The WD SmartWare software will install the appropriate driver for the drive. 2. Two or three screens might appear, depending on your computer setup: IF AutoRun (AutoPlay) is . . .
MY BOOK STUDIO AND STUDIO LX USER MANUAL The Welcome to WD SmartWare screen displays: 4. Disregard the rest of this procedure and continue to “Getting Started with the WD SmartWare Software on Windows” on page 54. Note: If you do not want to install the WD SmartWare software, go to “Getting Started Without the WD SmartWare Software” on page 60 instead. 5. AutoRun (AutoPlay) disabled—Open Computer. 6.
MY BOOK STUDIO AND STUDIO LX USER MANUAL The Welcome to WD SmartWare screen displays: If a flash video player is installed on your computer, the screen is animated. 7. Continue to “Getting Started with the WD SmartWare Software on Windows” in the next section. Note: If you do not want to install the WD SmartWare software, see “Getting Started Without the WD SmartWare Software” on page 60 instead. Getting Started with the WD SmartWare Software on Windows To get started with WD SmartWare software: 1.
MY BOOK STUDIO AND STUDIO LX USER MANUAL 3. Wait for the software installation to complete. This could take several minutes. 4. After the software installation completes: IF you clicked . . . at step 1, THEN the WD SmartWare software displays . . . Install WD SmartWare The initial Backup screen for performing your first backup: a. See Figure 5 on page 11 and “Backing Up Your Computer Files” on page 18. b. Proceed to step 5.
MY BOOK STUDIO AND STUDIO LX USER MANUAL Figure 16. Drive Maintenance Home Screen Figure 17.
MY BOOK STUDIO AND STUDIO LX USER MANUAL Using the WD SmartWare Icon After you have installed the WD SmartWare software (see “Getting Started with the WD SmartWare Software on Windows” on page 54), the WD SmartWare icon displays in the Windows task bar.
MY BOOK STUDIO AND STUDIO LX USER MANUAL Checking Drive Status and Temperature Hover the pointer over the WD SmartWare icon to see the drive capacity used and drive temperature, and to find out if the drive is locked: Monitoring Icon Alerts The WD SmartWare icon in the system tray status as follows: flashes green and white to indicate drive IF the WD SmartWare icon flashes . . . THEN the drive might be . . .
MY BOOK STUDIO AND STUDIO LX USER MANUAL Enabling the Backup and Retrieve Functions If you selected Install Drive Settings at the What would you like to do? prompt on the Welcome to WD SmartWare screen and now want to enable the Backup and Retrieve functions: 1. On the drive maintenance Drive Settings screen (see Figure 17 on page 56), click Preferences to display the Set Preferences dialog: 2. Select the Enable Backup and Restore functions check box. 3.
MY BOOK STUDIO AND STUDIO LX USER MANUAL Getting Started Without the WD SmartWare Software If you do not install the WD SmartWare software, you can still use your My Book as an external hard drive.
MY BOOK STUDIO AND STUDIO LX USER MANUAL 19 Troubleshooting This chapter includes the following topics: Installing, Partitioning, and Formatting the Drive Frequently Asked Questions If you have problems when installing or using this product, refer to this troubleshooting section or visit our support website at support.wdc.com and search our knowledge base for more help.
MY BOOK STUDIO AND STUDIO LX USER MANUAL Q: Why does the drive not power up? A: Be sure the drive is plugged in to a power source. A special cable may be needed for computers with limited bus power. For more information in the U.S., visit our Web site at store.westerndigital.com. Outside the U.S., contact WD Technical Support in your region. Q: Why is the drive not recognized under My Computer or on the computer desktop? A: If your system has a USB 2.
MY BOOK STUDIO AND STUDIO LX USER MANUAL A 1 Installing an SES Driver If you do not install the WD SmartWare software, you must have an SES driver installed on computers running Windows to keep the hardware popup wizard from displaying every time you connect your My Book drive to your computer.
MY BOOK STUDIO AND STUDIO LX USER MANUAL 4. Select Install the software automatically and click Next: 5.
MY BOOK STUDIO AND STUDIO LX USER MANUAL Installing the Driver Manually If your computer is not connected to the Internet, install the driver manually: 1. On the Found New Hardware Wizard screen, select No, not this time to inhibit a connection attempt to Windows Update: 2. Click Next to continue. 3. Select Install from a list or specific location and click Next: 4. Browse to My Computer and: a. Double-click the WD SmartWare VCD drive. b. Double-click the extras folder. c. Select WD SES Device Driver.
MY BOOK STUDIO AND STUDIO LX USER MANUAL d. Click Next: 5.
MY BOOK STUDIO AND STUDIO LX USER MANUAL Installing on Windows Vista Computers After you physically connect the drive as shown in Figure 4 on page 8, the Found New Hardware screen displays. Note: If Autoplay is enabled, two additional screens might appear at the same time as the Found New Hardware screen. If they appear, close them.
MY BOOK STUDIO AND STUDIO LX USER MANUAL Installing the Driver Manually If your computer is not connected to the Internet, install the driver manually: 1. On the Found New Hardware wizard screen, click Locate and install driver software: 2. On the Found New Hardware - WD SES Device wizard screen, click Don’t search online: 3. At the Install the disc that came with your WD SES Device prompt, click I don’t have the disc.
MY BOOK STUDIO AND STUDIO LX USER MANUAL 4. Browse to Computer and: a. Double-click the WD SmartWare VCD drive. b. Double-click the extras folder. c. Select WD SES Device Driver. d. Click Next: 5.
MY BOOK STUDIO AND STUDIO LX USER MANUAL Installing on Windows 7 Computers After you physically connect the drive as shown in Figure 4 on page 8, use the Windows 7 Computer Management utility to install the SES driver: 1. Open All Programs and click Computer > Manage: 2.
MY BOOK STUDIO AND STUDIO LX USER MANUAL 3. Click Browse my computer for driver software. 4. Browse to Computer, double-click the WD SmartWare VCD drive, double-click the extras folder, and select WD SES Device Driver: 5. Click Next. 6.
MY BOOK STUDIO AND STUDIO LX USER MANUAL B 1 Compliance and Warranty Information This appendix includes the following topics: Regulatory Compliance Environmental Compliance (China) Warranty Information Regulatory Compliance FCC Class B Information This device has been tested and found to comply with the limits of a Class B digital device, pursuant to Part 15 of the FCC Rules. These limits are designed to provide reasonable protection against harmful interference in a residential installation.
MY BOOK STUDIO AND STUDIO LX USER MANUAL KCC Notice (Republic of Korea only) Class B Device 1 Please note that this device has been approved for non-business purposes and may be used in any environment, including residential areas. Environmental Compliance (China) ᳝↦᳝ᆇ⠽䋼ܗ㋴ 䪙 (Pb) 䥬 (Cd) ∲ (Hg) ݁Ӌ䫀 (Cr6+) ⒈㘨㣃 (PBB) ⒈Ѡ㣃䝮 (PBDE) O O O O O O ࣙ㺙义 O O O O O O ࣙ㺙 O O O O O O ܝᇐㅵ O O O O O O ⬉⑤ᣝ䪂 O O O O O O HDD ᠬᶊ O O O O O O EMI O O O O O O Ͼᗻ࣪ᵓᴤ O O O O O O Kensington 䫕ᣝ䬂 O O O O O O 㶎ϱ 6-32x6.
MY BOOK STUDIO AND STUDIO LX USER MANUAL Warranty Information Obtaining Service WD values your business and always attempts to provide you the very best of service. If this Product requires maintenance, either contact the dealer from whom you originally purchased the Product or visit our product support website at support.wdc.com for information on how to obtain service or a Return Material Authorization (RMA).
MY BOOK STUDIO AND STUDIO LX USER MANUAL Index A Accessories, optional 3 B Backup about backing up files 18 files content box 21, 22 procedure 20, 21 Box contents 2 C F FAQs 61 File categories, defined 57 history, drive setting 40 history, screen 24 Formats 3 Front and back views 3 Full Media Scan 47 H Handling precautions 6 Hardware 2 CAUTION about erasing the drive 44 about lost passwords 30 about preventing data loss when disconnecting 36, 58 about your unlocked drive 31 China RoHS 73 Compatibility
MY BOOK STUDIO AND STUDIO LX USER MANUAL Register Drive screen 43 Registering your drive 43 Registration drive setting 42 Registration, online 6 Regulatory compliance 72 Remove drive 36 Retrieve about retrieving files 26 folder, software setting 40 folder, specifying 40 procedure 26, 29 RoHS 73 Run Diagnostics screen 47 S Security drive settings 42 Serial number 37 Set preferences screen 41 retrieve folder screen 40 sleep timer screen 44 Setting the drive sleep timer 44 SMART Status Check 47 Software Sett
Information furnished by WD is believed to be accurate and reliable; however, no responsibility is assumed by WD for its use nor for any infringement of patents or other rights of third parties which may result from its use. No license is granted by implication or otherwise under any patent or patent rights of WD. WD reserves the right to change specifications at any time without notice.