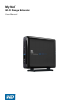
™ My Net Wi-Fi Range Extender User Manual
WD® Service and Support Should you encounter a problem, please give us an opportunity to address it before returning this product. Most technical support questions can be answered through our knowledge base or e-mail support service at http://support.wdc.com. If the answer is not available or, if you prefer, please contact WD at the best telephone number shown below. Your product includes 30 days of free telephone support during the warranty period.
Table of Contents WD® Service and Support . . . . . . . . . . . . . . . . . . . . . . . . . . . . . . . . . . . . . . . . . . . . . . . . . . iii 1 Important User Information . . . . . . . . . . . . . . . . . . . . . . . . . . . . . . . . . . . . 1 Important Safety Instructions . . . . . . . . . . . . . . . . . . . . . . . . . . . . . . . . . . . . . . . . . . . . . . . . 1 Recording Your WD Product Information . . . . . . . . . . . . . . . . . . . . . . . . . . . . . . . . . . . . . .
IMPORTANT USER INFORMATION 1 Important User Information Important Safety Instructions This device is designed and manufactured to assure personal safety. Improper use can result in electric shock or fire hazard. The safeguards incorporated into this unit will protect you if you observe the following instructions for installation, use, and servicing. Read these instructions. Keep these instructions. Heed all warnings. Follow all instructions. Do not use this apparatus near water. Clean only with dry cloth.
IMPORTANT USER INFORMATION Recording Your WD Product Information In the following table, write the serial and model numbers of your new WD product. You can find this information on the label on the bottom of the device. You should also note the date of purchase. This information may be required when requesting technical support.
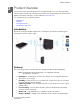
PRODUCT OVERVIEW 2 Product Overview Thank you for purchasing the My Net™Wi-Fi Range Extender. This user manual provides step-by-step instructions for installing and using your new range extender. For the latest WD product information and news, visit our website at www.wdc.com.
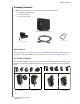
PRODUCT OVERVIEW Package Contents In addition to your My Net Wi-Fi Range Extender, the package contains: Network (Ethernet) cable AC power adapter Quick Install Guide My Net Wi-Fi Range Extender Quick Install Guide AC power adapter Ethernet cable Accessories For U.S. residents, visit www.shopwd.com to view additional accessories available for your My Net Wi-Fi Range Extender. For users outside the U.S., visit http://support.wdc.com.
PRODUCT OVERVIEW Components and LEDs Front Panel Signal Strength LEDs Power LED Wireless LAN LED Front LED indicators LED Description Power Steady blue when the extender is powered on and operational; flashes slowly during boot-up, firmware upgrades, and system self-tests. Wireless LAN The LED functions as follows: • It blinks when connecting the extender to the router and also when connecting the extender to the client. • If an error occurs during setup, the light blinks quickly.
PRODUCT OVERVIEW Side Panel Power button WPS button Frequency switch Port LEDs Ethernet port Power port Side components Component Description Power button Press to turn the extender on. Press again to turn it off. WPS (Wi-Fi Protected Setup) button Press this button to establish an initial connection between a WPSenabled router and the extender and then to connect WPS clients to the extender. Frequency switch Toggle to configure the extender to use either the 2.
PRODUCT OVERVIEW Back Component Description Reset button To reset the extender to factory default settings, press and release the button. The power and wireless LEDs flash, indicating a reset/ reboot. These LEDs are solid when the reset/reboot has been completed.
GETTING STARTED 3 Getting Started This chapter contains the following topics: Setting up Your Extender Configuring Your Extender After Initial Setup Tuning for Distance and Coverage 1 Setting up Your Extender 1. Set the frequency switch to the frequency of the router (2.4 GHz or 5 GHz). Note: If you don’t know whether your router is dual-band, leave the switch set to 2.4 GHz. 2. Connect the extender to a power source and press the Power button.
GETTING STARTED 3. If the router has a WPS or icon button: a. Press the router’s WPS button and the extender’s WPS button within a period of two minutes. b. Make sure: The wireless LAN LED blinks while the connection is being established. When the wireless connection between the router and the extender is established, the wireless LAN LED is solid, and the wireless signal strength indicator is on. The router and extender are connected wirelessly. c.
GETTING STARTED You have two options: Connect the extender directly to your computer using an Ethernet cable, -ORConnect a wireless-enabled device (for example, an iPad or computer) to network name wdrangeextender. Note: This is an open network without security. Continue to “Configuring Your Extender After Initial Setup” on page 11.
GETTING STARTED Configuring Your Extender After Initial Setup 1. Launch a web browser. If the extender’s Welcome screen does not appear automatically, enter http://wdrangeextender, http://wdrangeextender.local, or http://192.168.1.230 in the address field to display it. 2. On the Welcome screen, select a language from the drop-down list (upper right of screen). The language defaults to Auto, the language setting on the browser. Note: If you click Skip, the Dashboard home screen displays.
GETTING STARTED 4. Select a Network Name (or click anywhere in its row) and click Connect. If you do not see your router’s name in the list, enter it in the Use another network field at the bottom of the screen and click Connect. The Secure Network Connection screen displays. Note: For an open (unsecured) system, this screen does not appear. 5. If the router does not support WPS or WPS is not enabled, the following screen displays: Enter the network password and click Enter. Continue to step 9. 6.
GETTING STARTED 7. Click Use WPS to display the Secure Network Connection Wi-Fi Protected Setup screen: 8. You have the following options: To use WPS buttons, press the WPS button on the router and click the blue WPS button on the screen within a two-minute period. If your router has an 8-digit security PIN, enter it and click Connect (to the right of the PIN). If your router requests a PIN, at your router’s prompt, enter the PIN displayed at the bottom of the screen.
GETTING STARTED The Setup Complete screen displays. The extender is now connected to the router wirelessly. 10. The screen provides four options: IF you want to... THEN... Ensure that you will receive important product information and firmware update notices, Click Register Your Extender and continue with “Registering the Extender” on page 26. Configure the extender using the My Dashboard interface, Click Finish and continue with “Performing Basic Tasks” on page 16.
GETTING STARTED If only one set of LEDs are lit—Good for browsing. If all LED's are lit—Great for streaming. Note: If no LEDs are lit, the extender could be out of range or not configured for your router.
PERFORMING BASIC TASKS 4 Performing Basic Tasks This chapter contains the following topics: Opening My Dashboard After Setup Reviewing Current Settings Adding a New Wireless Device to Your Network 3 Opening My Dashboard After Setup To open the My Net Wi-Fi Range Extender dashboard after initial configuration: 1. Enter http://wdrangeextender or http://wdrangeextender.local in the address field of your browser. The login screen displays: 2.
PERFORMING BASIC TASKS The icons at the top of the screen open screens and wizards for performing important tasks: Icon Name Actions See ... My Dashboard Review and change current settings. “Performing Basic Tasks” on page 16. Set up Wireless Configure wireless settings such as network name and security. “Configuring Your Extender After Initial Setup” on page 11. Add a Device Add a wireless device and configure its security settings. “Configuring Advanced Settings” on page 21.
PERFORMING BASIC TASKS 1. Review the following settings: Setting Description Network Name Unique identifier of the 2.4 GHz or 5 GHz network; depending on your selection on the frequency switch. Password Password for accessing the wireless network. Mode Wireless range extender or AP (Access Point) Status Status can be Unconfigured, Configured and Connected, or Unconnected. Number of Devices Connected Number of devices connected to the extender with a wireless or wired connection. 2.
PERFORMING BASIC TASKS 2. If the new device supports WPS: a. Click Click here to connect using WPS to display the Wi-Fi Protected Setup screen: b. Follow the appropriate procedure below: Within two minutes, press the physical WPS button on your device and click the blue WPS button on this screen. -ORIf prompted by your wireless device, enter the extender’s WPS PIN shown on the screen into your wireless device. Note: The PIN also appears on the bottom of the extender. c. Click WPS.
PERFORMING BASIC TASKS b. When prompted by the device, enter the following into your wireless device’s Wi-Fi connection screen: The wireless network you want to use The password for the wireless network selected Note: The password of the device when in extender mode is the same as that of the router. When the extender is in AP mode, the device can have its own password. c. Click Close to display the My Dashboard home screen, which now lists an additional device connected.
CONFIGURING ADVANCED SETTINGS 5 Configuring Advanced Settings This chapter contains the following topics: Opening and Closing the Advanced Settings Screen Configuring Advanced Wireless Settings Configuring Advanced Administrative Settings Setting up Your Extender in AP Mode Opening and Closing the Advanced Settings Screen To open the Advanced Settings screen: 1. Click the Advanced Settings icon to display the Advanced Settings screen, which provides the Wireless and Admin icons. 2.
CONFIGURING ADVANCED SETTINGS Configuring Advanced Administrative Settings The Admin icon provides screens for registering the extender, changing the administrative password, updating the extender’s firmware, restoring factory settings, saving and restoring settings, and rebooting the extender. Changing the Administrator Password The admin account manages the extender interface. The admin has read/write access and can create passwords. The default password is password.
CONFIGURING ADVANCED SETTINGS Updating the Extender’s Firmware WARNING! Do not disconnect or turn off the extender while the update is in process. To check for extender firmware updates and upload new firmware: 1. On the Admin screen, click the Firmware Update tab on the left: To check for the latest firmware version: 1. Click Check Now. The extender searches the WD website for a new firmware file. If a new file exists, the latest firmware version and an Update Now button appear. 2.
CONFIGURING ADVANCED SETTINGS Saving and Restoring Your Extender’s Settings To save your settings: 1. On the Admin screen, click the System tab on the left of the screen to display the Admin / System screen: 2. Click Save Configuration. 3. Name and save the configuration file. To restore your extender’s settings: 1. Browse to locate the saved configuration file. 2. Click Restore Configuration.
CONFIGURING ADVANCED SETTINGS Resetting the Extender to Factory Defaults You may want to reset the extender to how it was when you bought it. You have two options for restoring factory defaults: through the user interface or through the Reset button on the back of the extender. WARNING! Do not reboot the extender while the reset is taking place. The extender reboots as part of the reset process. Using the Dashboard 1.
CONFIGURING ADVANCED SETTINGS Using the Reset button To reset the extender manually: 1. Press and hold the Reset button on the bottom of the extender. When the reset finishes, the Power LED blinks. 2. Wait until the reset finishes before using the extender. Rebooting You can reboot the extender two ways. If you are physically close to it, just press the On/Off button on the extender. If you cannot easily press the button: 1.
CONFIGURING ADVANCED SETTINGS Selecting a Language To change the language of the extender’s screens: Note: Auto represents the language of the browser. 1. On the Admin screen, click Language on the left to display the Admin / Language screen: 2. Select a language from the Select language drop-down list. 3. Click Change. Setting the Signal Strength LEDs You have the option of setting the display of the signal strength LEDs on the front of the extender. 1.
CONFIGURING ADVANCED SETTINGS Setting up Your Extender in AP Mode Wireless Extender Mode vs. AP Mode Extender mode uses the wireless signal from the router for connectivity, and then it repeats that signal to extend the wireless coverage for client devices. In AP mode, the extender gets its connectivity from the router via the Ethernet and acts as an access point for wireless clients.
CONFIGURING ADVANCED SETTINGS Using the Extender in AP Mode After changing the extender to AP mode, follow the procedure below: 1. To use the extender in AP mode, connect it directly to the router using an Ethernet cable. 2. Launch a web browser, and type http://wdrangeextender in the address field. The My Dashboard home screen displays.
CONFIGURING ADVANCED SETTINGS 3. Accept or change the settings in the top half of the screen: Setting Description Network Name Unique identifier of the 2.4 GHz or 5 GHz network, depending on your selection on the frequency switch. Network Mode For the 2.4 GHz band, the default network mode is Mixed 802.11 b+g+n. Keep this setting for maximum client compatibility. The other network modes are 802.11b only, 802.11g only, 802.11n only, Mixed 802.11 b+g, and Mixed 802.11 g+n.
CONFIGURING ADVANCED SETTINGS 4. View or change the settings in the bottom half of the screen: Setting Description Mode The wireless modes are Wireless range extender and AP (Access Point). Status Status can be Unconfigured, Configured and Connected, or Unconnected. Number of Devices Connected Number of devices connected to the extender, wired or wirelessly.
TROUBLESHOOTING 6 Troubleshooting Problem/Question Solution The power LED does not illuminate. 1. Push the power button on the extender to make sure the extender is powered on. 2. Make sure that the power cord is connected to the extender correctly. 3. Make sure that the electrical outlet is working properly. To do this, plug a different electronic device into the outlet and try to power it on. 4. Make sure that you are using the AC adapter provided with the extender.
TROUBLESHOOTING Problem/Question Solution The extender cannot connect to the router. 1. Ensure the extender is powered on. 2. Check the frequency selection switch to determine the frequency at which the extender is operating. 3. Verify that the router supports the frequency at which the extender is operating. 4. If you are using WPS method, make sure the router supports WPS. 5. If WPS fails, connect using the manual method described in step 4 on page 9. 6.
REGULATORY AND WARRANTY INFORMATION 7 Regulatory and Warranty Information This chapter contains the following topics: Regulatory Compliance Warranty Information (All Regions Except Australia/New Zealand) Warranty Information (Australia/New Zealand only) Regulatory Compliance Federal Communication Commission Interference Statement This device complies with Part 15 of the FCC Rules.
REGULATORY AND WARRANTY INFORMATION CAUTION: To comply with FCC RF exposure compliance requirements, the antenna used for this transmitter must be installed to provide a separation distance of at least 20 cm from all persons and must not be co-located or operating in conjunction with any other antenna or transmitter. Note: The country code selection is for non-US models only and is not available for all US models.
REGULATORY AND WARRANTY INFORMATION 以下警語適用台灣地區 經型式認證合格之低功率射頻電機,非經許可,公司、商號或使用者均不得擅自變更頻率、 加大功率或變更原設計之特性及功能。 低功率射頻電機之使用不得影響飛航安全及干擾合法通信;經發現有干擾現象時,應立即 停用,並改善至無干擾時方得繼續使用。前項合法通信,指依電信法規定作業之無線電通 信。低功率射頻電機須忍受合法通信或工業、科學及醫療用電波輻射性電機設備之干擾。 For Mexico Only La operación de este equipo está sujeta a las siguientes dos condiciones: (1) es posible que este equipo o dispositivo no cause interferencia perjudicial y (2) este equipo o dispositivo debe aceptar cualquier interferencia, incluyendo la que pueda causar su operación
REGULATORY AND WARRANTY INFORMATION (2006/95/EC) och EuP-direktivet (2005/32/EC). En "Konformitetsdeklaration" i enlighet med gällande direktiv har gjorts och finns arkiverad hos Western Digital Europe. Merking med CE-symbolet indikerer at dette systemet samsvarer med gjeldende direktiver (council directives) for EU, inkludert EMC-direktiv (2004/108/EF), (1999/5/EF), Lavspenningsdirektiv (2006/95/EF) og EuP-direktiv (2005/32/EF).
REGULATORY AND WARRANTY INFORMATION Environmental Compliance (China) ℶ❐₼㦘㹡㦘⹂䓸德㒥⏒侯䤓⚜䱿♙⚺摞 捷ↅ⚜䱿 ᴎ/ᴎㆅ ⬉䏃ᵓ㒘ড় / ᵓव ⬉⑤বय़఼ / ⬉⑤կᑨ఼ 㶎ϱ 䰸ॄࠋᵓ⬉䏃ᵓⱘ݊Ҫ⬉ᄤ㒘 ӊ 㦘㹡㦘⹂䓸德㒥⏒侯 杔 㻭 柘 ⏼ↆ杻 ⮩䅃勣啾 ⮩䅃ℛ啾搩 O O X O O O O O O O O O O O O O O O O O O O O O O O O O O X O: ⅲ嫷㷳䱜捷ↅ䤓㓏㦘⧖德㧟㠨₼㓏⚺䤓年䱜㦘㹡㦘⹂䓸德⧖⇝ℝ₼◝ⅉ㺠␀✛⦌≰㋾ℶ₩捷㓏欐を䤓ᇵ䟄 ≰㋾ℶ❐₼㦘㹡㦘⹂䓸德䤓棟摞尐㻑ᇶ(SJ/T 11363-2006) 屓⸩䤓棟摞ᇭ X: ⅲ嫷㷳䱜捷ↅ㓏䞷䤓⧖德㧟㠨₼, 咂⺠㦘伊㧟㠨␅㓏⚺䤓㦘㹡㦘⹂䓸德浧ℝ₼◝ⅉ㺠␀✛⦌≰㋾ℶ₩捷㓏 欐を䤓ᇵ䟄≰㋾ℶ❐₼㦘㹡㦘⹂䓸德䤓棟摞尐㻑ᇶ(SJ/T 11363-2006) 屓⸩䤓棟摞 棳槭ℶ❐ₙ♵㦘㪖帿᧨㓏㦘␔棓ℶ❐♙␅捷ↅ䤓ಫ䘾≬∎䞷㦮棟ಬ⧖䟀㷳㣍䯉䤓䶵⚆嫷䯉ᇭ㷳䘾 ≬∎䞷㦮棟♹抑䞷ℝℶ❐㓚␛₼㓏屓⸩䤓∎䞷㧰ↅᇭ (ℸ
REGULATORY AND WARRANTY INFORMATION Warranty Information (Australia/New Zealand only) For consumers purchasing products in Australia and New Zealand, please refer to this warranty information. Nothing in this warranty modifies or excludes your legal rights under the Australian Competition and Consumer Act or the New Zealand Consumer Guarantees Act. This warranty identifies WD's preferred approach to resolving warranty claims which is likely to be quick and simple for all parties.
REGULATORY AND WARRANTY INFORMATION addition to other rights and remedies available to you under the Australian Competition and Consumer Act or the New Zealand Consumer Guarantees Act. Your original box and packaging materials should be kept for storing or shipping your WD product. To conclusively establish the period of warranty, check the warranty expiration (serial number required) via http:// support.wdc.com. Western Digital Technologies, Inc.
APPENDIX: TECHNICAL SPECIFICATIONS Appendix: Technical Specifications Specification Value Wireless standard IEEE 802.11n, a, b, g Ethernet 1 x Gigabit Ethernet I/O ports (1) Ethernet (RJ-45) port Bands 2.4 GHz and 5 GHz selectable dual mode Antennas 3x3 (2.
INDEX Index GPL software 40 I A AC power adapters 4 accessories 4 adding a wireless device 18 with no WPS support 19 with WPS support 19 administrative settings 22 advanced settings 21 administrative 22 wireless 21 Advanced Settings screen, opening and closing 21 antennas 41 AP mode setting up 28 using extender in 29 B back panel reset button bands 41 box contents 4 button power 6 reset 7 WPS 18 7 17 L language selection LEDs 5 front panel 5 side panel 6 logging in 16 logging out 26 26 M modes, Wi
INDEX R W rebooting 26 recording product information 2 registering the extender 2, 26 regulatory compliance 34 reset button 7 resetting to factory defaults 25 restoring a configuration 24 RoHS (China) 38 warranty all regions but Australia/New Zealand 38 Australia/New Zealand 39 web browsers 41 wireless advanced settings 21 coverage 14 LAN 5 signal strength 5 signal strength LEDs 27 standard 41 WPS button 6, 18 LED 5 S safety compliance 35 instructions 1 saving a configuration 24 security 41 service all
Information furnished by WD is believed to be accurate and reliable; however, no responsibility is assumed by WD for its use nor for any infringement of patents or other rights of third parties which may result from its use. No license is granted by implication or otherwise under any patent or patent rights of WD. WD reserves the right to change specifications at any time without notice. Western Digital, WD and the WD logo are registered trademarks in the U.S.