WD ReadyView™ Surveillance System User Manual: Basic Features
Table of Contents 1 Introduction ................................................................................... 4 Important Safety Instructions ................................................................................................................ 5 2 Setup ............................................................................................. 7 Kit Contents ..................................................................................................................................
Warranty Information ......................................................................................................................... 34 Obtaining Service ....................................................................................................................................................................... 34 Limited Warranty ................................................................................................................................................................
1 Introduction When you need quality surveillance, the WD ReadyView™ Surveillance System is the mobile-first, all-in-one solution with a simple NVR device setup.* This complete system includes four HD, dustand water-resistant** cameras with night vision and motion detection, the award-winning WD Purple® drive storage that’s designed for 24/7 always-on surveillance systems, and no monthly fees.
Features Motion Detection Trip Line Scene Focus Change Defocus Area Detection 2TB/2MP Kit l 4TB/4MP Kit l l l l l Mobile App Get hand-held control of your powerful surveillance system. Using just your smartphone, you can easily set up your complete system by scanning the QR code on the Quick Install Guide (the same QR code is also available on the retail packaging and the bottom of the NVR).
Important Safety Instructions · Follow all warnings and instructions marked on the product. · Unplug this product from the wall outlet before cleaning. Do not use liquid cleaners or aerosol cleaners. Use a damp cloth for cleaning. · Do not use this product near any liquids. · Do not place this product on an unstable surface. The product may fall, causing serious damage to the product. · Do not drop the product.
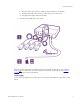
2 Setup This chapter explains how to setup the WD ReadyViewä system. 2.1 Kit Contents Your WD ReadyView™ kit includes the following items: 2.2 2.3 2.4 · Network Video Recorder (NVR; either 2TB or 4TB) · AC adapter (US) · Four (4) PoE IP cameras (either 2MP or 4MP) · Four (4) 100 ft Cat 5 cables (each cable comes with a weather-resistant connector on one end) · One (1) 6.
Connecting the Unit 2. b. Plug one end of the 6.5 ft Cat 5 cable into the network port on the NVR. c. Plug the other end of the 6.5 ft Cat 5 cable into a port on the router. d. Plug the power supply cable into the NVR. Plug the power supply into an AC outlet. Once the system is placed in a permanent location, an optional storage device (e.g. a WD My Book™) can be connected to one of the USB ports on the back of the NVR. See the External Storage 33 section for more information.
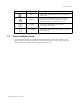
Connecting the Unit Icon Function Color and Description Power Steady blue LED; indicates the NVR is plugged into an AC outlet. Ethernet Steady blue LED; indicates one end of the Cat 5 cable is connected to the Ethernet port on the NVR and the other is connected to a router. Internet Steady blue LED; indicates the system is connected to the Internet. Recording 2.5 Flashing red LED; indicates the system is recording (normal activity).
Quick Installation Guide WD ReadyView™ User Manual 10
Quick Installation Guide WD ReadyView™ User Manual 11
3 Installing the App The WD ReadyViewä application is needed to install, configure, and maintain the system. The app is available in Android and iOS versions. 3.1 Downloading and Installing the App The WD ReadyView app can be downloaded from the Google Play Store (Android) or the Apple App Store (iOS). Downloading and Installing the App 1. Search for "WD ReadyView" in the appropriate store. 2. Once the app has been found, tap the Download button. 3. Tap Install. 4. Tap the WD ReadyView icon. 5.
Login for Additional Mobile Devices 3.3 Main Menu After login, the Live View will open. A number of other functions are available using the Main Menu. Tap the Main Menu icon in the upper left-hand corner to open the menu. The menu options are described in the following table. (Main Menu) icon Icon WD ReadyView™ User Manual Name Description LIVE VIEW Displays the live feed from one or more cameras. This is the default view once the app opens.
Main Menu Icon Name MY SNAPSHOTS Used to capture video and still images on your mobile device. By default, video and images stored on your mobile device are in HD (high definition) format. ALERT MANAGER Alerts are used to notify users of a motion event. Options include motion detection and other features; the list of options may vary by kit purchased or camera model. CAMERA MANAGER Allows users to rename cameras or set motion detection parameters.
4 Live View The Live View image displays the current feed in a single- or multi-camera view. This is the default view once the app opens. The following table lists the controls available on this screen. Tap an icon to start using the control. Icon Name Main Menu Switches between all app screens. Choices include live view (default), system recordings, my snapshots, alert manager, camera manager, config manager, NVR manager, firmware, and help.
Icon Name Number of Cameras Video Mode Full Screen Page Brightness Contrast Play/Stop WD ReadyView™ User Manual Description Toggles between single-camera and multi-camera views. Both views indicate the port number(s) on the DVR. Used to select display mode: HD (high definition), SD (standard definition), and "Eco" (low bandwidth). By default, video and images stored on your mobile device are in HD (high definition) format. Displays one camera in full-screen view.
5 System Recordings The System Recordings screen is used to playback or capture recordings from a camera. The start and stop date/time can be selected using this screen. Files from one or more cameras can be saved to internal (app) storage or downloaded to an external device. View a Recording System recordings can be viewed at any point in time when the system is running. To view a recording, follow the steps below. 1. From the main menu, tap System Recordings. 2. Select a camera from the list. 3.
Vertical Lines and Controls A number of vertical lines and controls are available on the System Recordings screen. Vertical Line (Color) Red Purple Icon Description A red line is the viewing reference point. Purple lines are motion events. Function Select Camera Snapshot WD ReadyView™ User Manual Description Selects a camera. Takes a snapshot of the current view. The snapshot is stored on the mobile device app. Start/Stop Starts (or stops) mobile device app recording of the current view.
Icon Function Full Screen Speed Frame Advance (30fps) Pause WD ReadyView™ User Manual Description Toggles between portrait and landscape view. Adjusts speed of playback up to 4X. A speed of 1X is normal speed. Advances the video one frame at a time. Pauses the current video playback.
6 My Snapshots The snapshot function captures video or still images for additional review. To view a video or image snapshot, follow the steps below. Review Snapshots 1. Tap the Main Menu. 2. Tap My Snapshots (the Images view is the default). 3. Tap the desired snapshot; a enlarged view of the video or image will open. 4. Select one of the controls at the bottom of the screen (enlarge, share, send, download or delete). 5. Tap the left arrow at the top of the screen to return to My Snapshots.
Icon Function Back Button Live View Description Returns to the My Snapshots screen. Returns to the Live View screen. Share Shares one or more snapshots or videos with another user; select an app (mail, etc.) to determine how the snapshot will be sent. Send Exports one or more snapshots or videos to the photo gallery on your mobile device. Delete Deletes one or more snapshots from the app; note that any snapshots saved to the photo gallery on your mobile device are not deleted.
7 Alert Manager This screen allows users to review and configure motion events. Users can: 1) view motion events, and 2) set search criteria for a) all cameras, or b) a specific camera. As the system captures motion events, messages are added to the Alert Manager. The newest message appears at the top of the screen, and contains the date, time, type of alert, camera name, and a playback icon. Once an alert is selected, the event can be reviewed in the System Recordings 17 screen.
8 Camera Manager This feature allows users to rename WD ReadyViewä cameras or configure motion detection. 8.1 Rename Cameras Camera names can be changed as needed. The following steps illustrate the naming procedure. 8.2 1. Tap the Main Menu. 2. Tap Camera Manager. 3. Tap Rename Cameras. The list of all system cameras will appear; if a camera is not connected to a port, it will appear as "empty" and cannot be changed. 4. Tap a camera row; a RENAME CAMERAS text box will appear. 5.
Configure Motion Detection The system default for motion events is to record video for five (5) seconds before and thirty (30) seconds after an event. Motion Detection (both 2MP and 4MP kits) 1. Select a camera from the icons at the top of the screen. 2. Tap the Disabled setting on the Motion Detection row; the setting will changed to "ENABLED." 3.
Configure Motion Detection The following items are part of the Intelligent Video Surveillance (IVS) features. Trip Line (4MP Kits Only) Note that this feature is only available when using WD ReadyView 4MP (and certain third-party) cameras and the 4MP kit. 1. Select a camera from the icons at the top of the screen. 2. Tap the Disabled setting on the Trip Line row; the setting will changed to "ENABLED." 3. Tap the gear icon to draw the trip line, set snapshots, sensitivity, and detection time settings.
Configure Motion Detection Area Detection (4MP Kits Only) Note that this feature is only available when using WD ReadyView 4MP (and certain third-party) cameras and the 4MP kit. 1. Select a camera from the icons at the top of the screen. 2. Tap the Disabled setting on the Area Detection row; the setting will changed to "ENABLED." 3. Tap the gear icon to draw the shape of the detection area, set snapshots, sensitivity, and detection time settings. 4. Tap Save.
9 Config Manager The Config Manager settings are used to set various system parameters. Tap Main Menu > Config Manager to begin. Time and Date This function is used to set the system time and date specific to your location. 1. From the Config Manager, tap TIME AND DATE. 2. Select a date format; either YYYY-MM-DD, MM-DD-YYYY, or DD-MM-YYYY 3. Tap Next. 4. Tap TIME FORMAT, and select either 12-hour or 24-hour. 5. Tap Next. 6. Tap TIME ZONE. 7. Select a time zone from the list. 8. Tap Next.
Password Manager For security reasons, a password is needed to login to the system. The Password Manager allows users to change the system password. 1. From the Config Manager, tap PASSWORD MANAGER. The "eyelash" icon displays the current password. 2. Type a new password. 3. Tap CHANGE PASSWORD. IMPORTANT NOTE: It is critical that you record and store the password in a safe place; should you forget or lose your password, you will need to contact Support.
Backup 4. Tap MY BACKUP PLAN.
Backup 5. Tap one camera, multiple cameras, or all cameras. 6. Tap a time period (1 day, 3 days, 5 days, or 7 days.) 7. Tap either BACKUP NOW or ADVANCED BACKUP. a. BACKUP NOW: Starts copying files to the external device immediately. b. ADVANCED BACKUP: Allows users to select a unique backup period (specific date/time) or a specific folder on the external device. 8. Tap OK when prompted to start backup. 9. A "Backup succeeded" message will appear when the back up is complete; tap I KNOW.
10 Firmware This feature displays the status of the firmware for the WD ReadyViewä NVR and individual cameras. Tap a device to see the status and full firmware version number; the system will display the installed (identified as "Latest") version. In addition, the current version (if different from the latest available version) will be displayed. Firmware Upgrade Using the following steps to upgrade the firmware of the NVR or one or more cameras. Note that any row displaying "LATEST" cannot be upgraded.
11 Help On occasion, additional information may be needed to complete a task using the WD ReadyViewä app. To view help information for a specific topic, follow the steps below. View Help Topics 1. Tap the Main Menu. 2. Tap Help. 3. Tap one of the help topics; a list of all available options will appear. 4. Tap the left arrow at the top of the screen to return to the list of all topics.
12 External Storage 12.1 Connecting a Storage Device A powered, external storage device can be used for saving video files and other data. A WD My Book ä unit (not included with your WD ReadyViewä kit) is recommended. Connect an external device to the system using the USB port on the back of the NVR. The device must be formatted NTFS before connecting it to the WD ReadyView system. USB flash drives or external storage without separate power supplies are not compatible with the WD ReadyView system.
13 Regulatory Compliance 13.1 FCC Class B Information Operation of this device is subject to the following conditions: · This device may not cause harmful interference. · This device must accept any interference received, including interference that may cause undesired operation. This device has been tested and found to comply with the limits for a Class B digital device, pursuant to Part 15 of the FCC Rules.
Warranty Information under the Australian Competition and Consumer Act or the New Zealand Consumer Guarantees Act. Your original box and packaging materials should be kept for storing or shipping your WD product. To conclusively establish the period of warranty, check the warranty expiration (serial number required) via http://support.wdc.com. 13.2.
Third Party Notices 13.4 Third Party Notices 13.4.1 H.264 AVC: MPEG-LA THIS PRODUCT IS LICENSED UNDER THE AVC PATENT PORTFOLIO LICENSE FOR THE PERSONAL USE OF A CONSUMER OR OTHER USES IN WHICH IT DOES NOT RECEIVE REMUNERATION TO (i) ENCODE VIDEO IN COMPLIANCE WITH THE AVC STANDARD (“AVC VIDEO”) AND/OR (ii) DECODE AVC VIDEO THAT WAS ENCODED BY A CONSUMER ENGAGED IN A PERSONAL ACTIVITY AND/OR WAS OBTAINED FROM A VIDEO PROVIDER LICENSED TO PROVIDE AVC VIDEO.
Western Digital, the Western Digital logo, WD, the WD logo, My Book, WD Purple and WD ReadyView are registered trademarks or trademarks of Western Digital Corporation or its affiliates in the U.S. and/or other countries. Apple and the Apple logo are trademarks of Apple Inc. App Store is a service mark of Apple Inc. iOS is a trademark of Cisco in the U.S. and other countries and is used under license by Apple Inc. Android and Google Play are trademarks of Google Inc. ONVIF is a trademark of Onvif, Inc.