
Operation Manual

WD ReadyView™ User Manual 7
2 Setup
This chapter explains how to setup the WD ReadyView system.
2.1 Kit Contents
Your WD ReadyView™ kit includes the following items:
Network Video Recorder (NVR; either 2TB or 4TB)
AC adapter (US)
Four (4) PoE IP cameras (either 2MP or 4MP)
Four (4) 100 ft Cat 5 cables (each cable comes with a weather-resistant connector on one
end)
One (1) 6.5 ft Cat 5 cable
Quick Install Guide
Window stickers
2.2 System Requirements
Mobile device with iOS 9+ or Android 4.4+
Router with active Internet connection
2.3 Compatibility
H.265 and H.264
ONVIF compliant
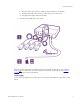
2.4 Connecting the Unit
Before final installation, the complete WD ReadyView™ system (NVR, cameras, cables, power
supply) should be connected for app installation and testing purposes. A desk or table near your
Wi-Fi router may be useful when assembling the system. Follow the steps below to connect the
system. The WD ReadyView Quick Install Guide also illustrates this process.
1. Connect the cameras, Cat 5 cables, and power to the NVR.
a. Using the 100 ft Cat 5 cables supplied with the WD ReadyView kit, connect the
cameras to the numbered PoE ports in sequence. For example, connect the first
camera to port #1. Connect the second camera to port #2, and so on. Failure to
connect the cameras in order will cause the first four cameras to be displayed on
two screens. Do not unspool the entire cable during testing; remove the outer
cellophane and extend a few feet from each end. Note that the weather-resistant
connector is designed to be connected to the camera.