User Manual Version 2.4.x WD SmartWare Software User Manual, Version 2.4.
WD Service and Support Should you encounter any problem, please give us an opportunity to address it before returning this product. Most technical support questions can be answered through our knowledge base or email support service at http://support.wd.com. If the answer is not available or if you prefer, please contact WD® at the best telephone number shown below. Your product includes 30 days of free telephone support during the warranty period.
WD SMARTWARE SOFTWARE USER MANUAL Table of Contents WD Service and Support . . . . . . . . . . . . . . . . . . . . . . . . . . . . . . . . . . . . . . . . . . . . . . . . . . . ii Accessing Online Support . . . . . . . . . . . . . . . . . . . . . . . . . . . . . . . . . . . . . . . . . . . . . . . . . . . . . ii Contacting WD Technical Support. . . . . . . . . . . . . . . . . . . . . . . . . . . . . . . . . . . . . . . . . . . . . . . ii 1 About the WD SmartWare Software . . . . . . . . . . . . . . . . .
WD SMARTWARE SOFTWARE USER MANUAL 8 Registering the Drive . . . . . . . . . . . . . . . . . . . . . . . . . . . . . . . . . . . . . . . . . . . . . . . . . . . . . Restoring the WD SmartWare Software and Disk Image . . . . . . . . . . . . . . . . . . . . . . . . . . Setting the Drive Sleep Timer . . . . . . . . . . . . . . . . . . . . . . . . . . . . . . . . . . . . . . . . . . . . . . . Showing or Hiding the Virtual CD Icon . . . . . . . . . . . . . . . . . . . . . . . . . . . . . . . . . . . . . . . .
WD SMARTWARE SOFTWARE USER MANUAL 1 1 About the WD SmartWare Software WD SmartWare™ software is an easy-to-use backup application that gives you the power to: Protect your data automatically—Continuous backup instantly makes a second copy whenever you add or change a file. Scheduled backups run on the days and times you select. See your backup as it happens—Category-mode backup organizes and displays your files in categories. File-mode backup lets you select specific files and folders.
WD SMARTWARE SOFTWARE USER MANUAL WD Hard Drive Support The WD SmartWare software supports the following direct- and network-attached WD external devices: My Book® direct-attached drives - My Book My Book Essential™ My Book Elite™ My Book Duo My Book for Mac (reformatted for Windows operating systems) My Book Studio™ (reformatted for Windows operating systems) My Passport® direct-attached drives - My Passport My Passport Essential™ My Passport Essential SE My Passport Elite™ My Passport Edge™ My Passp
WD SMARTWARE SOFTWARE USER MANUAL Non-WD Device Support The WD SmartWare Pro software upgrade extends the backup function to: Direct-attached non-WD drives (USB) Unsupported WD devices Supported cloud services Upgrading to the WD SmartWare Pro software requires purchase of an activation code. Or you can upgrade for a free 30-day trial. Cloud Services Support The upgraded WD SmartWare Pro software supports Dropbox cloud services.
WD SMARTWARE SOFTWARE USER MANUAL The . . . tab display Provides . . . Settings One of two dialogs, depending on the type and model of the selected backup target device: For most supported WD drives and network-attached devices, the Settings tab display provides buttons for displaying Software Settings and Drive Settings screens. For some supported WD drives, unsupported WD devices, and all non-WD drives, the Settings tab display provides only the Software Settings screen.
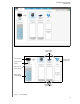
WD SMARTWARE SOFTWARE USER MANUAL Backup Target Device Icons Computer Icon Activation Code Required Icon Backup Source Selector Backup Source Device Selector Backup Source Content Gauge Backup Target Content Gauges Figure 1.
WD SMARTWARE SOFTWARE USER MANUAL Table 1. Home Tab Functional Description Display Component Description Activation code required icon Signifies that the device is either a non-WD device or an unsupported WD device that requires a valid activation code and upgrade to the WD SmartWare Pro software for access. Backup source Dropbox icon Not shown in Figure 1 on page 5: Signifies that you have selected the Dropbox option for backup operations.
WD SMARTWARE SOFTWARE USER MANUAL Table 1. Home Tab Functional Description (Continued) Display Component Description Backup source content gauge The content gauge for the selected backup source device shows all of the files that are available for a category-type backup against a blue background in six categories where: This file category Includes files with these extensions Documents .doc, .txt, .htm, .html, .ppt, .xls, .xml, and other document extensions Mail .mail, .msg, .pst.
WD SMARTWARE SOFTWARE USER MANUAL Table 1. Home Tab Functional Description (Continued) Display Component Description Backup source selector Provides options for selecting the type of source device you want to back up: Selecting the computer option displays your computer icon and lists all of your computer’s internal hard drives, hard drive partitions, and direct-attached drives in the device selector. Selecting the Dropbox option displays the Dropbox icon and hides the backup source device selector.
WD SMARTWARE SOFTWARE USER MANUAL Table 1. Home Tab Functional Description (Continued) Display Component Description Backup target device icon Provides the name of the backup target device connected to your computer. If you have more than one supported device connected to your computer, left-click the one that you want to use for backup and retrieve functions.
WD SMARTWARE SOFTWARE USER MANUAL Table 1. Home Tab Functional Description (Continued) Display Component Description Backup target device selector Not shown in Figure 1 on page 5: The backup target device selector appears under the icon for each supported backup target device that has more than one drive partition or network share. The drive partition or network share that you select is the target for subsequent backup operations and the source for subsequent retrieve operations.
WD SMARTWARE SOFTWARE USER MANUAL Table 1. Home Tab Functional Description (Continued) Display Component Description Upgrade to WD SmartWare Appears in the upper-right corner of each WD SmartWare tab Pro software button display to remind you of the WD SmartWare Pro software upgrade: Clicking the button displays a dialog for buying and activating the WD SmartWare Pro software upgrade or starting a free 30-day trial.
WD SMARTWARE SOFTWARE USER MANUAL Backup by Category Display Backup by Files Display Backup Source Content Gauge Category/File Backup Toggle Button Advanced Backup Area Set Backup Frequency Button Backup Target Content Gauge Enable/Disable Backup Toggle Button Figure 2.
WD SMARTWARE SOFTWARE USER MANUAL Table 2. Backup Tab Functional Description Display Component Description Advanced backup area In category mode, the initial/default configuration of the WD SmartWare software is to back up all categories of your files. In this configuration, the advanced backup area is blank.
WD SMARTWARE SOFTWARE USER MANUAL Table 2.
WD SMARTWARE SOFTWARE USER MANUAL Retrieve Tab Displays Three Retrieve tab displays guide you through finding backup files and copying them to the selected retrieve location: Selecting the backup volume to retrieve from Selecting the destination for retrieved files Selecting the files to retrieve See Figure 3 below and Table 3 on page 16 for a brief functional description of the Retrieve tab displays.
WD SMARTWARE SOFTWARE USER MANUAL Table 3. Retrieve Tab Functional Description Display Component Description Backed Up Volumes selection box Lists the backed up volumes that are available to retrieve files from on the selected backup target device. You must select a backup volume before you can click Next to continue with the retrieve operation.
WD SMARTWARE SOFTWARE USER MANUAL Settings Tab Displays The configuration of the Settings tab displays depends on the type and model of the selected backup target device: For most supported WD drives and network-attached devices, the Settings tab display provides buttons that link to the: - Software Settings screen - Drive Settings screen for direct-attached WD drives - Web user interface for network-attached WD devices For WD drives that support the WD Security and WD Drive Utilities software, and
WD SMARTWARE SOFTWARE USER MANUAL Settings Tab Display Software Settings Screen Drive Settings Screen Figure 4.
WD SMARTWARE SOFTWARE USER MANUAL Table 4. Settings Tab Functional Description Display Component Description Diagnostics button Displays the Run Diagnostics dialog for launching diagnostic/selftest utilities for checking drive health. Drive Erase button Displays the Drive Erase dialog for erasing the drive when it is not locked. Dropbox Account button Displays the dialog for configuring a Dropbox account for access by the WD SmartWare Pro software.
WD SMARTWARE SOFTWARE USER MANUAL Table 4. Settings Tab Functional Description (Continued) Display Component Description Virtual CD button Not shown in Figure 4 on page 18: For My Book and My Passport drives that provided the WD SmartWare software on the virtual CD, clicking the Virtual CD button on the Drive Settings screen displays the Virtual CD Settings dialog for showing or hiding the virtual CD icon and drive listing in your computer’s file management utility displays.
WD SMARTWARE SOFTWARE USER MANUAL Table 5. Help Tab Functional Description Display Component Description Contact Us link Uses your Web browser to connect to the WD Service & Support Contact Us page at http://support.wd.com/contact. Learning Center topic buttons Provide links to display the main Learning Center help topics: Overview Backup Retrieve Manage & Customize Online User Manuals link Uses your Web browser to connect to the user manual page for the WD SmartWare software at: http://www.wd.
WD SMARTWARE SOFTWARE USER MANUAL 2 1 Installing the Software and Getting Started This chapter provides instructions for installing the WD SmartWare software and getting started with your first backup and initial drive settings.
WD SMARTWARE SOFTWARE USER MANUAL 3. Read the license agreement, select the I have read and agree to... check box, and click Install to continue: 4. Wait for the installation to complete: 5.
WD SMARTWARE SOFTWARE USER MANUAL 6. When the installation completes, click Finish to close the WD SmartWare installer/ setup wizard: 7. To signify a successful installation, the WD SmartWare software: Briefly displays the WD SmartWare software logo: Displays the Select Backup Source and Backup Target screen to get started with your first backup: The WD SmartWare software is now installed.
WD SMARTWARE SOFTWARE USER MANUAL Getting Started—Your First Backup The Select Backup Source and Backup Target screen shows all of the devices that are available for backup operations. Use it to select the source and target devices for your first backup: 1. In the Backup Source area of the Select Backup Devices screen, by default, the computer option is selected as the backup source device: Computer Option Dropbox Option IF . . . Then . . .
WD SMARTWARE SOFTWARE USER MANUAL 3. Click Next to display the initial Select Backup Plan screen: 4. On the initial Select Backup Plan screen: a. Select the option for the type of backup that you want to run: Category Backup—Finds and backs up all of the files of the selected categories on the selected backup source device. File Backup—Backs up files or folders that you select from a folder view of the selected backup source device.
WD SMARTWARE SOFTWARE USER MANUAL b. Click Next to display the initial Select Backup Frequency screen: 5. On the initial Select Backup Frequency screen: a. Select the option for when you want to scan the backup source device and automatically back up any existing file that has changed or new file that was added: Continuous Backup Scheduled Backup b.
WD SMARTWARE SOFTWARE USER MANUAL Selecting . . . Performs a backup . . . Monthly On the selected day of the month, at the selected time: a. Use the Every selection box to specify which occurrence of the day that you want to run your backup—First, Second, Third, Fourth, or Last. b. Use the Day selection box to specify the day of the week that you want to run your backup. c. Use the at selection box to specify time of day that you want to run your backup. c.
WD SMARTWARE SOFTWARE USER MANUAL Initial Category Backup Screen Initial File Backup Screen Figure 6.
WD SMARTWARE SOFTWARE USER MANUAL Getting Started—Your Initial Drive Settings The drive settings buttons that are available on the initial Drive Settings screen depend on the hardware configuration of the backup target device you selected at step 2 on page 25. For example: The screen for unencrypted WD drives does not display a Security button.
WD SMARTWARE SOFTWARE USER MANUAL 1. On the initial Drive Settings screen, depending on the hardware configuration of your drive, click: Registration and see “Registering the Drive” on page 59. Security and see “Password Protecting the Drive” on page 36. Label and see “Showing or Hiding the Virtual CD Icon” on page 61. 2. Click Finish to close the initial Drive Settings screen.
WD SMARTWARE SOFTWARE USER MANUAL 3 1 Upgrading to the WD SmartWare Pro Software This chapter includes the following topics: Getting Started with the Upgrade Trying for Free Buying an Activation Code Activating the WD SmartWare Pro Software Upgrade After you have installed the WD SmartWare software, you can upgrade to the WD SmartWare Pro software and extend the backup function to: Non-WD external hard drives WD drives that are not otherwise supported Dropbox cloud service Upgrading requires the purchase
WD SMARTWARE SOFTWARE USER MANUAL Trying for Free Clicking Try for Free on the Upgrade to WD SmartWare Pro dialog: Activates the WD SmartWare Pro software upgrade for a free 30-day trial Displays the free-trial countdown icon and time-remaining message in the upperright corner of the WD SmartWare tab displays: Displays a brief explanation of the free trial: Click OK to close the message display. If you want to buy an activation code during the free-trial period: 1.
WD SMARTWARE SOFTWARE USER MANUAL Buying an Activation Code Clicking Buy or the WD Store link on the Upgrade to WD SmartWare Pro dialog uses your computer’s Web browser to display the Select Your Country to Begin Your Purchase dialog on the purchase page of the WD Store website. 1. Select your country and click Continue to display the SELECT LICENSE tab. 2. On the SELECT LICENSE tab: a.
WD SMARTWARE SOFTWARE USER MANUAL l. Type your phone number in the Phone Number box. m. Verify that your entries and selections are correct and click Continue to display the BILLING tab Payment Information dialog. 6. On the BILLING tab Payment Information dialog: a. Type your credit card account number in the Credit Card Number box. b. Use the Expiration Date selection boxes to select the card expiration month and year. c. Type the card security code in the Card Security Code box. d.
WD SMARTWARE SOFTWARE USER MANUAL 4 1 Securing the Drive This chapter includes the following topics: Password Protecting the Drive Unlocking the Drive Changing Your Password Turning Off the Drive Lock Feature Note: The WD SmartWare software provides the security functions for older My Book and My Passport drives. For newer drives, these functions are provided by the WD Security software.
WD SMARTWARE SOFTWARE USER MANUAL 4. On the Set Security dialog: a. Type your password in the Choose a password box, using up to 25 characters. b. Retype your password in the Verify password box. c. Type a hint to help remember your password in the Password hint box. d. Select the Remember my password on this computer check box if you want the WD SmartWare software to remember your password on this computer. Note: This function remembers the password for your currently logged on user name.
WD SMARTWARE SOFTWARE USER MANUAL Unlocking the Drive with the WD SmartWare Software Whenever you shut down and restart your computer, or disconnect and reconnect a locked drive to your computer, unless you selected the Remember my password on this computer check box when you created your password, the WD SmartWare software adds a lock symbol to the icon and displays a Drive is locked message in place of the content gauge for the drive: 1.
WD SMARTWARE SOFTWARE USER MANUAL 1. Start the WD Drive Unlock utility by either: Using your computer’s file management utility to open the WD Unlocker virtual CD and double-clicking the unlock application file—either Unlock.exe or WD Drive Unlock.exe, depending on the type and model of the external device Clicking Start > Computer and double-clicking the WD Unlocker virtual CD icon under Devices with Removable Storage The unlock screen that displays depends on the type and model of the drive: 2.
WD SMARTWARE SOFTWARE USER MANUAL 3. On the Drive Settings screen, click Security to display the Your Drive is Secure dialog: 4. On the Your Drive is Secure dialog: a. Type your current password in the Password box. b. Select the Change password option. c. Type your new password in the New password box, using up to 25 characters. d. Retype your new password in the Verify password box. e. Type a hint to help remember your new password in the Password hint box. f.
WD SMARTWARE SOFTWARE USER MANUAL 3. On the Drive Settings screen, click Security to display the Your Drive is Secure dialog: 4. On the Your Drive is Secure dialog: a. Type your password in the Password box. b. Select the Remove security option. c. Click Update Security Settings.
WD SMARTWARE SOFTWARE USER MANUAL 5 1 Backing Up Files This chapter includes the following topics: How the Backup Function Works Backing Up Files How the Backup Function Works The WD SmartWare software automatically backs up all your files to the selected backup target device—music, movies, photos, documents, email, and other files. Continuous backup instantly makes a second copy whenever you add or change a file on the selected backup source device.
WD SMARTWARE SOFTWARE USER MANUAL Selecting the Dropbox option displays the Dropbox icon to signify that the backup source device will be he Dropbox cloud service: c. If you selected the computer option, use the backup source device selector to select the internal drive, drive partition, or external drive that you want to back up: 2. In the Backup Target area of the Home screen: a. If you have more than one backup target device connected to your computer, select the one that you want to back up files to.
WD SMARTWARE SOFTWARE USER MANUAL c. Select the Hourly, Daily, or Monthly option and use the check boxes and selection boxes to schedule your backups: Selecting . . . Performs a backup . . . Hourly Every hour, on the hour. Daily On the selected days of the week, at the selected time: a. Select or clear the Days check boxes to specify the days of the week that you want to run your backup. b. Use the at selection box to specify the time of day that you want to run your backup.
WD SMARTWARE SOFTWARE USER MANUAL b. Click Advanced View to open the backup files selection box and verify that the check boxes for all six categories of files are selected: c. Select any cleared check boxes and then click Apply Changes to create a custom backup plan and refresh the content gauges. d. Click Enable Backup to begin backing up all categories of files on the backup source device, at the specified backup frequency, and skip to step 10 on page 47. 7.
WD SMARTWARE SOFTWARE USER MANUAL c. In the backup files selection box: Clear the check boxes for the categories of files that you want to exclude from the backup. Select the check boxes for the categories of files that you want to include in the backup. d. Click Apply Changes to create a custom backup plan and refresh the content gauges. e.
WD SMARTWARE SOFTWARE USER MANUAL b. In the backup files selection box, open the folder structure: c. Select the check boxes for the individual files or folders that you want to back up. Note that selecting a folder check box automatically selects all of the subfolders and files in the folder. d. Click Apply Changes to create a custom backup plan using your selections. Note: Clicking Revert clears your recent selections and redisplays the prior applied configuration. e.
WD SMARTWARE SOFTWARE USER MANUAL Some applications and running processes can keep files from being backed up. If you cannot determine why some of your files were not backed up, try: Saving and closing all of your open files Closing all running applications—including your email program and Web browser Important: Appearance of a Caution message indicating that the backup target device is full means that there is not enough free space on the device to complete the backup.
WD SMARTWARE SOFTWARE USER MANUAL 6 1 Retrieving Files This chapter includes the following topics: How the Retrieve Function Works Retrieving Files How the Retrieve Function Works The WD SmartWare software makes it easy for you to retrieve backed up files from your backup target device and copy them to either: Their original locations on the backup source device A special retrieve content folder Retrieve is generally a five-step process: 1.
WD SMARTWARE SOFTWARE USER MANUAL d. If you selected the computer option, use the backup source device selector to specify the internal drive, drive partition, or external drive that you want to copy retrieved files to: 2. In the Backup Target area of the Home screen: a. If you have more than one backup target device connected to your computer, select the one that you want to retrieve files from. b. Verify that a light-blue highlight surrounds the selected device: Selected My Book Drive c.
WD SMARTWARE SOFTWARE USER MANUAL IF you have . . . THEN the WD SmartWare software displays the . . . Created multiple backup volumes on the selected Select a volume to retrieve from dialog with the available volumes listed in the Backed Up Volumes selection box: retrieve source device from either: Different internal hard drives or hard drive portions on the backup source device Different backup source devices In this case: a.
WD SMARTWARE SOFTWARE USER MANUAL IF you want to copy your retrieved files to . . . THEN select the . . . option. A retrieved content folder, To a Retrieved Content Folder The default folder is Retrieved Contents in the My Documents folder for your user name. If you want to specify a different folder: a. Click Browse and use the browse function to identify the new folder. b. Click Apply. 5. Click Next to display the Select content to retrieve from... dialog. IF you want to retrieve . . .
WD SMARTWARE SOFTWARE USER MANUAL Select the Show deleted files check box to display backed up files that have been deleted: Select the View icon to list individual files. To find a file, type all or part of the file name in the search box and press the Enter key to initiate the search. To eliminate the search filter, delete all of the text in the search box and press Enter. Select the check boxes for the files or folders that you want to retrieve. 7. Click Start Retrieving. 8.
WD SMARTWARE SOFTWARE USER MANUAL 7 1 Managing and Customizing the Drive This chapter includes the following topics: Checking Drive Health Naming the Drive Registering the Drive Restoring the WD SmartWare Software and Disk Image Setting the Drive Sleep Timer Showing or Hiding the Virtual CD Icon Using the WD Quick View Icon Checking Drive Status Monitoring Icon Alerts Opening the WD SmartWare Software Safely Disconnecting the Drive Note: The WD SmartWare software provides the drive settings functions desc
WD SMARTWARE SOFTWARE USER MANUAL The best time to run the drive diagnostics and status checks is on a regular basis, before you encounter any problems with your drive. And, because they are so fast, running the quick SMART status check and the quick drive test provides a high level of assurance with minimal inconvenience. Then, run all three whenever you encounter disk error conditions when backing up or retrieving files. 1.
WD SMARTWARE SOFTWARE USER MANUAL The WD SmartWare software provides two ways to erase your supported WD drive, depending on whether it is locked or not: IF your drive is . . . AND you . . . THEN see . . . Not locked, Want to erase the drive, “Using the Drive Settings Drive Erase Function” on page 56. Locked, Have forgotten or lost your password and must erase the drive, “Using Five Invalid Passwords” on page 57.
WD SMARTWARE SOFTWARE USER MANUAL Using Five Invalid Passwords To erase your supported WD drive when it is locked and you have forgotten or lost your password: 1.
WD SMARTWARE SOFTWARE USER MANUAL 3. The fifth invalid password attempt displays a too many password attempts dialog: 4. If you see the dialog with a warning about the loss of data if you erase your drive, read it and select the I understand check box to signify that you accept the risk. 5. Click either Drive Erase or Erase Drive. After the drive erase operation completes, go to http://support.wd.
WD SMARTWARE SOFTWARE USER MANUAL 3. On the Drive Settings screen, click Label to display the Set Label dialog: 4. On the Set Label dialog: a. Type a name for the drive in the label box. b. Select or clear the Invert label check box to establish the label presentation that you want—dark text against a light background, or vice versa. c. Click Save Settings. Registering the Drive The WD SmartWare software uses your computer’s Internet connection to register your supported WD drive.
WD SMARTWARE SOFTWARE USER MANUAL 5. On the Register Drive dialog: a. Type your first name in the First name box. b. Type your last name in the Last name box. c. Type your email address in the E-mail address box. d. Select your language in the Preferred language box. e. Select or clear the Yes, I want to receive communication... check box to specify whether or not you want to receive notifications about software updates, product enhancements, and price discount opportunities. f. Click Register Drive.
WD SMARTWARE SOFTWARE USER MANUAL Showing or Hiding the Virtual CD Icon The hardware configuration of some My Book and My Passport drives provided the WD SmartWare software on the virtual CD. Each of these drives adds its own virtual CD icon to your computer’s file management utility listings. Use the Virtual CD Settings dialog to enable (show) or disable (hide) the virtual CD icon for these drives. Note: Hiding the virtual CD icon also disables password protection for the drive.
WD SMARTWARE SOFTWARE USER MANUAL d. Either reconnect the AC power adapter cable or press the drive power button to on. e. Reconnect the USB cable to the drive. 7. Check your computer’s file management utility listings to confirm the change.
WD SMARTWARE SOFTWARE USER MANUAL IF the WD Quick View icon flashes . . . THEN the device might be . . . White, A RAID-enabled dual-drive device with a degraded RAID configuration. Red, A RAID-enabled dual-drive device that is either: Overheated. Power down the device and let it cool for 60 minutes. Power it back on, and if the problem persists, contact WD Support. In some other RAID error condition.
WD SMARTWARE SOFTWARE USER MANUAL Wait for the power/activity LED stop flashing before disconnecting the drive from the computer.
WD SMARTWARE SOFTWARE USER MANUAL 8 1 Managing and Customizing the Software This chapter includes the following topics: Checking for Software Updates Configuring Your Dropbox Account Specifying a Different Retrieve Folder Uninstalling the WD SmartWare Software Checking for Software Updates When enabled, the Software Updates option automatically checks for software updates. This ensures that you are always using the most-recent software version. 1.
WD SMARTWARE SOFTWARE USER MANUAL 3. Click Select Account to display the Dropbox Login Required dialog: 4. On the Dropbox Login Required dialog: a. Click Sign In. The WD SmartWare Pro software uses your Web browser to access the Dropbox website and initiates a connection request on your behalf. b.
WD SMARTWARE SOFTWARE USER MANUAL 3. On the Software Settings screen, click Retrieve Folder to display the Set Retrieve Folder dialog: 4. On the Set Retrieve Folder dialog: a. Click Browse and use the browse function to identify the new retrieve folder. b. Click Apply. Specifying the Number of Backup Versions The WD SmartWare software can keep up to 25 older versions of each file.
WD SMARTWARE SOFTWARE USER MANUAL Uninstalling the WD SmartWare Software Important: Uninstalling the WD SmartWare software deletes all existing backup job configurations. You must restart the backup job manually after reinstalling the software. (See “Backing Up Files” on page 42.) If you installed the WD SmartWare software using a setup file that was on the device or the setup CD, disregard this procedure and follow the software uninstallation procedure in the device user manual.
WD SMARTWARE SOFTWARE USER MANUAL 5. Wait for the uninstallation to complete: 6. Click Finish to close WD SmartWare installer/setup wizard: On Windows 8 Computers: 1. Right-click the WD SmartWare Installer tile on the Metro Start screen. Note: DO NOT select WD SmartWare on the Metro Start screen. You must use the WD SmartWare installer/setup wizard to uninstall the software if you used to install the software. 2. Select Uninstall in the Windows taskbar. 3.
WD SMARTWARE SOFTWARE USER MANUAL A 1 Compliance Information GNU General Public License (“GPL”) This software may include third party copyrighted software licensed under the GPL or Lesser General Public License (“LGPL”) (collectively, “GPL Software”) and not Western Digital’s End User License Agreement. In accordance with the GPL, if applicable: 1) the source code for the GPL Software may be downloaded at no charge from http:// support.wd.
WD SMARTWARE SOFTWARE USER MANUAL Index A Activate WD SmartWare Pro 32, 35 Activation code required icon 6 Advanced backup area 12, 13 Alerts, flashing icon 63 B Backed Up Volumes selection box 15, 16, 51 Backup about backing up files 42 files content box 45, 47 procedure 42 schedule reminder button 14, 44 Backup Now button 14 Backup source computer icon 5, 6 content gauge 5, 12, 14 device selector 5, 7 Dropbox icon 6 selector 5, 8 Backup tab displays advanced backup area 13 Backup Now button 14 backup so
WD SMARTWARE SOFTWARE USER MANUAL Erasing the drive 55 F File backup screen, initial 29 File History button 19 Files Not Retrieved message 53 Flashing icon alerts 63 Free-trial countdown icon 10 G GNU general public license 70 GPL software 70 H Help tab display 20 Contact Us link 20, 21 description 20 functional overview 4 Learning Center topic buttons 20, 21 Online User Manuals link 20, 21 Support link 20, 21 WD Store link 20, 21 Home tab display backup source computer icon 6 backup target content gaug
WD SMARTWARE SOFTWARE USER MANUAL Set Security dialog 36 Set Sleep Timer dialog 60 Set Up Drive button 19 Set Up Software button 19 Settings tab displays 19 description 17 Drive Erase button 19 Dropbox Account button 19 functional overview 4 Registration button 19 Retrieve Folder button 19 Security button 19 Set File History button 19 Set Up Drive button 19 Set Up Software button 19 Sleep Timer button 19 Software Updates button 19 Show deleted files check box 53 Show older files check box 52 Sleep Timer bu
Information furnished by WD is believed to be accurate and reliable; however, no responsibility is assumed by WD for its use nor for any infringement of patents or other rights of third parties which may result from its use. No license is granted by implication or otherwise under any patent or patent rights of WD. WD reserves the right to change specifications at any time without notice.