® ™ ® ™ WD TV Live WD TV Live Plus HD-mediaspelers Gebruikershandleiding
Inhoud 1 Belangrijke gebruikersinformatie . . . . . . . . . . . . . . . 1 Belangrijke veiligheidsinstructies. . . . . . . . . . . . . . . . . . . . . . . . . . . . 1 WD®-service en -ondersteuning. . . . . . . . . . . . . . . . . . . . . . . . . . . . 2 Uw WD-productgegevens noteren . . . . . . . . . . . . . . . . . . . . . . . . . 3 Het WD-product registreren . . . . . . . . . . . . . . . . . . . . . . . . . . . . . . . 3 Accessoires . . . . . . . . . . . . . . . . . . . . . . . . . . . . . . . . . . . . .
7 Video bekijken . . . . . . . . . . . . . . . . . . . . . . . . . . . . . . 42 Video afspelen . . . . . . . . . . . . . . . . . . . . . . . . . . . . . . . . . . . . . . . . 42 Menuopties voor video. . . . . . . . . . . . . . . . . . . . . . . . . . . . . . . . . . 44 Video afspeelbediening . . . . . . . . . . . . . . . . . . . . . . . . . . . . . . . . . 45 Videoafspeelopties. . . . . . . . . . . . . . . . . . . . . . . . . . . . . . . . . . . . . 45 Dvd-navigatie. . . . . . . . . . . . . . . . . . . . .
12 Instellingen en geavanceerde functies . . . . . . . . . 136 Instellingen navigatieknoppen . . . . . . . . . . . . . . . . . . . . . . . . . . . 137 Audio/video . . . . . . . . . . . . . . . . . . . . . . . . . . . . . . . . . . . . . . . . . 137 Video . . . . . . . . . . . . . . . . . . . . . . . . . . . . . . . . . . . . . . . . . . . . . 140 Foto . . . . . . . . . . . . . . . . . . . . . . . . . . . . . . . . . . . . . . . . . . . . . . 142 Muziek . . . . . . . . . . . . . . . . . . . . . . . . . . .
WD TV Live/Live Plus HD-mediaspeler Gebruikershandleiding 1 Belangrijke gebruikersinformatie Belangrijke veiligheidsinstructies Dit apparaat is ontworpen en geproduceerd om de persoonlijke veiligheid te garanderen. Onjuist gebruik kan leiden tot een elektrische schok of brandgevaar. De in dit apparaat ingebouwde veiligheidsmaatregelen zullen u beschermen als u zich houdt aan de volgende procedures voor installatie, gebruik en onderhoud. Lees deze instructies. Bewaar deze instructies.
WD TV Live/Live Plus HD-mediaspeler Gebruikershandleiding WD®-service en -ondersteuning Mocht u tegen een probleem aanlopen, geeft u ons dan eerst de kans om deze te adresseren voordat u dit product retourneert. De meeste technische vragen kunnen worden beantwoord via onze kennisbank of de ondersteuning via onze e-mailservice op http://support.wdc.com. Als het antwoord niet aanwezig is, of als het uw voorkeur geniet, neemt u dan contact op met WD via het voor u beste onderstaande telefoonnummer.
WD TV Live/Live Plus HD-mediaspeler Gebruikershandleiding Uw WD-productgegevens noteren Schrijf in de volgende tabel het serie- en modelnummer van uw nieuwe WD-product op. U kunt deze informatie vinden op het label aan de onderkant van het apparaat. U dient tevens de datum van aanschaf te vermelden. Als u om technische ondersteuning vraagt, kan om deze informatie gevraagd worden.
WD TV Live/Live Plus HD-mediaspeler Gebruikershandleiding 2 Productoverzicht Dank u voor de aanschaf van de WD TV Live of WD TV Live Plus HD mediaspeler. Deze gebruikershandleiding geeft u stapsgewijze instructies voor het installeren en gebruiken van uw nieuwe mediaspeler. Ga naar onze website op www.westerndigital.com voor de meest recente WD-productinformatie en nieuws. Video's afspelen en navigeren in Full-HD, tot 1080p – Dit is het echte werk, afspelen in Full-HD 1080p.
WD TV Live/Live Plus HD-mediaspeler Gebruikershandleiding Speel naadloos media af vanaf meerdere USB-stations – Op de twee USB-poorten van de speler kunt u meerdere USB-opslagapparaten aansluiten en deze tegelijkertijd gebruiken. Onze mediabibliotheekfunctie verzamelt de inhoud op alle stations in één lijst die is gesorteerd op mediatype. De grootte van uw mediaverzameling kent geen grenzen, voeg gewoon meer USB-schijven toe voor meer ruimte.
WD TV Live/Live Plus HD-mediaspeler Gebruikershandleiding Bestandsbeheer Kopieer bestanden tussen USB-schijven en draag bestanden over tussen een op de mediaspeler aangesloten USB-schijf en uw computer Uitgangen voor HDMI 1.3, composiet video en component video – Met de HDMI-poort kunt u een hdtv of thuistheater van de hoogste kwaliteit aansluiten. Dankzij de extra composiet (RCA) en componentpoorten is compatibiliteit met bijna alle televisiesets gegarandeerd.
WD TV Live/Live Plus HD-mediaspeler Gebruikershandleiding 3 Voorzieningen en functies Voorzieningen Audio/Video Interface HDMI 1.3-interface voor digitale audio en hoge-definitie video. Component video-interface (YPbPr, groen/blauw/rood) voor analoge videoaansluiting. Composite interface (RCA, geel/wit/rood) voor analoge AV-aansluiting. S/PDIF (optische) audio voor high-fidelity digitale audio.
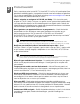
WD TV Live/Live Plus HD-mediaspeler Gebruikershandleiding Aansluitingen 1 3 2 4 5 6 7 8 9 Item Onderdeel Beschrijving 1 USB-poort 1 Ondersteunt aansluiting van verwisselbare opslagapparaten, draagbare mediaspelers en digitale camera's met USB-aansluitingen en draadloze USB-adapters. 2 Resetschakelaar Eén seconde ingedrukt houden om de fabrieksinstellingen te herstellen (zie “Reset to Factory Defaults (Herstellen naar fabrieksinstellingen)” op pagina 150).
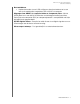
WD TV Live/Live Plus HD-mediaspeler Gebruikershandleiding LED-indicatoren 1 2 3 Item Onderdeel Beschrijving 1 Stroom LED • Aan – de stroomkabel is aangesloten en de stroom staat aan. • Uit – de mediaspeler staat in stand-by of de stroomkabel is losgekoppeld. • Knipperend – een diagnostische systeemfout is opgetreden. Zie “Problemen oplossen” op pagina 157. 2 Infraroodontvanger • Ontvangt signalen van de afstandsbediening.
WD TV Live/Live Plus HD-mediaspeler Gebruikershandleiding Afstandsbediening VOORZICHTIG: Stel de batterijen of de afstandsbediening met geplaatste batterijen niet bloot aan hitte (direct zonlicht, vuur, enz.). 1. Infraroodzender 2. HOME (Hoofdpagina) POWER (Stroom) 3. 4. Navigatieknoppen 5. ENTER (schakelt de infobalk IN of UIT) 6. STOP (Stoppen) 7. BACK (Terug) 8. REV (terugspoelen) 9. PREV (vorige nummer/pagina omhoog) 10. SEARCH (Zoeken) 11. OPTION (Optie) 12. PAUSE/PLAY (Pauzeren/Afspelen) 13.
WD TV Live/Live Plus HD-mediaspeler Gebruikershandleiding 4 Aan de slag Inhoud van het pakket WD TV Live/Live Plus HD-mediaspeler Composite AV-kabels Component (YPbPr)-kabels Afstandsbediening en twee AAA-batterijen Beknopte installatiegids AC-stroomadapter Installatievereisten Standaard of HDTV met een composiet (standaard A/V), component (YPbPr), of HDMI-ingangpoorten. USB-opslagapparaat met een USB 2.0-aansluiting. Een beschikbare netwerkverbinding voor online materiaal en services.
WD TV Live/Live Plus HD-mediaspeler Gebruikershandleiding Belangrijk: Voor de beste prestaties en hoogste betrouwbaarheid is het raadzaam de nieuwste updates en Service Packs (SP) te installeren. Ga voor Windows naar het menu Start en selecteer Windows Update. Ga voor Mac naar het menu Apple en selecteer Software Update. Installatieprocedure De installatieprocedure van de mediaspeler staat hieronder beschreven: 1. Zet inhoud over vanaf uw computer naar de USB-opslagmedia.
WD TV Live/Live Plus HD-mediaspeler Gebruikershandleiding Stap 1 – Laad inhoud op uw USB-schijf Zet uw favoriete inhoud over van uw computer naar uw externe USB-schijf, zoals My Passport® of My Book® (externe USB-schijven en standaard niet inbegrepen).
WD TV Live/Live Plus HD-mediaspeler Gebruikershandleiding Stap 2 – Aansluiten van de stroomkabel 1. Sluit de stroomklem op de stekker van de stroomkabel aan. De wisselstroomadapter verschilt per locatie. Sommige locaties vereisen geen klem voor stroomstekkers. De apparaten die in die locaties worden verkocht, hebben een vaste stroomstekker. Raadpleeg onderstaande illustratie. US/JA/TW EU/KO US/JA/TW EU/KO Installatie Verwijderen Installatie Verwijderen 2.
WD TV Live/Live Plus HD-mediaspeler Gebruikershandleiding Stap 3 – Sluit de mediaspeler aan De volgende figuren illustreren de kabelaansluitingen die door de mediaspeler worden ondersteund. De standaardaansluiting gebruikt de bijgeleverde composiet-naar-mini AV-kabels. Opmerking: HDMI en S/PDIF (optisch) kabels worden afzonderlijk verkocht. Belangrijk: Configureer de audio-/video-instellingen van de mediaspeler op basis van het gekozen verbindingstype.
WD TV Live/Live Plus HD-mediaspeler Gebruikershandleiding HDMI-video en -audio (Hoge definitie) HDMI combineert hoge-definitie video, meerkanaals audio, en inter-componentbesturing in een enkelvoudige digitale kabel. Deze interface biedt kwaliteitsresolutie voor video tot 1080p. Om uw mediaspeler aan te sluiten met behulp van een HDMI-kabel: 1. Steek een HDMI-kabel in de HDMI-connector op de mediaspeler. 2. Steek het andere uiteinde in de HDMI-poort op uw tv of audio-/videosysteem (indien beschikbaar).
WD TV Live/Live Plus HD-mediaspeler Gebruikershandleiding Component-video en -audio (Hoge definitie) De component-aansluiting geeft alleen videosignalen. U moet ook de composiet audiokabels aansluiten voor geluid. Deze interface biedt kwaliteitsresolutie voor video tot 1080i. Om uw mediaspeler aan te sluiten met behulp van een component-naar-mini-kabel: 1. Steek een mini-kabel in de component-connector op de mediaspeler. 2.
WD TV Live/Live Plus HD-mediaspeler Gebruikershandleiding Composiete AV-aansluiting (Standaarddefinitie) Het gebruik van een composietaansluiting: 1. Steek de mini-connector in de composiet-poort op de mediaspeler. 2. Steek de andere uiteinden in de composiet poortingangen op uw tv, geel op geel, rood op rood en wit op wit. 3. Selecteer de juiste invoerbron voor de tv. Wacht een paar seconden zodat uw tv de mediaspeler kan detecteren.
WD TV Live/Live Plus HD-mediaspeler Gebruikershandleiding Thuistheater (hoge definitie) Om een thuistheatersysteem aan te sluiten: 1. 2. 3. 4. 5. Steek een HDMI-kabel in de HDMI-connector op de mediaspeler. Steek het andere uiteinde in de HDMI-in-poort op uw A/V-ontvanger. Steek een HDMI-kabel in de HDMI-Uit-poort op uw A/V-ontvanger. Steek het andere uiteinde in de HDMI-poort op uw tv (indien aanwezig). Selecteer de juiste invoerbron voor de tv.
WD TV Live/Live Plus HD-mediaspeler Gebruikershandleiding Stap 4 – Aansluiten van een USB-apparaat De mediaspeler heeft twee USB-poorten dat het afspelen vanaf WD USB-externe schijven ondersteunt.* * Zie Artikel #3805 voor een lijst van ondersteunde WD externe schijven in onze kennisbank op http://support.wdc.com. Om het USB-apparaat aan te sluiten: 1. Sluit het USB-apparaat aan op een van de USB-poorten van de mediaspeler.
WD TV Live/Live Plus HD-mediaspeler Gebruikershandleiding Een vergrendeld WD USB-apparaat ontgrendelen: U moet een USB-apparaat ontgrendelen voordat de mediaspeler toegang krijgt tot de inhoud. 1. Ga naar het hoofdscherm en selecteer het pictogram voor de media-inhoud die u wilt benaderen. Dit kan Muziek , Video of Foto zijn. 2. Druk op / op het scherm Unlock your WD Drive (Uw WD-station ontgrendelen) om OK te selecteren en druk daarna op ENTER. 3.
WD TV Live/Live Plus HD-mediaspeler Gebruikershandleiding Verwijderen van een USB-apparaat Om gegevensverlies te voorkomen, wordt het ten zeerste aanbevolen dat u eerst op de EJECT (Uitwerpen)-knop op de afstandsbediening drukt, voordat u een USB-apparaat verwijdert. Om een USB-apparaat te verwijderen: 1. Druk op de knop HOME (Startpagina) . 2. Druk op de knop EJECT (Uitwerpen) . 3. Selecteer het USB-apparaat dat u wilt verwijderen. 4. Selecteer OK en druk daarna op Enter. 5.
WD TV Live/Live Plus HD-mediaspeler Gebruikershandleiding Stap 5 – Verbinding maken met uw netwerk De mediaspeler kan worden verbonden met uw thuisnetwerk voor toegang tot internet en netwerkopslag met een bekabelde of draadloze netwerkverbinding. Een netwerkverbinding biedt toegang tot lokaal opgeslagen en online mediabestanden. Netwerkverbinding met bekabeling Een verbinding maken met een thuisnetwerk via een Ethernet-kabel: 1.
WD TV Live/Live Plus HD-mediaspeler Gebruikershandleiding 5 Network Setup (Netwerk instellen) De mediaspeler kan worden verbonden met het LAN-netwerk via een bekabelde of draadloze netwerkverbinding voor toegang tot streaming video en online en offline media-inhoud. Instellen van Ethernet-netwerk (bekabeld) 1. Steek een Ethernet-kabel in de Ethernet-connector op de mediaspeler. 2. Sluit het andere uiteinde van de Ethernet-kabel rechtstreeks aan op een LAN-poort in een router of netwerkswitch. 3.
WD TV Live/Live Plus HD-mediaspeler Gebruikershandleiding 5. Druk op / om Network setup (Netwerk instellen) te selecteren en druk daarna op ENTER. 6. Selecteer een configuratie-optie voor de instellingen en druk daarna op ENTER. Selecteer Automatic (Automatisch) om het apparaat uw netwerkverbinding automatisch te laten detecteren en ga naar stap 11. Selecteer Manual (Handmatig) om uw netwerkverbinding handmatig in te stellen en ga naar stap 7.
WD TV Live/Live Plus HD-mediaspeler Gebruikershandleiding 7. Het volgende scherm verschijnt nadat het netwerk is gedetecteerd. Druk op om IP address (IP-adres) te selecteren en druk daarna op ENTER. / 8. Gebruik de knop om uw IP-adres in te voeren met het toetsenbord op het scherm. Selecteer Submit (Verzenden) en druk daarna op ENTER. 9. Herhaal de stap hierboven om de waarden voor de Subnet mask, Gateway, en DNS-instellingen in te vullen. 10.
WD TV Live/Live Plus HD-mediaspeler Gebruikershandleiding Draadloos netwerk instellen Opmerking: Afspelen via Wi-Fi kan om diverse redenen instabiel zijn, zoals een zwakke netwerkverbinding, signaalsterkte, variabele snelheden, of andere omgevingsfactoren.
WD TV Live/Live Plus HD-mediaspeler Gebruikershandleiding 6. Gebruik de navigatieknoppen druk daarna op ENTER. om een SSID-invoeroptie te selecteren en Als u voor Auto search (Automatisch zoeken) kiest, zoekt de eenheid naar beschikbare toegangspunten in de buurt. Ga verder met stap 7. Selecteer Manually input SSID (SSID handmatig invoeren) om de SSID handmatig in te voeren. Ga daarna verder met stap 8. 7.
WD TV Live/Live Plus HD-mediaspeler Gebruikershandleiding 9. Druk op ENTER. / om een beveiligingsprotocol te selecteren en druk daarna op 10. Gebruik de navigatieknoppen om het wachtwoord voor het toegangspunt waarmee u een verbinding wilt maken in te voeren, selecteer Submit (Verzenden) en druk daarna op ENTER. om Automatic (Automatisch) (het IP-adres 11.
WD TV Live/Live Plus HD-mediaspeler Gebruikershandleiding De netwerkverbinding controleren Als u netwerkproblemen heeft, controleert u de netwerkverbinding om de oorzaak van het probleem vast te stellen. U controleert de netwerkverbinding als volgt: 1. Ga naar Home (Hoofdpagina) | Settings (Instellingen) in de menubalk. 2. Druk op / om Network Setting (Netwerkinstelling) te selecteren en druk daarna op ENTER. 3. Druk op / om Check connection (Verbinding controleren) te selecteren en druk daarna op ENTER.
WD TV Live/Live Plus HD-mediaspeler Gebruikershandleiding Een rood kruis op de resultaten geeft een probleem met de netwerkinstellingen aan. Dit kan zowel betrekking hebben op het IP-adres als op het adres van de DNS-server. Als het probleem blijft bestaan, kunt u contact opnemen met uw internetaanbieder om te controleren of het probleem zich bij hen bevindt.
WD TV Live/Live Plus HD-mediaspeler Gebruikershandleiding 6 Bediening van de mediaspeler Gebruik van de afstandsbediening Met de afstandsbediening van de mediaspeler kunt u door het hoofdscherm navigeren, zoeken op mediabestanden, afspeelopties instellen en de systeeminstellingen aanpassen. De infraroodsensor detecteert infraroodsignalen vanaf de afstandsbediening. Belangrijk: Zorg ervoor dat er zich geen obstakels tussen de afstandsbediening en de infraroodsensor op de mediaspeler bevinden.
WD TV Live/Live Plus HD-mediaspeler Gebruikershandleiding Knop Functie NEXT (Volgende) • Springt naar het volgende audio-, video- of beeldbestand. (volgende nummer) • Druk hierop om een pagina omlaag te gaan. • Druk hierop in de Video FF-modus om 10 minuten vooruit te gaan. EJECT (Uitwerpen) Schakelt naar veilige modus zodat u op een veilige manier een USB-apparaat kunt verwijderen.
WD TV Live/Live Plus HD-mediaspeler Gebruikershandleiding Toets of toetsvolgorde Functie SPACE BAR (Spatiebalk) (Play/Pause) (Afspelen/Pauzeren) Schakelt tussen pauzeren en afspelen. + (FF) Zoekt voorwaarts door het afspelen van audio/video. Ondersteunt de volgende snelheden: 2×, 4×, 8×, 16×. N (Volgende) • Springt naar het volgende audio-, video- of beeldbestand. • Druk hierop om een pagina omlaag te gaan. • Druk hierop in de Video FF-modus om 10 minuten vooruit te gaan.
WD TV Live/Live Plus HD-mediaspeler Gebruikershandleiding Het menu van de mediaspeler gebruiken Het hoofdschermmenu wordt weergegeven wanneer u op de afstandsbediening op HOME (hoofdpagina) drukt. Met de pictogrammen op dit scherm kunt u uw mediabibliotheek doorzoeken en de instellingen van de mediaspeler configureren.
WD TV Live/Live Plus HD-mediaspeler Gebruikershandleiding Hoofdschermnavigatie Gebruik de volgende toetsen om door de menuschermen te navigeren.
WD TV Live/Live Plus HD-mediaspeler Gebruikershandleiding Ondersteunde categorieën voor Media Library (Mediabibliotheek) compilatie Als het proces Media Library (mediabibliotheek) compilatie gereed is, worden alle aanwezige mediabestanden georganiseerd in aparte mappen per mediatype. Standaard worden mediabestanden als miniaturen weergegeven (miniaturen van muziekalbums of filmposters, miniatuurafbeeldingen). De categorieën van de inhoud staan in de volgende tabel vermeld.
WD TV Live/Live Plus HD-mediaspeler Gebruikershandleiding Uw inhoud op de schijf zoeken U kunt op twee manieren een specifiek mediabestand zoeken, afhankelijk van of de functie media library (mediabibliotheek) compilatie is ingeschakeld of niet. Handmatig zoeken U kunt handmatig een mediabestand opzoeken door naar het specifieke mediagedeelte te navigeren en alle aanwezige mappen met bestanden te doorlopen. Deze manier wordt aanbevolen als er slechts een beperkt aantal bestanden is om doorheen te zoeken.
WD TV Live/Live Plus HD-mediaspeler Gebruikershandleiding Map Miniatuurweergaven Richtlijnen Muziek: folder.jpg weergeven (u moet het afbeeldingsbestand de naam “folder.jpg” geven, anders werkt de miniatuur niet) Als er geen bestand met de naam folder.jpg wordt gevonden, wordt de eerste foto in de map weergegeven Als er geen albumhoes beschikbaar is, wordt het eerste .
WD TV Live/Live Plus HD-mediaspeler Gebruikershandleiding 3. Kies de zoekparameters. Selecteer Starts with (Begint met) of Contains (Bevat) en druk daarna op ENTER. Starts with (Begint met) – Alle bestanden met bestandsnamen die beginnen met de ingevulde tekens in dit veld worden in de zoekresultaten inbegrepen. Als u bijvoorbeeld 'glo' invoert, kunnen de zoekresultaten er als volgt uitzien: Global party.mpeg Glow of the Field.jpg Gloss.
WD TV Live/Live Plus HD-mediaspeler Gebruikershandleiding 5. Nadat u de zoekparameters hebt opgegeven, selecteert u Submit (Indienen) aan de onderkant van het schermtoetsenborden drukt u daarna op ENTER. 6. Als er geen mediabestanden aan de zoekparameters voldoen, verschijnt het volgende bericht: Druk op ENTER om het schermtoetsenbord opnieuw weer te geven en de zoekargumenten opnieuw in te vullen. Als er mediabestanden zijn die aan de zoekparameters voldoen, worden zij zoals onderstaande lijst vermeld.
WD TV Live/Live Plus HD-mediaspeler Gebruikershandleiding 7 Video bekijken U kunt video's op uw tv bekijken met behulp van de mediaspeler. Ondersteunde video-indelingen De volgende bestandsindelingen worden voor video ondersteund: AVI (Xvid, AVC, MPEG1/2/4) MPG/MPEG VOB/ISO MKV (h.264, x.264, AVC, MPEG1/2/4) TS/TP/M2T (MPEG1/2/4, AVC, VC-1) MP4/MOV (MPEG4, h.264) M2TS WMV9 (VC-1) Video afspelen Om een video af te spelen: 1. Ga naar de categorie video. 2.
WD TV Live/Live Plus HD-mediaspeler Gebruikershandleiding Het scherm toont de aanwezige videobestanden en videomappen. Afhankelijk van de weergave-instellingen van uw browser worden zij in miniatuurweergave (standaard) of in lijstvorm getoond (zie “Browser Display (Browserscherm)” op pagina 141 voor meer informatie over de weergave-instellingen van uw browser). 3. Spoor het videobestand op dat u wilt afspelen.
WD TV Live/Live Plus HD-mediaspeler Gebruikershandleiding Menuopties voor video Druk in het hoofdscherm van Video op OPTION (Optie). De menuopties voor video worden weergegeven. Als u klaar bent, drukt u op OPTION (Optie) om terug te keren naar het hoofdmenu. Weergavemodi Het menu Video wordt standaard in de voorbeeldmodus weergegeven.
WD TV Live/Live Plus HD-mediaspeler Gebruikershandleiding Video afspeelbediening Gebruik deze knoppen op de afstandsbediening voor de bediening van het afspelen van video: Knop Functie STOP (Stoppen) Onderbreekt het afspelen van de video. PAUSE/PLAY (Pauzeren/Afspelen) Pauzeert of hervat het afspelen van de video. 1. Druk op FF (snel vooruit) of REV (terugspoelen) om video af te zoeken (druk herhaaldelijk om de zoeksnelheid te kiezen) 2.
WD TV Live/Live Plus HD-mediaspeler Gebruikershandleiding Weergeven van het video informatiepaneel Gebruik deze optie voor het weergeven van het video informatiepaneel aan de onderkant van het scherm. Dit paneel toont de volgende informatie over de huidige video: Het pictogram voor de huidige herhaalmodus wordt weergegeven, mits ingeschakeld.
WD TV Live/Live Plus HD-mediaspeler Gebruikershandleiding Audiokanaalselectie Gebruik deze optie om de gesproken taal voor het afspelen van de video te kiezen. Deze optie is alleen beschikbaar als de huidige video meer dan een geluidsspoor heeft. Zorg ervoor dat de geluidssporen in dezelfde map als de huidige video staan. Om het audiokanaal te selecteren: 1. Druk op OPTION (Optie). De optiebalk wordt geopend. 2.
WD TV Live/Live Plus HD-mediaspeler Gebruikershandleiding Ondertiteling selecteren Gebruik deze optie voor het lezen van ondertiteling tijdens hat afspelen van de video. Zorg ervoor dat de bestanden voor ondertiteling in dezelfde map als de huidige video staat en dat het dezelfde bestandsnaam als het videobestand heeft.
WD TV Live/Live Plus HD-mediaspeler Gebruikershandleiding Selecteren van de video zoomopties Gebruik deze opties om de beeldverhouding van het video afspeelscherm te wijzigen. Om de beeldverhouding te wijzigen: 1. Druk tijdens het afspelen van video op OPTION (optie). De optiebalk verschijnt aan de bovenkant van het scherm. 2. Markeer om in te zoomen of om uit te zoomen, en druk vervolgens herhaaldelijk op ENTER om de beschikbare zoomopties te doorlopen.
WD TV Live/Live Plus HD-mediaspeler Gebruikershandleiding Gebruik van videoherhaling Gebruik deze optie om de video die momenteel wordt afgespeeld te herhalen. Om de video herhalingsmodus in te stellen: 1. Druk tijdens het afspelen van video op OPTION (optie). De optiebalk verschijnt aan de bovenkant van het scherm. 2. Markeer het herhaalpictogram en druk daarna herhaaldelijk op ENTER totdat het door u gewenste herhalingspictogram wordt weergegeven.
WD TV Live/Live Plus HD-mediaspeler Gebruikershandleiding Dvd-navigatiebesturing Gebruik deze knoppen op de afstandsbediening voor de dvd-navigatie bij het afspelen van video: Knop Functie STOP (Stoppen) Onderbreekt het afspelen van de video. PAUSE/PLAY (Pauzeren/Afspelen) Pauzeert of hervat het afspelen van de video. 1. Druk op FF (snel vooruit) of REV (terugspoelen) om video af te zoeken (druk herhaaldelijk om de zoeksnelheid te kiezen) 2.
WD TV Live/Live Plus HD-mediaspeler Gebruikershandleiding Dvd-navigatie Afspeelopties De werkbalk voor dvd-navigatie heeft drie opdrachtpictogrammen. Om de videowerkbalk weer te geven, drukt u op OPTION (Optie). Druk op BACK (Terug) of nogmaals op OPTION (Optie) om de werkbalk te verbergen. Selectie van het hoofdmenu Het hoofdmenu weergeven in de dvd-navigatie: 1. Druk op OPTION (Optie). De optiebalk wordt geopend. 2. Selecteer en druk daarna op ENTER. Het hoofdmenu wordt weergegeven.
WD TV Live/Live Plus HD-mediaspeler Gebruikershandleiding 8 Muziek afspelen Met de mediaspeler kunt u uw muziekbibliotheek naar een USB-apparaat kopiëren en deze vanaf uw amusementsapparaat beluisteren met de mediaspeler. De volgende indelingen voor audiobestanden en audiocodecs worden ondersteund: MP3 WAV/PCM/LPCM WMA AAC FLAC MKA AIF/AIFF OGG Dolby Digital DTS Muziek afspelen 1. Druk op HOME (Hoofdpagina), en markeer daarna de Muziek muziekbalk wordt weergegeven. 2.
WD TV Live/Live Plus HD-mediaspeler Gebruikershandleiding Het scherm toont de aanwezige audiobestanden en audiomappen. De weergave bestaat uit miniaturen (waarin de hoezen van de muziekalbums worden getoond, mits aanwezig) of uit een lijst afhankelijk van de instellingen van uw browser. Er worden alleen audiobestanden weergegeven die door de mediaspeler worden ondersteund. 3. Spoor het audiobestand op dat u wilt afspelen.
WD TV Live/Live Plus HD-mediaspeler Gebruikershandleiding Het muziek afspeelscherm geeft de volgende informate over het op dit moment afgespeelde audiobestand weer: Huidige herhaalmodus (indien ingeschakeld) Voortgangsbalk voor het afspelen van audio Albumhoes (indien aanwezig) Verstreken en totale afspeeltijden Albumnaam Volgende nummer Artiest Genre Audio bestandsnaam Muziekafspeelbediening Gebruik deze knoppen op de afstandsbediening voor de bediening van het afspelen van muziek: Knop Functie STOP
WD TV Live/Live Plus HD-mediaspeler Gebruikershandleiding Muziekafspeelopties Met de twee opdrachtenpictogrammen op de muziekwerkbalk kunt u de instellingen voor het herhalen en de willekeurige volgorde instellen. Om de muziekwerkbalk weer te geven, druk op OPTION (Optie). Druk op BACK (Terug) of nogmaals op OPTION (Optie) om de werkbalk te verbergen. Om de muziek herhalingsmodus in te stellen: 1. Druk tijdens het afspelen van muziek op OPTION (Optie).
WD TV Live/Live Plus HD-mediaspeler Gebruikershandleiding 9 Foto's bekijken Met de mediaspeler kunt u in uw huiskamer uw digitale fotoalbum bekijken. Het is perfect voor het delen van die leuke momenten met vrienden en familie.
WD TV Live/Live Plus HD-mediaspeler Gebruikershandleiding Het scherm geeft miniatuurweergaven van beschikbare afbeeldingsbestanden en fotomappen weer. Er worden alleen beeldbestanden weergegeven die door de mediaspeler worden ondersteund. 3. Spoor het beeldbestand op dat u wilt bekijken. Om een beeldbestand te openen en te bekijken, selecteer het bestanden druk daarna op ENTER. Om de volgende afbeelding in de fotomap te bekijken, druk op NEXT (volgende) (nummer).
WD TV Live/Live Plus HD-mediaspeler Gebruikershandleiding 2. Druk op ENTER om de melding te sluiten. 3. Ga naar Home (Hoofdpagina) | Photo (Fotobalk) . 4. De digitale camera wordt beschouwd als een USB-apparaat. Gebruik de navigatietoetsen om te selecteren en druk daarna op ENTER. Het scherm geeft miniatuurweergaven van beschikbare afbeeldingsbestanden en fotomappen weer. Er worden alleen beeldbestanden weergegeven die door de mediaspeler worden ondersteund.
WD TV Live/Live Plus HD-mediaspeler Gebruikershandleiding Menuopties voor foto's Druk in het hoofdscherm van Foto op OPTION (Optie). De opties van het Fotomenu worden weergegeven. Als u klaar bent, drukt u op OPTION (Optie) om terug te keren naar het hoofdmenu. Weergavemodi Het menu Photo (Foto) wordt standaard in de lijstmodus weergegeven.
WD TV Live/Live Plus HD-mediaspeler Gebruikershandleiding Opties voor fotoweergave De afbeeldingenwerkbalk heeft diverse pictogrammen voor het geven van opdrachten om de manier aan te passen waarop u uw afbeeldingen bekijkt. 1. Om de afbeeldingenwerkbalk weer te geven, druk op OPTION (Optie). 2. Druk op BACK (Terug) of nogmaals op OPTION (Optie) om de werkbalk te verbergen. Pannen (Meedraaien) van de afbeelding Gebruik dit om de weergave van de afbeelding horizontaal of vertikaal mee te draaien.
WD TV Live/Live Plus HD-mediaspeler Gebruikershandleiding Gebruik van fotozoom Gebruik deze opties om de beeldverhouding van de beeldweergave te wijzigen. Om de grootte van de beeldweergave te wijzigen: 1. Druk tijdens het bekijken van foto's op OPTION (Optie). De afbeeldingenwerkbalk opent aan de bovenkant van het scherm. 2. Selecteer het pictogram voor inzoomen om in te zoomen of uit te zoomenen druk daarna herhaaldelijk op ENTER totdat de gewenst beeldverhouding wordt weergegeven.
WD TV Live/Live Plus HD-mediaspeler Gebruikershandleiding Foto diavoorstelling Met de mediaspeler kunt u een diavoorstelling maken met behulp van de inhoud van een fotomap. U start als volgt een diavoorstelling: 1. Zoek de fotomap met de afbeeldingen die u in de diavoorstelling wilt. (Zie “Fotoweergave” op pagina 57.) 2. Selecteer de fotomapen druk daarna op PAUSE/PLAY (Pauzeren/Afspelen) om de diavoorstelling te starten. Om tijdens een diavoorstelling naar achtergrondmuziek te luisteren: 1.
WD TV Live/Live Plus HD-mediaspeler Gebruikershandleiding Weergeven van het diavoorstellingen informatiepaneel U kunt het diavoorstellingen informatiepaneel aan de onderkant van het scherm weergeven.
WD TV Live/Live Plus HD-mediaspeler Gebruikershandleiding Afspeelbediening voor diavoorstellingen Gebruik deze knoppen op de afstandsbediening voor de bediening van het afspelen van diavoorstellingen: Knop Functie STOP (Stoppen) Onderbreekt de diavoorstelling PAUSE/PLAY (Pauzeren/Afspelen) Pauzeert of hervat van de diavoorstelling STOP (Stoppen) Stopt de achtergrondmuziek NEXT (Volgende) Toont de volgende afbeelding in de diavoorstelling PREV Toont de vorige afbeelding in de diavoorstelling Dia
WD TV Live/Live Plus HD-mediaspeler Gebruikershandleiding 2. Selecteer en druk daarna herhaaldelijk op ENTER totdat het door u gewenste herhaalmodus wordt weergegeven. Opties zijn: Normal (Normaal) – De diavoorstelling wordt eenmaal afgespeeld. Wanneer de laatste afbeelding wordt weergegeven, wordt het voorgaande browserscherm weergegeven. Repeat all (alles herhalen) – De diavoorstelling wordt herhaaldelijk afgespeeld totdat u op Stop (Stoppen) of Back (Terug) drukt.
WD TV Live/Live Plus HD-mediaspeler Gebruikershandleiding 10 Netwerkservices Toegang tot media-inhoud op het netwerk Wanneer de mediaspeler over een actieve netwerkverbinding beschikt, hebt u toegang tot media-inhoud op een NAS-apparaat of gedeelde computer op het zelfde netwerk als uw mediaspeler. U opent als volgt media-inhoud van een netwerkshare of mediaserver: 1. Ga naar het hoofdscherm en selecteer het pictogram voor de media-inhoud die u wilt benaderen. Dit kan Muziek , Video of Foto 2.
WD TV Live/Live Plus HD-mediaspeler Gebruikershandleiding 3. Druk op de navigatieknoppen om de netwerkbron te selecteren met de media-inhoud die u wilt openenen druk daarna op ENTER. 4. Voer uw gebruikersnaam en uw wachtwoord in om toegang te krijgen tot de netwerkbron. Zie de documentatie van uw NAS-apparaat voor meer informatie over het instellen van het wachtwoord. 5. Druk op om OK te selecteren en druk daarna op ENTER. De ondersteunde inhoud voor het geselecteerde mediatype wordt weergegeven. 6.
WD TV Live/Live Plus HD-mediaspeler Gebruikershandleiding Bestanden overdragen Als de mediaspeler over een actieve netwerkverbinding beschikt, kan elke aangesloten USB-schijf als netwerkstation worden gebruikt. Hiermee kunt u bestanden overdragen tussen uw mediaspeler en uw computer. Deze functie is van toepassing op een pc met Windows® XP, Windows Vista® of Windows 7 en op Macintosh®-computers met Mac® OS X® Leopard® of Snow Leopard®. Bestandsdeling op de netwerkshare (Samba Server) inschakelen 1.
WD TV Live/Live Plus HD-mediaspeler Gebruikershandleiding Bestanden verplaatsen tussen de mediaspeler en een computer met Windows 1. Sluit de USB-schijf die u nodig hebt voor de bestandsoverdracht aan op uw mediaspeler. 2. Zorg ervoor dat uw computer zich in hetzelfde netwerk als uw mediaspeler bevindt en dat de optie bestandsdeling is ingeschakeld. Zie Windows Help voor instructies over hoe u bestandsdeling op uw computer inschakelt. 3. Download het programma WD Discovery vanaf http://products.wdc.
WD TV Live/Live Plus HD-mediaspeler Gebruikershandleiding Bestanden verplaatsen tussen de mediaspeler en een computer met Windows Vista/Windows 7 1. Sluit de USB-schijf die u nodig hebt voor de bestandsoverdracht aan op uw mediaspeler. 2. Zorg ervoor dat uw computer zich in hetzelfde netwerk als uw mediaspeler bevindt en dat de optie bestandsdeling is ingeschakeld. Zie Windows Help voor instructies over hoe u bestandsdeling op uw computer inschakelt. 3.
WD TV Live/Live Plus HD-mediaspeler Gebruikershandleiding 5. Klik op de USB-schijf die u nodig hebt voor bestandsoverdracht om de inhoud weer te geven. 6. Zoek het bestand/de bestanden die u wilt overdragen en kopieer/plak, knip/plak of versleep. Bestanden verplaatsen tussen de mediaspeler en een Mac-computer 1. Sluit de USB-schijf die u nodig hebt voor de bestandsoverdracht aan op uw mediaspeler. 2.
WD TV Live/Live Plus HD-mediaspeler Gebruikershandleiding 5. Klik op het apparaat van uw mediaspeler. Het USB-station dat op uw mediaspeler is aangesloten wordt weergegeven. 6. Klik op de USB-schijf die u nodig hebt voor bestandsoverdracht om de inhoud weer te geven. 7. Zoek het bestand/de bestanden die u wilt overdragen en kopieer/plak, knip/plak of versleep.
WD TV Live/Live Plus HD-mediaspeler Gebruikershandleiding 11 Internetmedia Belangrijk: U hebt een breedbandinternetverbinding nodig (bv. DSL of kabel) om gebruik te maken van de webservices. De beschikbaarheid verschilt per land. Deze services kunnen op elk moment worden gewijzigd, beëindigd of onderbroken. Nadat u een verbinding met een netwerk hebt gemaakt, kunt u de mediaspeler gebruiken om toegang te krijgen tot de media-inhoud van de volgende webservices: AccuWeather.
WD TV Live/Live Plus HD-mediaspeler Gebruikershandleiding Pandora – Gratis, persoonlijke internetradio met alleen muziek waar u van houdt. Geniet van uw favoriete nummers of artiesten, en geniet van zenders die speciaal voor u gemaakt zijn. Beoordeel nummers terwijl ze worden afgespeeld, omdat Pandora u op uw wenken bedient en onmiddellijk op basis van uw feedback van zender wisselt.* *Pandora is alleen verkrijgbaar in de VS.
WD TV Live/Live Plus HD-mediaspeler Gebruikershandleiding AccuWeather.com Ontvang de plaatselijke en internationale weersvoorspellingen, klimaatveranderingen, en het laatste nieuws van 's werelds grootste weerstation. U opent AccuWeather.com als volgt: 1. Ga naar Home (Hoofdpagina) | menubalk Internet media (Internetmedia) en druk daarna op ENTER. 2. De lijst met internetservices wordt in alfabetische volgorde weergegeven. Druk op / om AccuWeather.
WD TV Live/Live Plus HD-mediaspeler Gebruikershandleiding Temperatuursweergave wijzigen Doe het volgende om de temperatuursweergave van Celsius in Fahrenheit te wijzigen of vice-versa: Druk in het hoofdscherm van AccuWeather.com op °F of °C en druk daarna op OK.
WD TV Live/Live Plus HD-mediaspeler Gebruikershandleiding Hoe moet ik een film downloaden en bekijken? Nadat u een film hebt gehuurd of aangeschaft, verschijnt deze in My Library (Mijn bibliotheek). Selecteer Start Download (Downloaden starten) om te beginnen. U kunt op het hoofdscherm in de downloadmanager de voortgang van het downloaden volgen. U kunt al beginnen met het kijken naar de film voordat deze helemaal is gedownload door op Play Now (Nu afspelen) te drukken, wanneer deze beschikbaar komt.
WD TV Live/Live Plus HD-mediaspeler Gebruikershandleiding 4. Ga op de mediaspeler naar het menubalk Home (Hoofdpagina) | Internet media (Internetmedia) en druk daarna op ENTER. 5. De lijst met services wordt in alfabetische volgorde weergegeven. Druk op / om CinemaNow te selecteren en druk daarna op ENTER. 6. Selecteer Settings (Instellingen) vanaf het menu aan de onderkant binnen de CinemaNow service en druk daarna op ENTER.
WD TV Live/Live Plus HD-mediaspeler Gebruikershandleiding 2. De lijst met internetservices wordt in alfabetische volgorde weergegeven. Druk op / om Deezer te selecteren en druk daarna op ENTER. Het hoofdscherm van Deezer verschijnt. 3. Druk op / Opties zijn: om een optie te kiezen en druk daarna op ENTER.
WD TV Live/Live Plus HD-mediaspeler Gebruikershandleiding 5. Gebruik de navigatieknoppen om met het schermtoetsenbord uw geregistreerde Deezer-e-mailadres in te vullen. Selecteer Submit (Verzenden) en druk daarna op ENTER. 6. Gebruik de navigatieknoppen om met het schermtoetsenbord uw Deezer-accountwachtwoord in te vullen. Selecteer Submit (Verzenden) en druk daarna op ENTER. 7. Druk op / om een optie voor opslag te selecteren. Opties zijn: No (Nee) – Uw accountgegevens worden niet opgeslagen.
WD TV Live/Live Plus HD-mediaspeler Gebruikershandleiding 3. Druk op / om een radiozender op muziekgenre te selecteren en druk daarna op ENTER. 4. Druk op / om een radiozender op een subgenre van muziek te selecteren en druk daarna op ENTER. 5. Zorg dat u een zender hebt geselecteerd en druk daarna op OPTION (Optie) voor het selecteren van Become a Fan (word een fan) . Hiermee voegt u de zender toe aan Favorite Radios (Favoriete zenders) om voortaan snel toegang hiertoe te krijgen. 6.
WD TV Live/Live Plus HD-mediaspeler Gebruikershandleiding Favoriete zenders U opent als volgt een favoriete radiozender in My Music: 1. Druk in het hoofdscherm van Deezer op / om My Music (Mijn muziek) te selecteren en druk daarna op ENTER. 2. Meldt u aan bij uw Deezer-account als u dit nog niet hebt gedaan. 3. Selecteer Favorite Radios (Favoriete zenders) en druk daarna op ENTER. Opmerking: Als u geen zenders heeft toegevoegd, verschijnt het bericht “no favorite available (geen favoriet gevonden)”. 4.
WD TV Live/Live Plus HD-mediaspeler Gebruikershandleiding Top Charts Dit zijn de populairste nummers van Deezer-gebruikers per land. 1. Druk in het hoofdscherm van Deezer op / om Top Charts te selecteren en druk daarna op ENTER. 2. Druk op / om de kanaalresultaten te filteren (French (Frans), BE, UK (VK), US (VS)), en daarna op / om een nummer op het scherm te selecteren. 3. Druk op of op ENTER om naar het geselecteerde nummer te luisteren. Search (Zoeken) 1.
WD TV Live/Live Plus HD-mediaspeler Gebruikershandleiding Facebook Deel uw status, foto's, video's en uw favoriete koppelingen op Facebook. Ontdek het laatste nieuws van uw sociale netwerk of de wereld en nog zoveel meer. Bekijk dit alles op uw grote breedbeeld-tv. Om van deze service gebruik te kunnen maken, hebt u een geldig Facebook account nodig. U kunt een Facebook-account aanmaken op http://www.facebook.com. Voor de eerste keer aanmelden bij Facebook 1.
WD TV Live/Live Plus HD-mediaspeler Gebruikershandleiding 3. Druk met een geselecteerde opmerking eenmaal op voor het selecteren van “Leuk”, als je de opmerking leuk vindt en druk daarna op ENTER. Druk tweemaal op om commentaar op een nieuws feed opmerking te geven , druk op ENTER, en vul daarna uw opmerking in met het schermtoetsenbord. Opmerking: Door te navigeren naar What’s on your mind? (Waar denk je aan?) en te drukken op OK kunt u een opmerking aan de wand in het nieuwsfeedscherm toevoegen.
WD TV Live/Live Plus HD-mediaspeler Gebruikershandleiding Videos Je kunt de video's bekijken die jij en andere gebruikers op Facebook hebben geplaatst. 1. Selecteer Videos (Video's) in het hoofdmenu van Facebook en druk daarna op ENTER. 2. Ga naar een video en druk daarna op of ENTER. De videospelerknoppen en -opties van Facebook zijn dezelfde als die voor het afspelen van een video op een aangesloten USB-station of networkshare.
WD TV Live/Live Plus HD-mediaspeler Gebruikershandleiding Flickr Flickr is een website waarop u online afbeeldingen en video's kunt beheren en delen. De inhoud van Flickr is geordend op basis van zogenaamde tags. Dit zijn sleutelwoorden of categorielabels die de inhoud beschrijven. Met tags kunnen gebruikers naar inhoud zoeken die iets gemeenschappelijk heeft. Er kunnen tot 75 tags zijn verbonden aan elk inhoudsbestand. Ga naar http://www.flickr.
WD TV Live/Live Plus HD-mediaspeler Gebruikershandleiding Verkennen op basis van populariteitstages: 1. Druk op / om Hot tags (Populaire tags) te selecteren in het scherm Explore (Verkennen) en druk daarna op ENTER. 2. Druk op / om een tag in de lijst te selecteren en druk daarna op ENTER. Een fotostream met de inhoud die bij de geselecteerde tag hoort wordt weergegeven. Ga naar pagina 90 voor instructies over hoe u in een fotostream navigeert.
WD TV Live/Live Plus HD-mediaspeler Gebruikershandleiding Zoeken naar een lid van Flickr Zoeken naar een lid van Flickr: 1. Druk op / om Search (Zoeken) te selecteren in het scherm Explore (Verkennen) en druk daarna op ENTER. 2. Druk op / om Flickr Members (Flickr-leden) te selecteren en druk daarna op ENTER. 3. Gebruik de navigatieknoppen om de gebruikersnaam, het e-mailadres of de interesse van een lid in te voeren met het toetsenbord op het scherm. Selecteer Submit (Verzenden) en druk daarna op ENTER.
WD TV Live/Live Plus HD-mediaspeler Gebruikershandleiding Flickr Player De indeling van de Flickr Player is dezelfde als die van een diavoorstelling van foto's. Druk op Druk op Druk op om de volgende inhoud in de fotostream te bekijken. om de vorige inhoud in de fotostream te bekijken. om terug te keren naar de fotostream. Opties van de Player Net zoals bij een normale diavoorstelling van uw foto's kunt u de manier waarop de inhoud in de Flickr Player wordt weergegeven aanpassen.
WD TV Live/Live Plus HD-mediaspeler Gebruikershandleiding Druk op / en selecteer om met de afbeelding mee te draaien (zie “Pannen (Meedraaien) van de afbeelding” op pagina 61 voor meer informatie). Wanneer u de afspeelmodus van de diavoorstelling wilt wijzigen, drukt u op / en selecteert u (zie “Een diavoorstelling herhalen en/of willekeurig afspelen” op pagina 65 voor meer informatie). Flingo Flingo biedt consumenten gratis internettelevisie van de grote tv-studio's, -omroepen en videowebsites.
WD TV Live/Live Plus HD-mediaspeler Gebruikershandleiding Live365 Gebruik Live365 om uw eigen online radiozender aan te maken of luister naar de online zenders van andere Live365-gebruikers. De muziekselecties worden samengesteld op basis van de gebruikersbeoordelingen. Enkele kleine AM- en FM-zenders gebruiken Live365 ook om audio via het internet te streamen. Toegang tot Live365: 1. Ga naar Home (Hoofdpagina) | menubalk Internet Media (Internetmedia) druk daarna op ENTER. 2.
WD TV Live/Live Plus HD-mediaspeler Gebruikershandleiding 4. Druk op / voor het selecteren van Sign In (Aanmelden) of Don’t have an account? (nog geen account?) en druk daarna op ENTER. Als u nog geen account hebt, volgt u de aanwijzingen op het scherm om uw Live365 account online aan te maken. 5. Gebruik de navigatieknoppen om uw Live365-gebruikersnaam in te voeren met het toetsenbord op het scherm. Selecteer Submit (Verzenden) en druk daarna op ENTER. om uw Live365-wachtwoord in te voeren 6.
WD TV Live/Live Plus HD-mediaspeler Gebruikershandleiding Naar een Live365-zender luisteren Nieuwe gebruikers van Live365 kunnen zoeken naar radiozenders. U kunt de laatste zender waarnaar u heeft geluisterd benaderen als u Live365 al vanaf de mediaspeler heeft benaderd. Geregistreerde gebruikers van Live365 kunnen toegang krijgen tot My Preset List (Mijn vooraf ingestelde lijst) en naar hun favoriete zenders luisteren. VIP-leden van Live365 kunnen naar premium radiozender luisteren.
WD TV Live/Live Plus HD-mediaspeler Gebruikershandleiding Toegang krijgen tot het laatst beluisterde station: 1. Druk op het hoofdscherm van Live365 op zenders) te selecteren. 2. Druk op / om Last Stations (Laatste of op ENTER om de geselecteerde radiozender te beluisteren. Luisteren naar een favoriete zender: 1. Druk op het hoofdscherm van Live365 op / voor het selecteren van My Presets (Mijn instellingen) en druk daarna op ENTER. 2. Druk op 3.
WD TV Live/Live Plus HD-mediaspeler Gebruikershandleiding 3. Druk op / om een muziekgenre te selecteren en druk daarna op ENTER. 4. Druk op 5. Druk op 6. Druk op / / om een muzieksubgenre te selecteren en druk daarna op ENTER. om de zender te selecteren die u wilt beluisteren. of op ENTER om de geselecteerde radiozender te beluisteren.
WD TV Live/Live Plus HD-mediaspeler Gebruikershandleiding Het station dat wordt afgespeeld weergeven 1. Druk op OPTION (Optie) op het hoofdscherm van Live365 om de werkbalk van Live365 te zien. 2. Druk op / om Now Playing (Speelt nu af) te selecteren en druk daarna op ENTER. Een zender aan uw vooraf ingestelde lijst toevoegen Als u graag naar een bepaalde zender luistert, kunt u deze aan uw vooraf ingestelde lijst toevoegen om deze gemakkelijker te benaderen in de toekomst.
WD TV Live/Live Plus HD-mediaspeler Gebruikershandleiding Feedback op een liedje geven De muziekselecties in Live365 worden samengesteld op basis van de gebruikersbeoordelingen. U kunt deelnemen aan het selectieproces door een nummer een “duim omhoog” of een “duim omlaag” te geven. Feedback op een liedje geven: 1. Druk terwijl het liedje wordt afgespeeld op / om een feedbackpictogram te selecteren – voor positieve feedback, voor negatieve. Druk op ENTER. 2.
WD TV Live/Live Plus HD-mediaspeler Gebruikershandleiding De volgorde van radiozenders instellen: 1. Druk op / op het hoofdscherm van Live365 om Preferences (Voorkeuren) te selecteren en druk daarna op ENTER. 2. Druk op / om Sorting (Sorteren) te selecteren en druk daarna op ENTER. 3. Druk op / om een sorteeroptie te selecteren en druk daarna op ENTER.
WD TV Live/Live Plus HD-mediaspeler Gebruikershandleiding Mediafly Mediafly is handig om uw favoriete internetinhoud en podcasts naar uw mediaspeler te brengen van populaire bronnen zoals CNN, BBC, NBC, ESPN, WSJ, Fox en NPR. Wanneer Mediafly is ingesteld kunt u dezelfde inhoud bekijken op tv's, smartphones, computers en meer. Mediafly is wereldwijd beschikbaar, functies kunnen verschillen per land. Toegang tot Mediafly: 1.
WD TV Live/Live Plus HD-mediaspeler Gebruikershandleiding 4. Selecteer Sign in (Aanmelden) en druk daarna op ENTER. 5. U heeft twee mogelijkheden om u aan te melden bij uw Mediafly-account. Optie 1: ga op uw computer naar www.mediafly.com/wd en voer de code in van uw tv-scherm. Selecteer Continue (Doorgaan) en druk daarna op ENTER. Optie 2: selecteer Enter Mediafly User ID and password (Gebruikers-id en wachtwoord van Mediafly invoeren) en druk daarna op ENTER. Ga verder met stap 6-7. 6.
WD TV Live/Live Plus HD-mediaspeler Gebruikershandleiding Mediafly Player De lay-out van Mediafly lijkt op die van het normale scherm om video's af te spelen. Het geeft de statusbalk voor het afspelen weer en de verstreken en totale afspeeltijden. Druk op PLAY/PAUSE (Afspelen/Pauzeren) om het afspelen te onderbreken en te hervatten. Druk op FF/REV om met stappen van 10 seconden vooruit of terug te spoelen.
WD TV Live/Live Plus HD-mediaspeler Gebruikershandleiding View episodes (Afleveringen weergeven) 1. Druk op / om in de werkbalk te selecteren en druk daarna op ENTER. 2. De afleveringen van de podcast worden weergegeven. Druk op / om een podcast in de lijst te selecteren en druk daarna op ENTER. Show info (Informatie weergeven) 1. Druk op / om in de werkbalk te selecteren en druk daarna op ENTER. 2. Er wordt informatie over de podcast weergegeven. Druk op om de podcast verder te bekijken of te beluisteren.
WD TV Live/Live Plus HD-mediaspeler Gebruikershandleiding Een Mediafly-account van de mediaspeler verwijderen 1. Druk op het Mediafly-dashboard op / om My Channels (Mijn kanalen) selecteren en druk daarna op ENTER. 2. Druk op OPTIONS (Opties) en druk daarna op / om Manage Users (Gebruikers beheren) te selecteren. Druk op ENTER. 3. Druk op / ENTER. 4. Druk op / op ENTER. 5. Druk op / ENTER.
WD TV Live/Live Plus HD-mediaspeler Gebruikershandleiding 2. De lijst met internetservices wordt in alfabetische volgorde weergegeven. Druk op / voor het selecteren van Netflix en druk daarna op ENTER. Huidige Netflix-leden Volg de instructies op het scherm om met de afstandsbediening uw gebruikersnaam (dit is in de meeste gevallen het e-mailadres waarmee u bent geregistreerd) en wachtwoord op uw account in te loggen. Ga naar www.netflix.com/signinhelp als u problemen ondervindt.
WD TV Live/Live Plus HD-mediaspeler Gebruikershandleiding Pandora Pandora is een service die automatisch muziek aanbeveelt en webradio aanbiedt. Met Pandora kunt u de titel van een liedje of de naam van een artiest invoeren. De service speelt daarna selecties af die muzikaal soortgelijke kenmerken hebben. U kunt feedback geven (goedgekeurd/niet goedgekeurd) op afzonderlijke liedjes. Pandora houdt hiermee rekening voor toekomstige selecties.
WD TV Live/Live Plus HD-mediaspeler Gebruikershandleiding Voor de eerste keer aanmelden bij Pandora 1. Ga naar Home (Hoofdpagina) | menubalk Internet Media (Internetmedia) en druk daarna op ENTER. 2. De lijst met internetservices wordt in alfabetische volgorde weergegeven. Druk op / voor het selecteren van Pandora en druk daarna op ENTER. 3. Druk op ENTER om het scherm Add account (Account toevoegen) te openen. 4.
WD TV Live/Live Plus HD-mediaspeler Gebruikershandleiding Nadat u zich hebt aangemeld bij Pandora, verschijnt het scherm Stations (Zenders). Op dit scherm kunt u nieuwe zenders aanmaken, luisteren naar eerder aangemaakte zenders en een Quickmix-afspeellijst en profielvoorkeuren voor uw account instellen. Ga voor meer informatie over de functies, opties, en beperkingen van het gebruik van Pandora naar http://www.pandora.com.
WD TV Live/Live Plus HD-mediaspeler Gebruikershandleiding Een Pandora-zender aanmaken: 1. Druk in het scherm Stations (Zenders) op OPTION (Optie) en op / om Create a new station (Een nieuwe zender maken) te selecteren. Druk op ENTER. 2. Gebruik de navigatieknoppen om de naam van een artiest of titel van een liedje in te voeren met het toetsenbord op het scherm. Selecteer Submit (Verzenden) en druk daarna op ENTER. 3.
WD TV Live/Live Plus HD-mediaspeler Gebruikershandleiding Een Pandora-zender verwijderen: 1. Ga naar de zender die u wilt verwijderen en druk daarna op OPTION (Optie). 2. Druk op / om Delete Station (Zender verwijderen) te selecteren en druk daarna op ENTER. 3. Druk op / om OK te selecteren in het bevestigingsvenster en druk daarna op ENTER. U geeft als volgt het nummer weer dat nu wordt afgespeeld: 1.
WD TV Live/Live Plus HD-mediaspeler Gebruikershandleiding Duim omlaag Als u een nummer op een bepaalde zender niet wilt horen, kunt u het een duim omlaag geven. Deze negatieve feedback betekent: Het liedje wordt niet verder afgespeeld als u nog resterende skips van uw “zes skips per uur” hebt voor deze zender (deze limiet is per zender per uur op voortdurende basis). Het nummer wordt permanent verwijderd uit de afspeellijst van dit station.
WD TV Live/Live Plus HD-mediaspeler Gebruikershandleiding Waarom een nummer zich in de afspeellijst van mijn zender bevindt U kunt zien waarom Pandora een bepaald nummer in de afspeellijst van uw zender heeft opgenomen. De analyse van een liedje bekijken: Druk op / terwijl het nummer wordt afgespeeld om te selecteren en druk daarna op ENTER. De analyse van het nummer wordt weergegeven. Uw Pandora-zenders sorteren U sorteert uw Pandora-zenders als volgt op alfabetische volgorde: 1.
WD TV Live/Live Plus HD-mediaspeler Gebruikershandleiding TuneIn 's Werelds grootste radiogids op internet met toegang tot meer dan 30.000 gratis radiozenders die gezocht kunnen worden op locatie, genre of indeling. Zo opent u Tuneln: 1. Ga naar Home (Hoofdpagina) | menubalk Internet media (Internetmedia) druk daarna op ENTER. 2. De lijst met internetservices wordt in alfabetische volgorde weergegeven. Druk op / om Tuneln te selecteren en druk daarna op ENTER.
WD TV Live/Live Plus HD-mediaspeler Gebruikershandleiding 5. Noteer de activeringscode en volg de scherminstructies (ga naar http://radiotime.com/mydevice voor de bij uw account bijbehorende mediaspeler). Selecteer Continue (Doorgaan) wanneer u klaar bent en druk daarna op ENTER. 6. Selecteer Sign in (Aanmelden) en druk daarna op ENTER. 7. Gebruik de navigatieknoppen om uw Tuneln-gebruikersnaam met het toetsenbord op het scherm in te vullen en druk daarna op ENTER. 8.
WD TV Live/Live Plus HD-mediaspeler Gebruikershandleiding Opties zijn: Local Radio – Luister naar uw lokale zenders die in nummervolgorde worden weergegeven. Music (muziek) – Categoriseert uw lokale muziek radiozenders op genre. Talk (praat) – Categoriseert uw lokale praatradiozenders op type. Sports – Categoriseert lokale en nationale sportuitzendingen en programma's op type. By Location (op locatie) – Vind radiozenders over de hele wereld uit de lijst met regio's en landen.
WD TV Live/Live Plus HD-mediaspeler Gebruikershandleiding Een zender aan uw vooraf ingestelde lijst toevoegen Als u graag naar een bepaalde zender luistert, kunt u deze aan uw vooraf ingestelde lijst toevoegen om deze gemakkelijker te benaderen in de toekomst. Voer het volgende uit voor het toevoegen van een zender, programma, of podcast aan uw voorkeuzezenders: 1. Ga naar de zenderlijst met daarin de zender die u wilt toevoegen. 2.
WD TV Live/Live Plus HD-mediaspeler Gebruikershandleiding Zenderinformatie ophalen Over de huidige zender en nummer kunt u de informatie bekijken. 1. Druk, terwijl de zender wordt beluisterd of geselecteerd is, op OPTION (Optie) en daarna op / voor het selecteren van . Druk op ENTER. 2. Het informatiescherm wordt geopend en geeft informatie over genre, taal, het nummer dat wordt afgespeeld, het volgende nummer en de tijd. Druk op ENTER om terug te keren naar het vorige scherm.
WD TV Live/Live Plus HD-mediaspeler Gebruikershandleiding YouTube Hiermee kunt u op uw tv uw favoriete video's bekijken op 's werelds populairste videowebsite. Toegang tot YouTube: 1. Ga naar Home (Hoofdpagina) | menubalk Internet Media (Internetmedia) en druk daarna op ENTER. 2. De lijst met internetservices wordt in alfabetische volgorde weergegeven. Druk op / voor het selecteren van YouTube en druk daarna op ENTER. Het hoofdscherm van YouTube verschijnt. 3.
WD TV Live/Live Plus HD-mediaspeler Gebruikershandleiding Aanmelden bij uw YouTube-account Opmerking: Als u nog geen YouTube-account heeft en u er een wilt maken, gaat u naar www.youtube.com. 1. Ga naar Home (Hoofdpagina) | menubalk Video . 2. Druk op / voor het selecteren van YouTube en druk daarna op ENTER. 3. Druk op / iin het hoofdscherm van YouTube voor het selecteren van Account en druk daarna op ENTER. 4. Selecteer Sign in (Aanmelden) en druk daarna op ENTER. 5.
WD TV Live/Live Plus HD-mediaspeler Gebruikershandleiding Save username only (Alleen gebruikersnaam opslaan) – Uw gebruikersnaam wordt opgeslagen, maar u wordt naar uw wachtwoord gevraagd telkens als u de mediaspeler gebruikt om toegang te krijgen tot YouTube. Yes (Ja) – Zowel uw gebruikersnaam als uw wachtwoord wordt opgeslagen. U kunt zich later aanmelden bij uw account op het aanmeldingsscherm van YouTube. 8. De pagina My favorites (Mijn favorieten) wordt geopend.
WD TV Live/Live Plus HD-mediaspeler Gebruikershandleiding Zoeken naar video's U kunt op YouTube zoeken naar video's die voor u interessant zijn. De zoekresultaten zijn gebaseerd op de tags die zijn verbonden aan de geüploade video's. Uw zoekopdrachten worden opgeslagen in de mediaspeler, zodat u deze snel weer kunt oproepen. Opmerking: Video's die als “private (persoonlijk)” zijn gemarkeerd door gebruikers worden niet weergegeven in de zoekresultaten. Zoeken naar video's: 1.
WD TV Live/Live Plus HD-mediaspeler Gebruikershandleiding De zoekbewerking naar video's begint (dit kan enkele seconden duren). Video's die overeenkomen met uw zoekterm verschijnen in een videoselectiebalk. 3. Druk op / om in de weergave een video te selecteren. 4. Druk op of ENTER om de geselecteerde video te bekijken. Ga naar pagina 130 voor meer informatie over het gebruik van de YouTube Player. De zoekgeschiedenis gebruiken: 1.
WD TV Live/Live Plus HD-mediaspeler Gebruikershandleiding Topfavorieten Dit zijn video's die als favorieten zijn aangemerkt door de meeste YouTube-gebruikers. Toegang tot topfavorieten: 1. Druk op / in het hoofdscherm van YouTube voor het selecteren van Top Favorites (topfavorieten) en druk daarna op ENTER. Hint: U kunt ook op OPTION (Optie) klikken op een videoselectiepagina, op om te selecteren in de werkbalk en daarna op ENTER drukken. / 2.
WD TV Live/Live Plus HD-mediaspeler Gebruikershandleiding Aanbevolen video's Deze videocategorie wordt vooral gevuld met video's van de commerciële partners van YouTube, maar kan ook een selectie van gebruikersvideo's bevatten die op dit moment populair zijn of die eerder werden getoond in het onderdeel Spotlight Videos van YouTube. Toegang tot aanbevolen video's: 1. Druk op / in het hoofdscherm van YouTube voor het selecteren van Featured Videos (Aanbevolen video's) en druk daarna op ENTER.
WD TV Live/Live Plus HD-mediaspeler Gebruikershandleiding Meest populair Deze video's zijn het populairst bij YouTube-gebruikers. Toegang tot Most Popular (Populairst): 1. Druk op / in het hoofdscherm van YouTube voor het selecteren van Most popular (Meest populair) en druk daarna op ENTER. Hint: U kunt ook op OPTION (Optie) klikken op een videoselectiepagina, op om te selecteren in de werkbalk en daarna op ENTER drukken. / 2.
WD TV Live/Live Plus HD-mediaspeler Gebruikershandleiding Meest bekeken Deze video's worden het meest bekeken door YouTube-gebruikers. Toegang tot Most Viewed (Meest bekeken): 1. Druk op / in het hoofdscherm van YouTube voor het selecteren van Most viewed (Meest bekeken) en druk daarna op ENTER. Hint: U kunt ook op OPTION (Optie) klikken op een videoselectiepagina, op om te selecteren in de werkbalk en daarna op ENTER drukken. / 2.
WD TV Live/Live Plus HD-mediaspeler Gebruikershandleiding Als beste gewaardeerd Deze video's worden het hoogst beoordeeld door YouTube-gebruikers. Toegang tot Top Rated (Als beste gewaardeerd): 1. Druk op / in het hoofdscherm van YouTube om Top rated (Als beste gewaardeerd) te selecteren en druk daarna op ENTER. Hint: U kunt ook op OPTION (Optie) klikken op een videoselectiepagina, op om te selecteren in de werkbalk en daarna op ENTER drukken. / 2.
WD TV Live/Live Plus HD-mediaspeler Gebruikershandleiding Voorkeuren Via de voorkeuren kunt u kiezen van welk land de inhoud (video's en kanalen) wordt weergegeven die u wilt bekijken zonder de taal van de site te wijzigen. Toegang tot Preferences (Voorkeuren): 1. Druk op / in het hoofdscherm van YouTube voor het selecteren van Preferences (Voorkeuren) en druk daarna op ENTER. 2. De huidige locatie wordt gemarkeerd. Druk op ENTER. 3. Druk op / om een land in de lijst te selecteren en druk daarna op ENTER.
WD TV Live/Live Plus HD-mediaspeler Gebruikershandleiding YouTube Player De lay-out van de YouTube Player lijkt op die van het normale scherm om video's af te spelen. Het geeft de statusbalk voor het afspelen weer en de verstreken en totale afspeeltijden. Druk op om het afspelen te onderbreken en te hervatten. Druk op of om met stappen van 10 seconden vooruit of terug te spoelen.
WD TV Live/Live Plus HD-mediaspeler Gebruikershandleiding Gerelateerde video's Het scherm Related Videos (Gerelateerde video's) verschijnt na het afspelen van een video. Het scherm geeft een lijst met video's die mogelijk gerelateerd zijn aan de video die u net hebt afgespeeld op basis van het onderwerp. Dit maakt het gemakkelijker om te zoeken naar video's op basis van hetzelfde of een soortgelijk onderwerp.
WD TV Live/Live Plus HD-mediaspeler Gebruikershandleiding Video's waarderen U kunt video's waarderen met één tot vijf sterren tijdens of na het afspelen van een video. Opmerking: U moet zijn aangemeld bij uw YouTube-account om video's te kunnen waarderen. Zie “Aanmelden bij uw YouTube-account” op pagina 120 voor instructies- om aan te melden. Video's waarderen: 1. Druk tijdens het afspelen op OPTION (Optie). 2. Druk op / om te selecteren in de werkbalk en druk daarna op ENTER. 3.
WD TV Live/Live Plus HD-mediaspeler Gebruikershandleiding Video's toevoegen aan favorieten Als u een bepaalde video leuk vond of deze later opnieuw wilt bekijken, kunt u deze markeren als “favoriet” om deze toe te voegen aan uw lijst My Favorites (Mijn favorieten). Nadat u deze hebt toegevoegd, kunt u deze video blijven bekijken. Een video toevoegen aan My Favorites (Mijn favorieten) op het scherm Related Videos (Gerelateerde video's): 1.
WD TV Live/Live Plus HD-mediaspeler Gebruikershandleiding Een YouTube-account verwijderen van de mediaspeler Een YouTube-account verwijderen van de mediaspeler: 1. Druk op / iin het hoofdscherm van YouTube voor het selecteren van Account en druk daarna op ENTER. 2. Druk op / om Delete account (Account verwijderen) te selecteren en druk daarna op ENTER. 3. Druk op / op ENTER. om het account te selecteren dat u wilt verwijderen en druk daarna 4.
WD TV Live/Live Plus HD-mediaspeler Gebruikershandleiding Beperkte video-inhoud Sommige video's op YouTube zijn beperkt door de eigenaar van de inhoud en kunnen niet worden afgespeeld op apparaten die op een tv zijn aangesloten. Als u een van deze video's probeert af te spelen, wordt het volgende scherm weergegeven: Druk op ENTER om terug te keren naar het vorige scherm.
WD TV Live/Live Plus HD-mediaspeler Gebruikershandleiding 12 Instellingen en geavanceerde functies Met het instellingenmenu kunt u de manier bepalen waarop u de mediaspeler gaat gebruiken en voorkeursinstellingen voor het afspelen van media instellen. Om een categorie voor instellingen te selecteren: 1. Druk op HOME (Hoofdpagina), en selecteer daarna het pictogram voor instellingen 2. Druk op ENTER. / .
WD TV Live/Live Plus HD-mediaspeler Gebruikershandleiding Instellingen navigatieknoppen Gebruik deze knoppen op de afstandsbediening om binnen en tussen de instellingenschermen te navigeren. Knop Functie Pijl omhoog/omlaag • Een menu selecteren • Een menu-instelling in een optiescherm selecteren Pijl naar rechts Selecteer bestanden en mappen in File Management (Bestandsbeheer) ENTER Geeft het optiescherm voor het geselecteerde menu weer 1. Druk op ENTER. Er verschijnt een bevestigingsverzoek. 2.
WD TV Live/Live Plus HD-mediaspeler Gebruikershandleiding Video Output (Video-uitgang) Gebruik dit menu om een videosignaal te selecteren. Composite Wanneer u de standaard RCA A/V-kabel gebruikt (gele, rode en witte aansluitingen) om een verbinding te maken met de mediaspeler, selecteert u Composite in het videouitgangscherm. Er wordt u gevraagd om de tv-standaard voor uw apparaat te selecteren. Deze instelling hangt af van uw regionale locatie.
WD TV Live/Live Plus HD-mediaspeler Gebruikershandleiding HDMI Deep Color Mode (HDMI-modus voor diepe kleuren) Gebruik dit menu om het aantal voor verzending beschikbare HDMI-bits met diepe kleuren voor elk kanaal te verhogen. Een groter aantal bits betekent dat er meer tinten gemengd kunnen worden op het televisiescherm. De standaardinstelling is 8 bit (8-bits), wat compatibel is met de meeste televisies. U kunt echter de hogere kleurendiepte van 12 bit (12-bits) selecteren als uw televisie HDMI 1.
WD TV Live/Live Plus HD-mediaspeler Gebruikershandleiding Video Gebruik de menu's in de categorie Video voor het configureren van de opties voor de weergave en volgorde van videobestanden. Video Sequence (Videovolgorde) Gebruik dit menu om de modus voor video afspelen te selecteren. De standaardinstelling is Normal (Normaal). Ga naar “Gebruik van videoherhaling” op pagina 50 voor een beschrijving van deze afspeelmodi voor video.
WD TV Live/Live Plus HD-mediaspeler Gebruikershandleiding Browser Display (Browserscherm) Gebruik dit menu om de standaard weergavemodus voor het videokeuzescherm te selecteren. De standaardinstelling is Thumbnail mode (Miniatuurweergave). In de videodirectory toont dit miniatuurweergaven van aanwezige filmposters.
WD TV Live/Live Plus HD-mediaspeler Gebruikershandleiding Foto Gebruik de menu's in deze categorie voor het configureren van de weergavegrootte en de instellingen voor diavoorstellingen wanneer u uw afbeeldingen bekijkt. Browser Display (Browserscherm) Gebruik dit menu om te selecteren hoe mediabestanden in hun respectievelijke mappen worden weergegeven. De standaardinstelling is Thumbnail mode (Miniatuurweergave). In de fotodirectory toont dit miniatuurweergaven van aanwezige beeldbestanden.
WD TV Live/Live Plus HD-mediaspeler Gebruikershandleiding Diavoorstelling volgorde Gebruik dit menu om de volgordemodus van diavoorstellingen in te stellen. De standaardinstelling is Normal (Normaal). Zie “Een diavoorstelling herhalen en/of willekeurig afspelen” op pagina 65 voor een beschrijving van deze afspeelmodi voor diavoorstellingen. Photo Scaling (Verkleinen/vergroten van foto's) Gebruik dit menu om te bepalen welke schaalgrootte de afbeeldingen moeten hebben wanneer u deze bekijkt.
WD TV Live/Live Plus HD-mediaspeler Gebruikershandleiding Muziek Gebruik de menu's in de categorie Music settings (Muziekinstellingen) voor het configureren van de opties voor de weergave en volgorde van audiobestanden. Music sequence (Muziekvolgorde) Gebruik dit menu om de modus voor audio afspelen te selecteren. De standaardinstelling is Normal (Normaal). Zie “Om de muziek herhalingsmodus in te stellen:” op pagina 56 voor een beschrijving van deze afspeelmodi voor audio.
WD TV Live/Live Plus HD-mediaspeler Gebruikershandleiding Bestandsbeheer Met de functie bestandsbeheer kunt u bestanden kopiëren, verplaatsen of verwijderen van de aangesloten USB-apparaten of netwerkstations. Bestanden kopiëren, verplaatsen en verwijderen 1. Gebruik de navigatietoetsen om File Management (bestandsbeheer) te selecteren en druk daarna op ENTER. 2. Gebruik de navigatietoetsen om een bronlocatie te selecteren en druk daarna op ENTER. 3.
WD TV Live/Live Plus HD-mediaspeler Gebruikershandleiding 4. Nadat u de te kopiëren bestanden en mappen hebt geselecteerd, drukt u op OPTION (Optie) en selecteert u Copy (Kopiëren) , Move (Verplaatsen) of Delete (Verwijderen) . 5. Ga naar de doelmap van uw voorkeur en druk daarna op selecteren (alleen Copy en Move). om deze te 6. Druk op ENTER om de geselecteerde bestanden te kopiëren of te verplaatsen naar de doelmap, of om bestanden te verwijderen.
WD TV Live/Live Plus HD-mediaspeler Gebruikershandleiding Netwerk Gebruik de menu's in deze categorie om de netwerkinstellingen van de mediaspeler te configureren en te bekijken. Druk op / om een selectie te maken in de optielijst, en druk daarna op OK. Network Setup (Netwerk instellen) Zie “Network Setup (Netwerk instellen)” op pagina 24 voor informatie en instructies. Wireless Favorites (Draadloze favorieten) In dit menu wordt een overzicht met instellingen van uw draadloze netwerk weergegeven.
WD TV Live/Live Plus HD-mediaspeler Gebruikershandleiding Workgroup Name (Werkgroepnaam) Hiermee kunt zich op een specifieke werkgroep binnen uw netwerk aansluiten. Met besturingssystemen en apparatuur op basis van Microsoft binnen dezelfde werkgroep kunnen bestanden, printers of internetverbindingen onderling worden uitgewisseld. Leden van andere werkgroepen binnen hetzelfde lokale netwerk en een TCP/IP-netwerk kunnen alleen gebruikmaken van hulpbronnen binnen de werkgroepen waarop ze zijn aangesloten.
WD TV Live/Live Plus HD-mediaspeler Gebruikershandleiding Systeem Gebruik de menu's in deze categorie om de algemene functies van de mediaspeler te configureren. Druk op / om een selectie te maken in de optielijst, druk vervolgens op ENTER. Set Time Zone (Tijdszone instellen) Gebruik dit menu om uw lokale tijdszone te selecteren en de zomertijd Off (Uit) of On (Aan) te schakelen, zodat de mediaspeler de juiste tijd weergeeft. Language (Taal) Druk op ENTER.
WD TV Live/Live Plus HD-mediaspeler Gebruikershandleiding Screensaver Delay (Screensaver vertraging) Gebruik dit menu om de inactieve tijd van het systeem in te stellen voordat de screensaver wordt geactiveerd. De standaardinstelling is 5 minutes (5 minuten). Display File Size (Bestandsgrootte weergeven) Stel deze optie in op On (Aan) om informatie over de bestandsgrootte weer te geven in het scherm van de mediabrowser.
WD TV Live/Live Plus HD-mediaspeler Gebruikershandleiding Inhoud wissen Licentiesleutel Licentiesleutels horen bij afzonderlijke video's die gedownload worden via premium videoservices als BLOCKBUSTER On Demand en CinemaNow. Gebruik dit menu om de opslag voor de licentiesleutel te wissen.
WD TV Live/Live Plus HD-mediaspeler Gebruikershandleiding 4. Druk op / om System registration (Systeemregistratie) te selecteren en druk daarna op ENTER. 5. Druk op / op het scherm Register Product (Product registreren) om First Name (Voornaam) te selecteren en druk daarna op ENTER. 6. Gebruik de navigatieknoppen om met het schermtoetsenbord uw voornaam in te vullen. Selecteer Submit (Verzenden) en druk daarna op ENTER. 7. Druk op / om Last Name (Achternaam) te selecteren en druk daarna op ENTER. 8.
WD TV Live/Live Plus HD-mediaspeler Gebruikershandleiding Media Library (mediabibliotheek) Media Library (Mediabibliotheek) doorzoekt en consolideert de media-inhoud van een USB-schijf in een database waardoor u mediabestanden gemakkelijk kunt vinden. Deze functie staat standaard aan. De volgende situaties voorkomen dat Media Library (Mediabibliotheek) uw media verwerkt: Het USB-apparaat heeft alleen-lezen beveiliging. Er is onvoldoende ruimte op het USB-apparaat.
WD TV Live/Live Plus HD-mediaspeler Gebruikershandleiding Bewerken van metagegevens met Windows Media Player: 1. 2. 3. 4. Open Windows Mediaspeler. Klik op het tabblad Library (Bibliotheek). Rechtsklik op de titel of op een ander onderdeel om te bewerken. Wanneer het menu opent, klikt u op Edit (Bewerken).
WD TV Live/Live Plus HD-mediaspeler Gebruikershandleiding 13 Systeemonderhoud De systeemsoftware van uw mediaspeler kan worden geüpgraded naar de nieuwste release, waardoor de ondersteuning voor het afspelen van mediabestanden kan worden verbeterd, en bevat bug fixes en productverbeteringen. Om ervoor te zorgen dat u de nieuwste update ontvangt, raden wij u aan uw product te registreren op http://register.wdc.com.
WD TV Live/Live Plus HD-mediaspeler Gebruikershandleiding 2. Selecteer OK op de firmware-update-prompten druk daarna op ENTER. Hiermee start u het apparaat opnieuw op. 3. Na opnieuw te zijn opgestart, gaat het systeem onmiddellijk in de firmwareupgrademodus. 4. Na het beëindigen van het update-proces wordt de mediaspeler automatisch herstart. Wanneer de HD-mediaspeler opnieuw is opgestart, wordt de nieuwe firmware automatisch geladen. Handmatig Ga als volgt te werk om de firmware handmatig te updaten: 1.
WD TV Live/Live Plus HD-mediaspeler Gebruikershandleiding Problemen oplossen Probleem Oplossing SCHERM Het tv-scherm is leeg en het stroomLED van de mediaspeler blijft uit. • Zorg ervoor dat de tv is aangezet. • Zorg ervoor dat de stroomadapter en het stopcontact in orde zijn. • Zorg ervoor dat de interfacekabel goed is aangesloten op de juiste uitgangen op zowel de tv als de mediaspeler. Het tv-scherm is leeg en het stroomLED van de mediaspeler knippert.
WD TV Live/Live Plus HD-mediaspeler Gebruikershandleiding Probleem Oplossing De videoweergave wordt afgebroken of verschijnt in een zijbalk. Navigeer naar het scherm Home (Hoofdpagina) | Settings (Instellingen) | Audio/Video en zorg ervoor dat de beeldverhouding op Normal (Normaal) is ingesteld. De afbeeldingen van de diavoorstelling zijn vervormd.
WD TV Live/Live Plus HD-mediaspeler Gebruikershandleiding Probleem Oplossing AFSTANDSBEDIENING De afstandsbediening van de mediaspeler functioneert niet. • Druk per keer slechts op één knop. • Zorg ervoor dat de batterijen goed geplaatst zijn. • De batterijen kunnen al zijn leeggelopen. Vervang de batterijen voor nieuwe. • Zorg ervoor dat het signaal tussen de afstandsbediening en de mediaspeler niet geblokkeerd wordt.
WD TV Live/Live Plus HD-mediaspeler Gebruikershandleiding Gangbare foutmeldingen Als deze melding verschijnt Voer deze actie uit HOME (Hoofdpagina) De harde schijf kan niet aggregeren. Er zijn verschillende omstandigheden waarin deze foutmelding kan verschijnen. De melding zal het probleem weergeven. Er is bijvoorbeeld niet voldoende ruimte op de opslag of een journaled file system gebruikt. Geen opslagruimte aanwezig. Sluit het USB-apparaat aan waarop uw mediabestanden staan.
WD TV Live/Live Plus HD-mediaspeler Gebruikershandleiding Als deze melding verschijnt Voer deze actie uit Het is niet mogelijk om het geselecteerde bestand af te spelen. Zie de gebruikershandleiding voor een lijst van ondersteunde bestandsformaten. 1. Verwijder het USB-apparaat van de mediacenter of koppel een schijf aan de mediacenter terwijl het bestand gevonden is. 2.
WD TV Live/Live Plus HD-mediaspeler Gebruikershandleiding 14 Bijlage Afspelen van meerdere bestandsindelingen Multiformat is een bestandstype dat andere bestanden met dezelfde digitale inhoud groepeert, maar die in verschillende digitale indelingen gecodeerd kunnen zijn. Een enkel videobestand kan bijvoorbeeld feitelijk een paar componenten als video, audio en foto samengegroepeerd hebben. De mediaspeler kan diverse verschillende typen multiformat-bestanden afspelen.
WD TV Live/Live Plus HD-mediaspeler Gebruikershandleiding Ondersteunde indelingen Bestandsnaam extensie Codec Indeling/container VIDEO .AVI Video: Xvid AVC MPEG1/2/4 WMV9 VC-1 Audio: MPEG Audio PCM Dolby Digital DTS AVI .MPG/.MPEG Video: MPEG1/2 Audio: MPEG Audio Dolby Digital DTS PCM mpeg ps .MKV Video: h.264 x.264 AVC MPEG1/2/4 WMV9 VC-1 Audio: MPEG Audio PCM Dolby Digital DTS AAC MKV .TS/.TP/.M2T Video: MPEG1/2/4 AVC VC-1 Audio: MPEG Audio Dolby Digital DTS TS .MP4/.
WD TV Live/Live Plus HD-mediaspeler Gebruikershandleiding Bestandsnaam extensie Codec Indeling/container .ASF/.DVR-MS/.WMV Video: MPEG2 WMV9 VC-1 Audio: WMA/WMA Pro Dolby Digital ASF .VOB/.ISO Video: MPEG1/2 Audio: MPEG Audio Dolby Digital DTS PCM VOB/ISO .M2TS Video: MPEG1/2/4 AVC VC-1 Audio: MPEG Audio Dolby Digital DTS M2TS .WMV9 VC-1 WMV9 .FLV H.264 FLV Voor digitale uitvoer voor multikanaals surroundsound is een audio-ontvanger vereist. Video-gegevens: 1.
WD TV Live/Live Plus HD-mediaspeler Gebruikershandleiding Bestand Codec Indeling/container AUDIO MP1/2/3/a MPEG audio Geen AAC MPEG 2/4 AAC LC/HE 1. ADTS 2. ADIF M4A/MP4A MPEG 2/4 AAC LC/HE Quicktime FLAC FLAC FLAC WAV PCM (Microsoft®) WAVE LPCM/PCM PCM Geen OGG OGG VORBIS OGG WMA WMA ASF AIF/AIFF PCM AIFF MKA 1. MPEG audio 2. MPEG 2/4 AAC LC/HE 3.
WD TV Live/Live Plus HD-mediaspeler Gebruikershandleiding Type Bestandsnaam Codec Resolutie Overige beperkingen FOTO's Alleen gecomprimeerde RGB JPEG-indelingen en progressieve JPEG tot 2048. Alleen éénlaags TIFF-bestanden. Alleen niet-gecomprimeerde BMP. niet aanwezig geeft aan dat er momenteel geen beperkingen bekend zijn.
WD TV Live/Live Plus HD-mediaspeler Gebruikershandleiding Wettelijke conformiteit FCC Klasse B-informatie Deze apparatuur is getest en in overeenstemming bevonden met de eisen voor een digitaal apparaat van Klasse B, conform Deel 15 van de FCC-bepalingen. Deze normen bieden redelijke garantie tegen schadelijke storingen bij installatie in een woonomgeving.
WD TV Live/Live Plus HD-mediaspeler Gebruikershandleiding Le symbole CE indique que ce système est conforme aux directives du Conseil de l'Union Européenne, notamment à la Directive CEM (2004/108/CE) et la Directive Basse tension (2006/95/CE). Une "déclaration de conformité" aux directives applicables a été déposée auprès de Western Digital Europe.
WD TV Live/Live Plus HD-mediaspeler Gebruikershandleiding KCC-aankondiging (alleen de Republiek Korea) 기종별 B 급 기기 ( 가정용 정보통신기기 ) 사용자 안내문 이 기기는 가정용으로 전자파적합충족을 한 기기 로서 주거지역에서는 물론 모든 지역에서 사용할 수 있습니다 . Klasse B apparaat 1. Dit apparaat is goedgekeurd voor niet-zakelijke doeleinden en mag overal worden gebruikt, inclusief woonomgevingen. Compliantie met milieuwetten (China) Garantie-informatie Service verkrijgen WD waardeert u als klant en stelt alles in het werk om u de beste service te leveren.
WD TV Live/Live Plus HD-mediaspeler Gebruikershandleiding Beperkte garantie WD garandeert dat het product bij normaal gebruik, volgens onderstaande garantieperiode, vrij is van gebreken in materiaal en vakmanschap en derhalve voldoet aan de specificaties van WD. De duur van uw beperkte garantie hangt af van het land waarin uw product is aangeschaft.
WD TV Live/Live Plus HD-mediaspeler Gebruikershandleiding Rovi ™ Sluit het apparaat aan niet via een videorecorder. Videosignalen via videorecorders kunnen worden beïnvloed door systemen voor bescherming van copyright en kunnen vervormd worden weergegeven op de televisie. Microsoft Dit product bevat technologie die onderhevig is aan bepaalde rechten van Microsoft aangaande intellectueel eigendom.
WD TV Live/Live Plus HD-mediaspeler Gebruikershandleiding Index A Accessoires 3 AccuWeather.
WD TV Live/Live Plus HD-mediaspeler Gebruikershandleiding F G Facebook aanmelden 85 afsluiten 87 foto uploaden 60 foto's 86 foto's opties 86 Nieuwsfeed 85 notificaties 87 video uploaden 44 video's 87 Vrienden 87 wand 86 firmware upgrade problemen oplossen 159 procedure 155 Flickr 88 fotostream 90 inhoud verkennen 88 player 91 zoeken naar een lid 90 Flingo 92 foto's bekijken 57 informatiepaneel 62 meedraaien 61 menuopties 60 MLB-categorieën 37 ondersteunde indelingen 162 ondersteuning voor digitale camera
WD TV Live/Live Plus HD-mediaspeler Gebruikershandleiding informatiepaneel diavoorstelling 64 foto's 62 muziek 55 video's 46 Inhoud Licentiesleutel wissen 151 Inhoud van het pakket 11 installatie composiet AV-aansluiting 18 HDMI-aansluiting 16, 19 stroomverbinding 14, 17, 18 USB-aansluiting 20 vereisten 11 instellingen Audio/Video menu 137 Filmmenu 140 Fotomenu 142 Instellingen menubalk 136 Navigatie instellingenscherm 137 netwerk 147 nieuwe waarden toepassen 137 Systeemmenu 147, 149 L LED-indicatoren sta
WD TV Live/Live Plus HD-mediaspeler Gebruikershandleiding Netwerkservices bestanden overdragen 69 netwerkshare 147 bestanden delen inschakelen 69 netwerkshares 67 NTSC 138 R O scherm problemen oplossen 157 Setup tijdszone selecteren 149 shuffle-modus muziek 56 Software, GPL 170 stroom aan/uit-knop 32, 33 AC-connector 8 Algemene configuraties van netadapters* 14 inschakelen 14, 17, 18 kabelaansluiting 14 LED-indicator 9 systeemcompatibiliteit 11 Systeeminstellingmenu's apparaat bijwerken 151 automatisch
WD TV Live/Live Plus HD-mediaspeler Gebruikershandleiding T temperatuursweergave 77 Thuistheater aansluiting 19 tijd Instellen 149 Toslink connectoren 8 TuneIn 114 aanmelden 114 afmelden 118 een zender aan uw vooraf ingestelde lijst toevoegen 117 een zender uit uw vooraf ingestelde lijst verwijderen 117 luisteren 115 Luisteren naar een zender in uw lijst met voorkeuzezenders 117 Melden van Problemen 118 zenderinformatie ophalen 118 zoeken 116 U Uitwerpfunctie knop 33, 34 procedure 22 USB-apparaat aansluit
WD TV Live/Live Plus HD-mediaspeler Gebruikershandleiding Z Zoeken naar media-inhoud handmatig zoeken 38 Zoekfunctie 39 Zoekfunctie knop 32, 33 procedure 39 zoomopties foto's 62 video's 49 INDEX – 177