
User Guide


WESTERN DIGITAL HARD DRIVE
INSTALL THE HARD DRIVE WITHOUT A CONTROLLER CARD - 5
INSTALLATION GUIDE
Install the Hard Drive
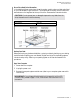
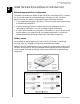
1. Connect the IDE Interface Cable to the Hard Drive(s).
a) If installing the hard drive as the only drive on the cable:
Connect the black connector of the IDE interface cable to the drive.
b) If installing two drives on the same IDE interface cable:
Configure the bootable drive as Master and the other drive as Slave; then connect the
Master drive to the black connector of the IDE interface cable and the Slave drive to the
gray connector.
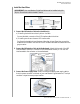
2. Connect the IDE Interface Cable to the Motherboard: Attach the blue end of the IDE
interface cable to the 40-pin connector on the motherboard. Match pin 1 on the IDE
interface cable to the connector on the motherboard..
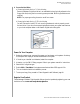
3. Connect the Power Supply Cable: Attach the computer system power supply cable to
the 4-pin power connector on the back of your new Western Digital hard drive. The 4-pin
connector is keyed to ensure proper insertion.
IMPORTANT: Your new Western Digital hard drive must be installed using the
40-pin, 80 conductor cable included in the kit.