MY PASSPORT SSD ™ Portable Hard Drive User Manual
Accessing Online Support Visit our product support website at http://support.wdc.com and choose from these topics: ▪ Downloads — Download software and updates for your WD product ▪ Registration — Register your WD product to get the latest updates and special offers at http://register.wdc.com. You can also register using WD Discovery software.
Table of Contents _________ Accessing Online Support.................................................................................ii _________ 1 About Your WD Drive.................................................................................... 1 Features.............................................................................................................................1 Kit Contents.............................................................................................................
_________ 6 Managing and Customizing the Drive........................................................ 17 Checking Drive Health................................................................................................... 17 Safely Disconnecting the Drive ....................................................................................18 Erasing the Drive............................................................................................................ 18 Using the Drive Erase Function....
Australia/New Zealand..................................................................................................... 31 Warranty............................................................................................................................ 32 Obtaining Service..............................................................................................................
About Your WD Drive 1 About Your WD Drive Welcome to your My Passport™ SSD portable hard drive. This drive offers high capacity in a sleek portable device. It features ultra-fast USB 3.1 connectivity, local and cloud backup, and password protection to help protect your files from unauthorized use.
About Your WD Drive Kit Contents As shown in figure 1, your My Passport SSD drive kit includes the following: Figure 1: My Passport SSD Portable Hard Drive Kit Components ▪ My Passport SSD portable hard drive, with WD Discovery software (includes WD Backup, WD Security and WD Drive Utilities) ▪ USB 3.1 Type-C cable ▪ Type-C to A adapter ▪ Quick install guide Optional Accessories For information about optional accessories for WD products, visit www.wdc.
About Your WD Drive For highest performance and reliability, always install the latest updates and service pack (SP). For Windows computers, go to the Start menu and select Windows Update. For Mac computers, go to the Apple menu and select Software Update. Disk Drive Format Your My Passport SSD drive is formatted as a single exFAT partition for compatibility with updated Windows and Mac OS X operating systems. To use with other operating systems, see Reformatting the Drive and Troubleshooting.
About Your WD Drive ▪ Do not move the drive during activity.
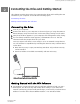
Connecting the Drive and Getting Started 2 Connecting the Drive and Getting Started This chapter provides instructions for connecting the drive and installing the WD software on your computer. It includes the following topics: Connecting the Drive Getting Started with the WD Software Connecting the Drive 1. Turn on your computer. 2. Connect the drive to your computer as shown in figure 3. If using the USB-C to USB-A adapter, verify the arrows are on the same side, pointing at each other. 3.
Connecting the Drive and Getting Started 2. For Mac, open WD Discovery for Mac.dmg to install WD software to help set drive security and modify drive settings. If you don’t have internet connectivity, please install WD Security™ and WD Drive Utilities™ from the WD Software Offline Installers > For Mac folder.
Backing Up Files 3 Backing Up Files This chapter includes the following topics: How the Backup Function Works Backing Up Files How the Backup Function Works The WD Backup software is a scheduled backup application that automatically backs up the files that you select on the schedule that you specify. When you create a backup plan, you specify the backup: ▪ Target—the external storage device where you will copy your files for backup protection.
Backing Up Files [Root]\Drivers\, [Root]\Temp\, System Volume Information, WD Backup.swstore, .WD Hidden Items, WD SmartWare.swstor, [Windows] ▪ Extensions: .ds_store, .temp, .tmp, .wdsync ▪ Start value: ~ ▪ End values: desktop.ini, .dropbox, .dropbox.attr, hiberfil.sys, -journal, pagefile.sys, thumbs.db Backing Up Files 1.
Backing Up Files 4. On the Automatic Backup Schedule screen, select the option for the automatic backup schedule that you want: Selecting . . . Configures automatic backups . . . Hourly Every hour, on the hour, 24 hours/day, 7 days/ week. Daily Once a day, on the days of the week you select, at the hour or half-hour you specify. For a daily backup: 1. Select or clear the Days check boxes to specify the days of the week you want to run your backup. 2.
Backing Up Files back up. Note that selecting the check box for a folder automatically selects the check boxes for all of the files and subfolders in the folder. c. Clear the check box for each file and folder that you do not want to include in the backup. Note also that clearing the check box for a folder automatically clears the check boxes for all of the files and subfolder in the folder. Note: The default backup source is everything in the Windows Users folder for your computer user name.
Restoring Files 4 Restoring Files This chapter includes the following topics: How the Restore Function Works Restoring Files How the Restore Function Works The WD Backup software makes it easy for you to restore backed up files from your backup target device to either: ▪ Their original locations on the backup source device ▪ Any other location you select Restore is generally a four-step process: 1. Select the backup target device and the scheduled backup that has the files you want to restore. 2.
Restoring Files c. Click Select Files to Restore to display the Restore Files screen with the earliest backup selected by default in the View files from list. 3. On the Restore Files screen: a. In the View files from list, select the backup that has the files you want to restore. b. Use the folder structure view of the selected backup to specify the files that you want to restore: IF you want to restore . . . THEN . . .
Locking and Unlocking the Drive 5 Locking and Unlocking the Drive This chapter includes the following topics: Password Protecting the Drive Unlocking the Drive Changing Your Password Turning Off the Drive Lock Feature Password Protecting the Drive You should password protect your drive if you are worried that someone else will gain access to your drive and you do not want them to see your files on the drive. A password can be used to lock and unlock your drive.
Locking and Unlocking the Drive Note: When you create a password, the drive begins to protect your data. This listing appears: ▪ The next time you shut down and restart your computer ▪ When you remove and reconnect the My Passport SSD drive ▪ Your computer exits the sleep mode, depending on its configuration The listing appears regardless of whether the drive is locked or not, or whether you selected the Enable auto unlock for this computer... check box when you created your password.
Locking and Unlocking the Drive 2. If you have more than one supported device connected to your computer, select the one that is locked to display the Unlock Drive dialog. 3. On the Unlock Drive dialog: a. Type your password in the Password box. b. Click Unlock Drive. With the WD Drive Unlock Utility Whenever you connect your password-protected drive to a computer that does not have the WD Security or WD Drive Utilities software installed, you can use the WD Drive Unlock utility to unlock the drive.
Locking and Unlocking the Drive After changing a password, the drive remains unlocked for as long as you continue your current work session. Then the WD Security software: ▪ ▪ Locks the drive when you shut down your computer, disconnect your drive, or your computer goes into the sleep mode Requires you to type your password to unlock the drive when you restart your computer or reconnect your drive, UNLESS you selected the Enable auto unlock for this computer...
Managing and Customizing the Drive 6 Managing and Customizing the Drive This chapter includes the following topics: Checking Drive Health Safely Disconnecting the Drive Erasing the Drive Registering the Drive Restoring the WD Software The My Passport SSD software makes it easy for you to manage and customize your drive for the best possible performance: ▪ Diagnose—Run diagnostics and status checks to make sure your drive is working properly.
Managing and Customizing the Drive 1. There are two ways to run WD Drive Utilities: a. If you have WD Discovery installed and open, you can run WD Drive Utilities by going to the Apps tab, finding WD Drive Utilities and clicking Open. b. Otherwise, you can run WD Drive Utilities from the Windows Start menu by clicking Start > All Programs > WD Discovery > More WD Apps > WD Drive Utilities or Start > All Programs > WD Apps > WD Drive Utilities. 2.
Managing and Customizing the Drive b. Otherwise, you can run Drive Utilities from the Windows Start menu by clicking Start > All Programs > WD Discovery > More WD Apps > WD Drive Utilities or Start > All Programs > WD Apps > WD Drive Utilities. 2. If you have more than one supported drive connected to your computer, select the one that you want to erase. 3. On the WD Drive Utilities screen, click Drive Erase to display the drive erase dialog. 4. On the drive erase dialog: a.
Managing and Customizing the Drive Note: Erasing your drive also removes your password. If you still want to use a password to protect your drive, you will need to re-create it after restoring the WD software. (See Password Protecting the Drive.) Registering the Drive The WD Discovery software uses your computer’s Internet connection to register your drive. Registering the drive provides free technical support during the warranty period and keeps you up-to-date on the latest WD products.
Managing and Customizing the Software 7 Managing and Customizing the Software This chapter includes the following topics: Configuring Your Cloud Service Account Uninstalling the WD Software Configuring Your Cloud Service Account Before you can use a cloud service as a backup source or target device, you must configure your account for access by the WD Backup software. 1.
Managing and Customizing the Software 4. On the connection dialog: a. Click Sign In. The WD Backup software initiates a connection request on your behalf and uses your Web browser to access the Dropbox website. b. On the Dropbox website, if you have not configured your account to remember your login credentials, type your email address and password and click Sign In to see the connection request from the WD Backup software. c. Click Allow to accept the connection request. d.
WD Discovery 8 WD Discovery The WD Discovery application, a collection of drive management tools such as WD Security and WD Backup, can be installed from your My Passport SSD drive. WD Discovery is a tray application; a small icon appears in the Windows system tray in the lower right-hand corner of the screen. The application can also be "unpinned", which causes the application to open in a window.
WD Discovery Using WD Discovery By default, the WD Discovery application is visible in the system tray. If it suddenly seems to be missing, it is likely the application has been "unpinned," which means the application is running in a window. It is recommended that you register your drive as soon as possible.
WD Discovery My Passport SSD User Manual 25
Using the Drive with a Mac Computer 9 Using the Drive with a Mac Computer The My Passport SSD drive is formatted as a single exFAT partition for compatibility with updated Windows and Mac OS X operating systems. To use Time Machine on the Mac OS X operating system, you must reformat the drive to a single HFS+J partition, which will remove compatibility with Windows operating systems.
Troubleshooting 10 Troubleshooting This chapter includes the following topics: Installing, Partitioning, and Formatting the Drive Frequently Asked Questions If you have problems installing or using this product, refer to this troubleshooting section or visit our support website at http://support.wdc.com and search our knowledge base for more help.
Troubleshooting Why won't my computer boot when I connect my USB drive to the computer before booting? Depending on your system configuration, your computer might try to boot from your WD portable USB drive. Refer to your system’s motherboard BIOS setting documentation to disable this feature or visit http:// support.wdc.com and see Knowledge Base answer ID 1201. For more information about booting from external drives, refer to your system documentation or contact your system manufacturer.
Compliance and Warranty Information 11 Compliance and Warranty Information This appendix includes the following topics: Regulatory Compliance Environmental Compliance (China) Warranty Information Regulatory Compliance FCC Class B Information Operation of this device is subject to the following conditions: ▪ This device may not cause harmful interference. ▪ This device must accept any interference received, including interference that may cause undesired operation.
Compliance and Warranty Information (2014/30/EU) and RoHS Directive (2011/65/EU). A “Declaration of Conformity” in accordance with the applicable directives has been made and is on file at Western Digital Europe. Environmental Compliance (China) Warranty Information Obtaining Service WD values your business and always attempts to provide you the very best of service.
Compliance and Warranty Information to WD’s specification therefor. The term of your limited warranty depends on the country in which your Product was purchased. The term of your limited warranty is for 3 years in the North, South and Central America region, 3 years in the Europe, the Middle East and Africa region, and 3 years in the Asia Pacific region, unless otherwise required by law. The term of your limited warranty period shall commence on the purchase date appearing on your purchase receipt.
Compliance and Warranty Information No other warranties either express or implied by law, including but not limited to those contained in the Sale of Goods Act, are made with respect to the Product. If you purchased your Product in New Zealand for the purposes of a business, you acknowledge and agree that the New Zealand Consumer Guarantees Act does not apply. In Australia, our goods come with guarantees that cannot be excluded under the Australian Consumer Law.
Compliance and Warranty Information DELETION ALTERATION OF DATA. NOTE THAT YOU SHALL BE RESPONSIBLE FOR THE LOSS, CORRUPTION, DELETION OR ALTERATION OF DATA HOWSOEVER CAUSED, AND FOR BACKING UP AND PROTECTING DATA AGAINST LOSS, CORRUPTION, DELETION OR ALTERATION. YOU AGREE TO CONTINUALLY BACK UP ALL DATA ON THE PRODUCT, AND TO COMPLETE A BACKUP PRIOR TO SEEKING ANY GENERAL SERVICE AND TECHNICAL SUPPORT FROM WD.
Index A I Australia/New Zealand 31 ICES-003/NMB-003 compliance 29 B K Backup about backing up files 7 procedure 8 Box contents 2 Kit contents 2 C CAUTION about erasing the drive 18 lost passwords 13 China RoHS, environmental compliance 30 Cloud service, configuring 21 Compatibility with operating systems 2 Compliance, regulatory 29 Converting drive format 27 Creating a password 13 D Disconnecting the drive 18 Disk image, downloading and restoring 20 Drive diagnostics and status checks 17 disconnect
W Warranty information 30, 32 WD service, obtaining 30, 33 WD Drive Utilities software Drive Erase dialog 19 Register Your Device dialog 20 WD Software, downloading and restoring 26 My Passport SSD User Manual 35
. WD, the WD logo, My Passport, WD Backup, WD Drive Utilities and WD Security are registered trademarks or trademarks of Western Digital Corporation or its affiliates in the U.S. and/or other countries. All other marks are the property of their respective owners. Picture shown may vary from actual product. Product specifications subject to change without notice. Apple, Mac, OS X, and Time Machine are trademarks of Apple Inc., registered in the U.S. and other countries.