
User Manual


2
Connecting the Drive and Getting Started
This chapter provides instructions for connecting the drive and installing the WD
software on your computer. It includes the following topics:
Connecting the Drive
Getting Started with the WD Software
Connecting the Drive
1. Turn on your computer.
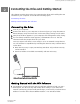
2. Connect the drive to your computer as shown in
figure 3. If using the USB-C to
USB-A adapter, verify the arrows are on the same side, pointing at each other.
3. Verify that the drive appears in your computer's file management utility listing.
4. If a Found New Hardware screen appears, click Cancel to close it. The WD
software installs the proper driver for your drive.
Your My Passport SSD drive is now ready to use as an external storage device.
You can enhance its capabilities by installing the WD Discovery software that is
on the drive:
▪ Once WD Discovery is open, WD Backup (Windows only) and WD Security
can be installed
▪ WD Drive Utilities is installed automatically with WD Discovery
Figure 3: Connecting the My Passport SSD Drive
Getting Started with the WD Software
1. For Windows, run WD Discovery.exe to install WD software to help you get a
backup plan, set drive security and modify drive settings. If you don’t have
internet connectivity, please install WD Backup
™
, WD Security
™
and WD Drive
Utilities
™
from the WD Software Offline Installers > For Windows folder.
Connecting the Drive and Getting Started
My Passport SSD
User Manual
5