
User`s guide


4.6.1. Implementing IP Security
The NPS can be configured to restrict unauthorized IP addresses from Telneting to the unit.
This allows the user to grant Telnet access to only a specific group of IP addresses, or block a
particular IP address from gaining access. In the default state, the NPS accepts incoming IP
connections from all hosts. To configure the IP Security feature, proceed as follows:
1. Access the Network Parameters menu as described in Section 4.6. Note that the Network
Parameters menu is not available in User Mode.
2. When the Network Parameters menu appears, type 4 and press [Enter] to access the IP
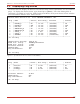
Security menu (Figure 8).
3. The IP Security menu lists five IP Security "masks" along with the selected permit/deny
action for each mask.
a) Each Security Mask prompt is used to define a specific IP address or range of IP
addresses. Each Mask Action prompt is used to define the permit/deny action for the
corresponding Mask.
b) Masks are listed in order of ascending priority; Mask 1 has the lowest priority, Mask
5 has the highest priority.
c) Masks have a cumulative effect; high priority masks supersede the effect of lower
priority masks.
d) Each IP Address consists of a series of four eight bit numbers. The number 255 is
used as a wild card.
14
NPS Series - Network Power Switches, User's Guide Start-Up / Configuration
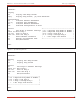
IP SECURITY
1. Security Mask #1: (undefined)
2. Mask #1 Action: Permit
3. Security Mask #2: (undefined)
4. Mask #2 Action: Permit
5. Security Mask #3: (undefined)
6. Mask #3 Action: Permit
7. Security Mask #4: (undefined)
8. Mask #4 Action: Permit
9. Security Mask #5: (undefined)
10. Mask #5 Action: Permit
Enter Selection or <ESC> to Exit
Figure 8: IP Security Menu