
Installation guide


3
3-64
UltraNet Storage Director Hardware Installation Guide
DAT Drive Replacement Procedure
7. Place the DAT drive in an anti-static bag and return it to the
factory.
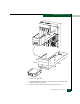
8. Remove the new DAT drive from its container and, while
carefully moving the cables out of the way, insert it into the
auxiliary drive chassis.
9. Using the Phillips screwdriver, secure the DAT drive to the
auxiliary drive chassis with the screws removed in step 5.
10. Replace the data cable.
11. Slide the auxiliary drive chassis into the USD-X.
12. Using the medium straight slot screwdriver, fasten the auxiliary
drive chassis into place with the screws located on the front of the
auxiliary drive chassis.
13. Boot the application processor connected to the DAT drive with
the
boot -r command. This causes the application processor to
reprobe for all attached hardware devices.
Chapter 6, Using the Tape Utility for Backups and Restores, provides
the procedures for performing full and incremental backups using
the Tape Utility.
Application
Processor Backup
and Restore
Procedures for a
DAT Drive
The application processor backup and restore procedures in this
section describe how to backup and restore the configuration created
and saved by the Graphical Configuration Interface to the DAT tape
drive. Backup and restores should be part of routine maintenance
procedures, use the backup and restore utility to run complete
backups and restores.
Configuration Backup
Procedure for a DAT
Drive
This procedure defines how to backup USD configurations created
and saved with the GCI to tape using the tar command. The
configurations are stored in a subdirectory named for the
configuration, which is located in the /cnt/configs/offline directory. This
procedure describes a method using full path names for backup,
which also applies to any subsequent restores.
1. Login as root.
2. Install a DAT tape that is not write locked.
3. To backup all the configurations enter this command:
tar -cvf /dev/rmt/0 /cnt/configs/offline