
User`s guide


5-32
PollCat NetLink II - User’s Guide
Adding IP Addresses to the Allow and Deny Lists
To add an IP Address to the Allow or Deny list, and begin configuring the
IP Security feature, proceed as follows.
Notes:
• Both the Allow and Deny list can include Linux operators, wild
cards, and net/mask pairs.
• In some cases, it is not necessary to enter all four "digits" of the
IP Address. For example, if you wish to allow access to all IP
addresses that begin with "192", then you would only need to
enter "192."
• The IP Security Configuration menu is only available to accounts
that allow access to Administrator level commands.
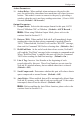
1. Access the IP Security Configuration Menu. From the Main Menu,
type 22 and press [Enter] to access the Port Configuration Menu, then
type 23 and press [Enter] to access the Network Port Configuration
menu. From the Network Configuration menu, type
6 and press
[Enter] to display the IP Security Menu, shown in Figure 5.14.
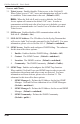
2. Allow List:
a) From the IP Security Menu, type 1 and press [Enter] to access
the Allow List.
b) Enter the IP Address(es) for the clients that you wish to allow.
Note that if an Address is found in the Allow List, the client will
be allowed to connect, and NetLink will not check the Deny List.
c) Note the number for the first empty field in the Allow List, then
type that number at the command prompt, press [Enter], and then
follow the instructions in the resulting submenu.
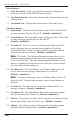
CLIENT LIST FOR “hosts.allow”:
1. (undefined)
2. (undefined)
3. (undefined)
4. (undefined)
5. (undefined)
6. (undefined)
7. (undefined)
8. (undefined)
Enter selection,
Press <ESC> to return to previous menu ...
Figure 5.15: IP Security: The Allow List