WESTFIRE INSET STOVES MODELS: WF32/UNIQ 32 NARROW AND WIDE FRAME, WF23/UNIQ 23 INSET STOVE IMPORTANT These appliances will become very hot during operation; a glove is provided for use when the stove is hot. We recommend that a guard should be used for the protection of the young, elderly and vulnerable. Do not burn rubbish or pre sawn / treated timber in this appliance. Please read the instruction manual carefully before installation and use. Please keep this manual for future reference.
UK: Installation Manual and Operating instructions WESTFIRE WF23/UNIQ 23 INSET, WESTFIRE WF32/UNIQ32 INSET This manual refers to the stove type listed above, which has been tested in accordance with EN13240. Congratulations on your purchase of a new wood burning stove from Westfire ApS. Please read this manual carefully in order to ensure that you get maximum enjoyment from your new stove and to prevent any problems.
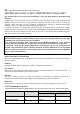
PREPARATORY WORK AND SAFETY CHECKS - IMPORTANT WARNING This stove must not be installed into a chimney that serves any other heating appliance. There must not be an extractor fan fitted in the same room as the stove as this can cause the stove to emit fumes into the room.
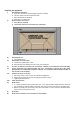
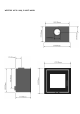
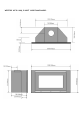
WF 23 / UNIQ 23 BUILDERS APERTURE SIZE WF 32 / UNIQ 32 BUILDERS APERTURE SIZE 420mm Narrow frame model Wide frame model WF23/UNIQ 23, WF 32 / UNIQ 32 DOOR REMOVAL
Installing the appliance I) II) III) IV) V) VI) VII) VIII) IX) X) XI) Remove door and frame a. Open door and lift so bottom hinge in lifts out of holder. b. Tilt base away from stove and lower door. c. Door should now be released. d. Place door in a safe place. Remove frame from stove. a. Once door is removed b. Loosen four Allen keys and frame will come away. Remove Brick set a. See manual below Remove Bar from flue collar a. Loosen bolts holding flue collar b.
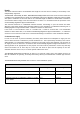
Typical installation of an inset stove Distance to Combustible materials Combustible materials should not be located where the heat dissipating through the walls of fireplaces or flues could ignite it. Therefore when installing the stove in the presence of combustible materials due account must be taken of the guidance on the separation of combustible material given in Building Regulations Approved Document J and also in these stove instructions.
Hearth The hearth should be able to accommodate the weight of the stove and its chimney if the chimney is not independently supported. The WESTFIRE WF23/UNIQ 23 INSET, WESTFIRE WF32/UNIQ32 INSET wood inset stove has been tested and is suitable to be installed above a 12mm non combustible plate such as Westfire 12mm glass plates or 20mm slate plates. Installation of the stove must be at a minimum height of 450mm for 12mm hearth.
WESTFIRE WF23/ UNIQ 23 INSET MODEL
WESTFIRE WF32 / UNIQ 32 INSET NARROW FRAMED MODEL 810.
WESTFIRE WF32/ UNIQ 32 INSET WIDE FRAMED MODEL
WESTFIRE WF23/UNIQ 23 INSET, WESTFIRE WF32/UNIQ32 INSET WF32/UNIQ32 INSET WF32/UNIQ32 INSET WF23/UNIQ23 INSET Narrow frame Wide frame Std frame Height (frame) 610mm 570mm 660mm Width (frame) 880mm 1000mm 670mm Height (stove box) 555mm 555mm 600mm Width (stove box) 810mm 810mm 610mm Depth (stove box) 405mm 380mm 375mm Closed combustion fitted as standard NOT AVALIABLE NOT AVAILABLE OPTIONAL Westfire Insulated chambers The WESTFIRE WF32/UNIQ32 AND WF23/UNIQ23 stove is lined with
Operating your stove- WESTFIRE WF23/UNIQ 23 INSET, WESTFIRE WF32/UNIQ32 INSET The first lighting of your stove. The heat-resistant paint on your stove will cure and harden the first time you light your appliance. The curing process produces a good deal of smoke and odour, it is therefore important that the first time you light your stove the room should be well ventilated.
RE-FUELING To re-fuel your stove in the cleanest way. Only refuel your stove when flames have died down and you have glowing embers. Before refuelling, open secondary air slider fully, also open primary air slider fully and leave for 5 minutes. Open door gently, add two pieces of wood measuring approx 33cm with a combined weight of approx 1.5kg and close the door. Leave the air sliders open for 10 minutes to allow the fire to reach a good temperature.
CONTROLS on WESTFIRE WF 32 /UNIQ32 INSET CONTROLS on WESTFIRE WF 23 /UNIQ 23 INSET Door operation When opening the door of your Westfire stove always wear the glove that is provided to protect your hand from possible heat.
WOOD FUEL IMPORTANT: Never use toxic wood such as chipboard, impregnated, painted wood or pre-sawn wood such as pallets. Good quality wood is the most important factor in your stove working efficiently and cleanly. Always use dry firewood. The dryness of the firewood plays an important role since the use of wet wood results in poor fuel economy and may cause a tarry sooty film on the internals of the stove. Newly cut wood contains 60–70% water, making it totally unsuitable for use as firewood.
FIRE BRICK INSTALLATION SEQUENCE - WESTFIRE UNIQ 23 Vermiculite brick set for the Uniq 23 freestanding and Uniq 23 inset .
FIRE BRICK INSTALLATION SEQUENCE - WESTFIRE UNIQ 23 - continued Left base brick 5 positioned. Left side brick 6 positioned on top of left base brick 5. Left mid baffle brick 2 must be held up to enable brick 6 to be fitted. Brick 2 is then supported by left side brick 6. Right base brick 7 positioned. Right side brick 8 positioned on top of right base brick 7. Right mid baffle brick 3 must be held up to enable brick 8 to be fitted. Brick 3 is then supported by right side brick 8.
FIRE BRICK INSTALLATION SEQUENCE - WESTFIRE UNIQ 23 - continued Grate support 12 fitted. Grate 13 fitted. Log retainer 14 fitted.
FIRE BRICK INSTALLATION SEQUENCE - WESTFIRE UNIQ 32 1 – Outer Top Baffle Brick 2 – Left Angled Side Brick 3 – Right Angled Side Brick 4 – Rear Brick 5 - Left Side Brick 6 – Right Side Brick 7 – Left Base Brick 8 – Right Base Brick 9 – Rear Base Brick 10 – Front Base Brick 11 – Base Grate 12 – Log Retainer 13 – Inner Top Baffle Brick 1 13 5 2 3 4 9 11 7 8 10 12 Outer top baffle brick 1 must be held in place and then supported by left and right angled side bricks 2 & 3.
FIRE BRICK INSTALLATION SEQUENCE - WESTFIRE UNIQ 32 Left base brick 7 fitted. Right base brick 8 fitted. Rear base brick 9 fitted. Front base brick 10 fitted. Base grate 11 fitted. Log retainer 12 fitted. Inner top baffle brick 13(Angled parallel edge at rear resting on chrome tertiary air bar) fitted and supported with two side pins.
Trouble shooting 1. Fire will not burn - check a) b) c) d) e) the air inlet is not obstructed in any way, that chimneys and flueways are clear, that a suitable fuel is being used, that there is an adequate air supply into the room, that an extractor fan is not fitted in the same room as the fire. 2.
WARNING NOTE Properly installed, operated and maintained this stove will not emit fumes into the dwelling. Occasional fumes from de-ashing and re-fuelling may occur. However, persistent fume emission is potentially dangerous and must not be tolerated.