
Installation Manual


6
Westin Automotive Products, Inc.
W. 320 Covina Blvd
San Dimas, Ca. 91773
Thank you for choosing Westin products
for additional installation assistance please call
Customer Service (800) 793-7846
www.westinautomotive.com
P.N.: 75-3111 REV B
ECO #: W17-0022
DATE: 2/23/17
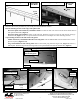
13. Repeat Steps 6 & 7 to install the passenger Sidebar, (Figure 21).
14. Once the Sidebars are fully installed and all hardware fully tightened, reinstall the DEF tank and cover, if equipped, as de-
scribed in Steps 8 & 12.
15. Do periodic inspections to the installation to make sure that all hardware is secure and tight.
Care Instructions
REGULAR WAXING IS RECOMMENDED. DO NOT USE ANY TYPE OF POLISH OR WAX THAT MAY CONTAIN ABRASIVES.
STAINLESS STEEL PRODUCTS CAN BE CLEANED WITH MILD SOAP AND WATER. STAINLESS STEEL POLISH SHOULD BE USED TO POLISH SMALL SCRATCHES.
GLOSS BLACK FINISHES SHOULD BE CLEANED WITH MILD SOAP AND WATER.
(2) M8 x 25mm Hex Bolts
(2) M8 Lock Washers
(2) M8 Flat Washers
Passenger side installation pictured
Figure 21
Models with weld nut on tab use:
M8 x 25mm Hex Bolt
M8 Lock Washer
M8 Flat Washer
to bolt Lower Bracket to weld nut
All models use:
M8 x 25mm Hex Bolt
M8 Lock Washer
M8 Flat Washer
Front
Figure 20
On models with flat tab and M8 Bolt
Plate (see Fig. 15) use:
M8 Flat Washer
M8 Nylon Lock Nut
to attach Lower Bracket to Bolt Plate
Installation Complete
Extended Cab Shown
Installation Complete
Crew Cab Shown