
Owners manual
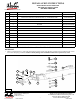


4
Thank you for choosing Westin products
for additional installation assistance please call
Customer Service (800) 793-7846
www.westinautomotive.com
P.N.: 75-1670 REV A DATE: 05/09/16
ECO #: W15-0150
Westin Automotive Products, Inc.
320 Covina Blvd
San Dimas, Ca. 91773
CARE INSTRUCTIONS
REGULAR WAXING IS RECOMMENDED. DO NOT USE ANY TYPE OF POLISH OR WAX THAT MAY CONTAIN ABRASIVES
STAINLESS STEEL PRODUCTS CAN BE CLEANED WITH MILD SOAP AND WATER. STAINLESS STEEL POLISH SHOULD BE USED TO POLISH SMALL SCRATCHES.
GLOSS BLACK FINISHES SHOULD BE CLEANED WITH MILD SOAP AND WATER
Installation complete
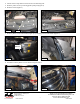
Figure 14 Figure 15
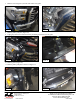
Figure 16 Figure 17
Figure 18 Figure 19
12. Pull rubber cover to have access to mounting locations. (Figure 14 & 15).
13. Remove bolts (Figure 14 & 15).
14. After removal of bolt on Figure 15, uncover the nut under the bracket (Figure 16).
15. If u-nut is not available proceed to install supplied M8 U-nut (Item 7).
16. Install mounting straps and light bar as shown in Figures 1, 17, and 18. Trim rubber cover at bracket locations (Fig. 18).
17. Torque M10 hardware to 40 ft-lbs and M8 to 20 ft-lbs.
18. Replace all the parts that were removed.
19. Light saddle (item 4) will be installed with the light kit’s hardware that you will use to install in the light bar.
20. Light saddle extension (Item 5 optional) is supplied to make more room if light does not fit between mount location to
vehicle grill.
Spacer (Item 6)
Trim rubber cover