
Owners manual

1
Thank You for choosing Westin products
For Additional installation assistance please call
Customer service (800) 793-7846
www.westinautomotive.com
P.N.: 75-1049 REV A ECO #: W14-0093
Westin Automotive Products, Inc.
320 Covina Blvd
San Dimas, Ca. 91773
DATE: 12/17/14
APPLICATION: SPORTSMAN GRILLE GUARD / 2015 & UP CHEVY COLORADO
APP PART #45-3840, 45-3845
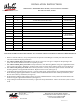
ITEM QUANTITY DESCRIPTION TOOLS NEEDED
1 1 GRILLE GUARD ASSEMBLY RATCHET
2 2 LOWER MOUNTING BRACKET UTILITY KNIFE
3 1 DRIVER SIDE UPPER SUPPORT BRACKET 18MM SOCKET
4 1 PASSENGER SIDE UPPER SUPPORT BRACKET 15MM SOCKET
5 4 TWO HOLE SPACER 14MM SOCKET
6 4 M12 HEX CAP SCREW (YELLOW ZINC) ALLEN WRENCH
7 4 M12 HEX NUT (YELLOW ZINC) TORQUE WRENCH
8 4 M12 FLAT WASHER 32MM OD (YELLOW ZINC)
FLAT HEAD
SCREW DRIVER
9 4 M12 FLAT WASHER 24MM OD (YELLOW ZINC)
10 4 M12 SPLIT LOCK WASHER (YELLOW ZINC) SOCKET EXTENS.
11 6 M10 HEX BUTTON HEAD SCREW (STAINLESS)
12 6 M10 BELLVILLE WASHER (STAINLESS)
13 6 M10 SERRATED FLANGE NUT (STAINLESS)
14 2 M10 SERRATED FLANGE NUT (YELLOW ZINC)
INSTALLATION INSTRUCTIONS
AUTOMOTIVE PRODUCTS, INC.
1. Remove contents from box, verify if all parts listed are present and undamaged. Carefully read and understand all
instructions before attempting installation.
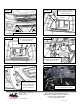
2. For vehicles without factory tow hooks trim the plastic in the areas in Figure 1. Repeat for the passenger side.
(Note: For vehicles without tow hooks use 2 spacers per side)
3. For vehicles without factory tow hooks Loosely install the Lower Mounting Bracket using the supplied M12 hard-
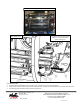
ware as shown in Figure 2. Repeat for passenger side. (Note: For easier access remove plastic covers see Figure 6)
4. For vehicles with factory tow hooks remove factory hardware. Loosely install one spacer between tow hook and
mounting bracket with supplied M12 hardware. Repeat for drivers side. (See Figure 3)
5. Trim plastic behind grille opening in Figure 1. Loosely install upper support brackets using supplied M10 hardware.
When fastening upper support bracket to A-frame, set the bracket flush with the back of factory welded nut. (Note:
Do not remove factory welded nut, see Figure 4)
6. With assistance hold the Grille Guard up to the previously installed brackets. Loosely attach the Grille Guard to the
brackets using the supplied M10 hardware. (See Figure 5)
7. Align and adjust the Grille Guard as necessary. Tighten and torque all hardware : M10 to 20-25 ft-lbs., M12 to 50-55
ft-lbs.
ANTI-SEIZE LUBRICANT MUST BE USED ON ALL STAINLESS STEEL FASTENERS TO PREVENT THREAD DAMAGE