
User Manual


18 | Westinghouse Portable Power
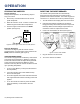
If oil level is below
this line it is too
low to operate.
Figure 10: Oil level
6. Check oil level: When checking the engine oil, remove
the oil ll plug/dipstick and wipe it clean. Thread the oil
ll plug/dipstick all the way back in and then remove
and check the oil level on the oil ll plug/dipstick.
• Acceptable Oil Level – Oil is visible on the
crosshatches between the H and L lines on the oil ll
plug/dipstick (see Figure 10).
• Low Oil – Oil is below the L line on the oil ll plug/
dipstick.
NOTICE
Engine oil must always be checked and added when
the inverter is on a at, level surface, or an inaccurate
reading may result, causing serious engine damage.
ADDING ENGINE OIL
1. Always operate or maintain the inverter on a at
surface.
2. Stop engine if running.
3. Let engine sit and cool for several minutes (allow
crankcase pressure to equalize).
4. Thoroughly clean around the oil ll plug/dipstick.
5. Remove the oil ll plug/dipstick (see Figure 9).
6. Select the proper engine oil as specied in
Figure 8.
7. Using the supplied oil funnel, slowly add engine oil to
the engine. Stop frequently to check the oil level and
avoid overlling.
8. Continue to add oil until the oil is at the
correct level then replace oil ll plug/dipstick.
ENGINE OIL MAINTENANCE
Engine Oil Specication
1. Only use the engine oil specied in Figure 8.
2. Only use 4-stroke/cycle engine oil. NEVER USE
2-STROKE/CYCLE OIL. Synthetic oil is an
acceptable substitute for conventional oil.
Figure 8: Recommended oil
CHECKING ENGINE OIL
NOTICE
Always maintain proper engine oil level. Failure to
maintain proper engine oil level could result in severe
damage to the engine and/or shorten the life of the
engine.
Always use the specied engine oil. Failure to use the
specied engine oil can cause accelerated wear and/
or shorten the life of the engine.
Engine oil level should be checked before
every use.
1. Always operate or maintain the inverter on a at
surface.
2. Stop engine if running.
3. Let engine sit and cool for several minutes (allow
crankcase pressure to equalize).
4. With a damp rag, clean around the oil ll plug.
5. Remove the oil ll plug/dipstick (see Figure 9).
Figure 9: Oil ll plug/dipstick location
MAINTENANCE