
User Manual


Westinghouse Portable Power | 21
8. Install the spark plug by carefully following the steps
outlined below:
a. Carefully insert the spark plug back into the
cylinder head. Hand-thread the spark plug until it
bottoms out.
b. Using the spark plug socket wrench provided, turn
the spark plug to ensure it is fully seated.
c. Replace the spark plug boot, making sure the boot
fully engages the spark plug’s tip.
Recommended Spark Plug Replacement:
NGK: BPR7ES (Replacement)
Torch: F7RTC (OE Spark Plug)
Westinghouse Part Number: 180526
CLEANING THE SPARK ARRESTOR
Check and clean the spark arrestor after every 100 hours of
use or 6 months.
1. Stop the inverter and let it cool for several minutes if
running.
2. Move the inverter to a at, level surface.
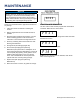
3. Remove the screws holding the inverter cover as well
as the bolts and screw holding the inverter cover (see
Figure 19).
Inverter
Cover
Muer
Cover
Figure 19: Remove screws holding inverter and muer cover
4. Once the inverter cover is removed, tilt the top of the
muer cover downward and pull out to remove it.
5. Loosen the clamp holding the spark arrestor onto the
muer with a screw driver (see Figure 20).
6. Slide the spark arrestor band clamp o the spark
arrestor screen.
7. Pull the spark arrestor screen o the muer exhaust
pipe.
SPARK PLUG MAINTENANCE
The spark plug must be checked and cleaned after
every 100 hours of use or 6 months and must be
replaced after 300 hours of use or every year.
1. Stop the inverter and let it cool for several minutes
if running.
2. Remove the spark plug boot by rmly pulling the
plastic spark plug boot handle directly away from
the engine (see Figure 18).
NOTICE
Never apply any side load or move the spark plug
laterally when removing the spark plug. Applying a
side load or moving the spark plug laterally may crack
and damage the spark plug boot.
Figure 18 - Remove spark plug boot
3. Clean area around the spark plug.
4. Using the spark plug socket wrench provided,
remove the spark plug from the cylinder head.
5. Place a clean rag over the opening created by the
removal of the spark plug to make sure no dirt can
get into the combustion chamber.
6. Inspect the spark plug for:
• Cracked or chipped insulator
• Excessive wear
• Spark plug gap (the acceptable
limit of 0.027–0.032 in.
[0.70 – 0.80 mm]).
7. If the spark plug fails any one of the
conditions listed above, replace the plug.
NOTICE
Only use the recommended spark plug. Using a non-
recommended spark plug could result in damage to
the engine.
MAINTENANCE
SPARK PLUG GAP