USER’S MANUAL MANUEL DE L’UTILISATEUR MANUAL DEL USUARIO LD-4680
TABLE OF CONTENTS TABLE OF CONTENTS i English TABLE OF CONTENTS .................................................... i DIGITAL TELEVISION TRANSITION NOTICE .................. 1 AVISO RELATIVO A LA TRANSICIÓN A TELEVISIÓN DIGITAL ......................................................................... 1 IMPORTANT INFORMATION .......................................... 2 Warnings .................................................................... 2 NOTICES ................................................
TABLE OF CONTENTS English EXTERNAL DEVICE CONNECTIONS ............................ POWER CONNECTION ................................................ CONNECTING AC POWER ....................................... INITIAL SETUP ........................................................ BASIC OPERATIONS ................................................... TURNING THE POWER ON AND OFF ....................... ADJUSTING THE VOLUME ....................................... CHANGING CHANNELS .............................
DIGITAL TELEVISION TRANSITION NOTICE DIGITAL TELEVISION TRANSITION NOTICE For more information, call the FCC at 1-888-CALL-FCC (1-888-225-5322) or see www.DTV.gov. For information on the TV Converter program, and on government coupons that may be used toward the purchase of one, see www.dtv2009.gov, or call the NTIA at 1-888-DTV-2009.
IMPORTANT INFORMATION IMPORTANT INFORMATION Warnings To reduce the risk of fire or electric shock: English • Do not expose this product to rain or moisture. • Do not remove the rear cover. There are no user-serviceable parts inside. Refer all servicing requirements to qualified service personnel. • The plug should be connected to a mains socket outlet with a protective earthing connection.
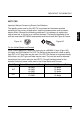
IMPORTANT INFORMATION NOTICES Important Notices Concerning Power Cord Selection Figure A1 Figure A2 For the United States and Canada In the United States and Canada the male plug is a NEMA5-15 style (Figure A2), UL-listed, and CSA-labeled. For LED TVs that are to be placed on a desk or table, type SVT or SJT cord sets may be used. For LED TVs that are to be placed directly on the floor, only SJT type cord sets may be used. The cord set must be selected according to the current rating for the LED TV.
IMPORTANT INFORMATION FCC COMPLIANCE STATEMENT English This equipment has been tested and complies with the limits for a Class B digital device, pursuant to part 15 of the FCC Rules. These limits are designed to provide reasonable protection against harmful interference in a residential installation. This equipment generates, uses, and can radiate radio frequency energy, and may cause harmful interference to radio communications if not installed and used in accordance with the instructions.
IMPORTANT INFORMATION IMPORTANT SAFETY INSTRUCTIONS Make sure to note and follow all warnings and instructions marked on the LED TV. Observe the following safety instructions. Read these instructions. • Keep these instructions. • Heed all warnings. • Follow all instructions. • Do not use this apparatus near water. • Clean only with dry cloth. • Do not block any ventilation openings. Install in accordance with the manufacturer’s instructions.
IMPORTANT INFORMATION Circuit Overload Do not overload wall outlets, extension cords, or power strips. This can result in a fire or electronic shock. English Power Cord Protection Power supply cords should be routed so that they are not likely to be walked on or pinched by items placed upon or against them. Periodically inspect the cords for damage. Install the LED TV near a wall socket outlet where the power cord can be readily accessed.
IMPORTANT INFORMATION WARNINGS AND PRECAUTIONS Do not orient the LED TV towards direct sunlight to reduce glare. • If the LED TV will not be used for a long period of time, unplug the unit and remove the batteries from the remote control. • Avoid touching the display screen by hand or any object. • Never remove the rear cover. The LED TV interior contains high-voltage parts. You may be seriously injured if you touch them. • Always handle the LED TV with caution when moving it.
IMPORTANT INFORMATION ANTENNA INSTALLATION SAFETY Outdoor Antenna Grounding English If an outside antenna or cable system is connected to the LED TV, be sure the antenna or cable system is grounded to prevent voltage surges and built-up static charges.
IMPORTANT INFORMATION CLEANING THE LED TV Make sure the LED TV is turned off and the power cord is disconnected from the power outlet. • Never spray or pour any liquid directly onto the screen or the case. To clean the screen: 1 Wipe the screen with a clean, soft, lint-free cloth. This removes dust and other particles. 2 If it is still not clean, apply a small amount of non-ammonia, non-alcohol based glass cleaner onto a clean, soft, lint-free cloth, and wipe the screen.
IMPORTANT INFORMATION Open Source License Open source licenses ensure users’ freedom to run, copy, distribute, study, change and improve the software. Any such open source code is subject to the copyrights of one or more authors. The terms of the GPL and LGPL, and access to any GPL Code, LGPL Code, or other open source code used in this product, are available to you at: http://westinghousedigital.com/compliance/.
PACKAGE CONTENTS PACKAGE CONTENTS 46” LED TV Unit Remote Control (with 2x AAA batteries) C.C.
CONTROL PANEL CONTROL PANEL MENU 2 VOL 3 CH 4 INPUT English 1 5 DC IN AUDIO IN Item 1. MENU 2. Volume +/3. Channel +/4. INPUT 5. Power VGA Y L R TUNER L R Description Displays the LED TV setup screen. • Adjusts the volume during playback. • Selects an item on a menu screen. • Switches the channel during TV viewing. • Selects an item on a menu screen. • Selects the video input source. • Executes a command on a menu screen. Toggles the power on and off.
TERMINALS TERMINALS English SPDIF 9 USB 8 HDMI 1 DC IN AUDIO IN VGA Y L R TUNER L 7 R HDMI 2 DC IN AUDIO IN 1 VGA 2 3 Item 1. DC in 2. Audio in 3. VGA 4. Composite AV input 5. TV tuner 6. Audio out 7. HDMI 1/2 8. USB Service port 9. SPDIF audio out 12 Y L 4 R TUNER 5 L R 6 Function Connects the AC to DC adapter from this outlet to a power source. Connects to the audio out port of a computer. Connects to a computer or other device with a VGA output using a 15-pin VGA cable.
REMOTE CONTROL (TYPE A) REMOTE CONTROL (TYPE A) Item 3 5 ZZZ C.C. MTS Favorite Toggles the TV power on or off. 3. Backlight 9 11 9. Enter ENT Adjusts the LED screen backlight. Toggles the Multichannel Television Sound options. Toggles the closed caption display on or off. Sets the sleep timer for the LED TV to turn off automatically. Use to key in the channel number. Switches to the favorite channels (for details on how to save a new favorite channel, see page 25). Executes a channel entry.
REMOTE CONTROL (TYPE B) REMOTE CONTROL (TYPE B) Item Description Mutes the sound. Press again to toggle the sound back on. 1. Mute English 2. Power 3. Channel keys 4. Enter ENT 1 3 2 1 2 3 4 5 6 7 8 9 0 5 B ENT 4 C 6. Arrow keys 7. Enter Use to key in the channel number. Executes a channel entry. Switches to the favorite channels (for details on how to save a new favorite channel, see page 25). Navigate through the on-screen menus. Executes a command. 8.
REMOTE CONTROL (TYPE B) Item 24. MTS Description Toggles the Multichannel Television Sound options.
REMOTE CONTROL OPERATION REMOTE CONTROL OPERATION INSTALLING THE REMOTE CONTROL BATTERIES English CAUTIONS: • Only use AAA batteries. • Do not mix new and old batteries. This may result in cracking or leakage, which may pose a fire risk or lead to personal injury. • Insert batteries according to the (+) and (-) markings. Inserting the batteries incorrectly may result in cracking or leakage, which may pose a risk of fire or lead to physical injury.
LED TV BASE LED TV BASE INSTALLING THE LED TV BASE 1 Open the LED TV carton box. 2 Remove the LED TV base. 3 Remove the plastic bag. 4 Remove the three top carton stabilizers from the LED TV. 5 Remove the protective plastic covering the LED TV. 6 Grasp the two sides of the LED TV and then pull it out of the carton box. 7 Remove the two bottom carton stabilizers from the LED TV. 8 Lay the LED TV on a clear, flat, and stable surface.
LED TV BASE 11 IMPORTANT: Use one M x 16 screw to fix the stand base and LED TV on the desk.
LED TV BASE REMOVING THE LED TV BASE If you intend to repack the LED TV unit (for shipping or storage) or you want to change the installation to a wall mount option, you must first remove the LED TV base. Turn off the LED TV and all connected devices. 2 Disconnect the power cord from the LED TV. 3 Disconnect all signal cables from the I/O port terminals. 4 Remove the M5 x 16 screw securing the base to the desk. 5 Lay the LED TV on a clear, flat, and stable surface.
ANTENNA CONNECTION ANTENNA CONNECTION OUTDOOR ANTENNA CONNECTION English Cable TV lead in VHF, UHF or VHF/UHF combination antenna 75 ohm coaxial cable (round) 300 ohm twin-lead (flat) RF IN 300-75 ohm ADAPTER (Not supplied) Separate VHF/UHF Antenna VHF Antenna UHF Antenna Home Antenna terminal (75 ohm) 300 ohm twin-lead COMBINER (Not supplied) 300 ohm twin-lead IN OUT 75 ohm coaxial cable NOTE: The F-type connector should be finger-tightened only.
EXTERNAL DEVICE CONNECTIONS • A position on the RF switch (not supplied) – You can view all unscrambled channels by using the TV's channel keys. • B position on the RF switch (not supplied) – You can view the scrambled channels via the converter/descrambler by using the converter's channel keys.
EXTERNAL DEVICE CONNECTIONS The following diagram shows the external device connections. Audio amplifier SPDIF cable English SPDIF AUDIO OUT USB DVI-HDMI cable DVD player with a DVI terminal HDMI 1 DVD player HDMI-HDMI cable with an HDMI terminal DC IN AUDIO IN VGA HDMI 2 Y L R AC to DC adapter Composite AV cable RGB cable TUNER L R Antenna cable / Cable TV line Audio cable 3.
POWER CONNECTION POWER CONNECTION CONNECTING AC POWER Connect the power cord of the AC to DC adapter to the LED TV then to a proper AC outlet. DC IN AUDIO IN VGA Y L R TUNER L R INITIAL SETUP Press on the control panel or on the remote control to turn on the LED TV. Select the desired language and your time zone to use the Setup Wizard. The Setup Wizard will guide you on how to scan and store channels. 23 English IMPORTANT: The LED TV is designed to be powered via an AC to DC adapter.
BASIC OPERATIONS BASIC OPERATIONS TURNING THE POWER ON AND OFF Turning on the power English Press on the control panel or on the remote control to turn on the LED TV. Turning off the power Press on the control panel or on the remote control to turn off the LED TV. The LED behavior will depend on the enabled Power settings. LED indicator Operation Turns from none to white. Turn the power on. Turns from white to none. Turn the power off.
BASIC OPERATIONS CHANGING CHANNELS Follow the instructions below to change channels. Using the Ch / Buttons Vol YPbPr1 Ch HDMI1 Video1 TV To browse through the available channels, press Ch the remote control or on the control panel. / on Using the Channel Keys Favorite A B C ENT D Selecting channel To change to a certain channel, key in the channel number using the channel keys and press ENT.
BASIC OPERATIONS Using the Input Key Select source using Input Key Input Vol YPbPr1 Ch HDMI1 Video1 1 Press Input. TV 2 A list of supported video sources is displayed. English 3 Press 4 Press / to select the preferred source. to switch to the selected input source. ADJUSTING THE DISPLAY FORMAT The input source can sometimes affect the way images are displayed on-screen. You can adjust the display format to view the image properly.
SETUP MENUS SETUP MENUS SETUP MENU OPERATION Use the setup menus to configure the various operational settings of the LED TV. Press on the remote control or MENU on the control panel to display the setup menu screen. Navigating the setup menu screen Use the buttons on the remote control or on the control panel to navigate through the menu screens. MENU VOL SPDIF Enter USB HDMI 1 CH HDMI 2 DC IN AUDIO IN VGA Y L R TUNER L R INPUT Action Displays or closes the menu bar.
SETUP MENUS PICTURE Use the Picture sub-menus to configure the display quality. English Press on the remote control or MENU on the control panel to display the setup menu screen then select Picture to display the Picture sub-menu. The following options are available: Brightness, Contrast, Saturation, Video Presets, Sharpness, Color temperature, Hue, and Reset. Brightness Use Brightness to adjust the luminance level.
SETUP MENUS Saturation Use Saturation to adjust the color intensity. English Saturation Adjusting Saturation 1 Use the / 2 Press the 3 Press keys to select Saturation and press / . keys on the remote control to adjust the saturation level. to save and exit the screen. Video Presets Use this sub-menu to select one of the five preset view options optimized for different viewing conditions.
SETUP MENUS Adjusting Video Presets 1 Use the / 2 Press the English 3 Press keys to select Video Presets and press / . keys on the remote control to select the desired option. to save and exit the screen. Sharpness Use Sharpness to adjust the sharpness or softness of the display. Sharpness Adjusting Sharpness 1 Use the / 2 Press the 3 Press keys to select Sharpness and press / . keys on the remote control to adjust the sharpness level. to save and exit the screen.
SETUP MENUS Adjusting Color Temperature 1 Use the / 2 Press the / . keys on the remote control to select the desired option. to save and exit the screen. English 3 Press keys to select Color temperature and press Hue Use Hue to adjust the balance of the red, green, and blue colors in the display. Hue Adjusting Hue 1 Use the / 2 Press the 3 Press keys to select Hue and press / . keys on the remote control to adjust the hue level. to save and exit the screen.
SETUP MENUS AUDIO Use the Audio sub-menus to configure the audio quality. These settings apply to the LED TV speakers only. Any connected audio devices are not affected. English Press on the remote control or MENU on the control panel to display the setup menu screen then select Audio to display the Audio sub-menu. The following options are available: Bass, Treble, Balance, Surround 3D, TV Speaker, Audio Presets, and Reset. Bass Use Bass to calibrate low-pitched sounds.
SETUP MENUS Balance Use Balance to adjust the sound balance between the L/R speakers. English Balance Adjusting Balance 1 Use the / 2 Press the 3 Press keys to select Balance and press / . keys on the remote control to adjust the balance level. to save and exit the screen. Surround 3D Use this sub-menu to toggle the Surround 3D on and off. Surround 3D ON OFF Adjusting Surround 3D 1 Use the / 2 Press the 3 Press keys to select Surround 3D and press / .
SETUP MENUS TV Speaker Use this sub-menu to toggle the LED TV speakers on and off. English TV Speaker ON OFF Adjusting TV Speaker 1 Use the / 2 Press the 3 Press keys to select TV Speaker and press / . keys on the remote control to select ON or OFF. to save and exit the screen. Audio Presets Use this sub-menu to select one of the five preset audio options optimized for different sounding conditions.
SETUP MENUS Adjusting Audio Preset 1 Use the / 2 Press the / . keys on the remote control to select the desired option. to save and exit the screen. English 3 Press keys to select Audio Preset and press Reset Select Yes on this sub-menu to reset all audio-related settings.
SETUP MENUS VIEW MODE Use the View Mode sub-menu to select the aspect ratio of the display. English Press on the remote control or MENU on the control panel to display the setup menu screen then select View Mode to display the View Mode sub-menu. The following options are available: 1:1 Mode, Standard, Fill, and Overscan. 1:1 Mode Matches the incoming resolution exactly to the pixels without any scaling.
SETUP MENUS Aspect Ratio Use this sub-menu to select the display's aspect ratio in the following options: 1:1 Mode: Matches the incoming resolution exactly to the pixels without any scaling. • Standard: Picture is displayed in its original size. English • H. Position Use this sub-menu to adjust the horizontal position of the display. A 16:9 H. Position V. Position Use this sub-menu to adjust the vertical position of the display. A 16:9 V.
SETUP MENUS TV PROGRAM Use the TV Program sub-menus to manage the channel list, language sound, and to scan for available TV channels in your area. English Press on the remote control or MENU on the control panel to display the setup menu screen then select TV Program to display the TV Program sub-menu. The following options are available: Skip List, Channel Edit, MTS, Auto Search, and Manual Add. Skip List Use Skip List to select the channels you want to skip. Channel Skip List Clear List 11.0 13.
SETUP MENUS Channel Edit Use Channel Edit to assign a name to a channel. Channel Name Edit English 11.0 13.0 16.1 17.0 21.0 22.0 23.0 24.0 :Select Enter: Confirm Menu: Exit Editing Channel Names 1 Use the / keys to select Channel Edit and press Name Edit screen appears. . The Channel 2 Use the / keys to select the desired channel and press the Edit Name screen. 3 Use the press the / to open / / keys to move the cursor to the desired symbol and button to enter.
SETUP MENUS MTS Use MTS to select multichannel television sound. English The following options are available: • Mono: Allows mono output (useful when stereo is noisy or inconsistent). • Stereo: Allows stereo sound for superior TV viewing experience. • SAP: Allows second audio program from the speakers while watching a scene in the original program. Adjusting MTS 1 Use the / 2 Press the 3 Press keys to select MTS and press / . keys on the remote control to select the desired option.
SETUP MENUS Manual Add Use Manual Add to add channels manually. Channel Add English _ Enter :Select Enter: Confirm Menu: Exit Adding Channels Manually 1 Use the / keys to select Manual Add and press screen appears. . The Channel Add 2 Use the Channel keys on the remote control to enter the channel number and select Enter. Wait a few moment for the TV to search for the channel. 3 When the channel is found, you can select Add to add the channel or select Skip to cancel.
SETUP MENUS SETTINGS Use the Settings sub-menus to configure the LED TV operational setup and view the current firmware version. English Press on the remote control or MENU on the control panel to display the setup menu screen then select Settings to display the Settings sub-menu. The following options are available: Date and Time, Closed Captions, Parental Control, OSD Timeout, OSD Language, Power settings, Reset All, and Version. Date and Time Use Date and Time to adjust the current date and time.
SETUP MENUS 4 Press to save and exit the screen. Adjusting Date and Time / 2 Use the / 3 Use the / 4 Use the 5 Press keys to select Date and Time and press / / . keys to select Date or Current Time and press . keys to select a date or time segment. / keys to adjust the value. to save and exit the screen. Adjusting Daylight Saving 1 Use the / keys to select Date and Time and press . 2 Press repeatedly to check (enable) or uncheck (disable) Adjust for Daylight Saving Time.
SETUP MENUS English • Digital Type: Can be set to CS1, CS2, CS3, CS4, CS5, or CS6. • Font: Can be set to As Broadcaster, Style 1, Style 2, Style 3, Style 4, Style 5, Style 6, or Style 7. • Size: Can be set to As Broadcaster, Small, Medium, or Large. • Font Color: Can be set to As Broadcaster, Black, White, Green, Blue, Red, Cyan, Yellow, or Magenta. • Background Color: Can be set to As Broadcaster, Black, White, Green, Blue, Red, Cyan, Yellow, or Magenta.
SETUP MENUS After you enter the correct password, the Parental Control menu is shown. By default, only the Rating and Change Password submenu are displayed. To display the hidden submenu, set Rating to ON. The following options are available: Rating: Select ON/OFF to hide or display the hidden submenu. Block Unrated: Select ON/OFF to block/unlock all unrated programs.
SETUP MENUS Rating D L S V Description Suggestive dialogue. L Coarse language. Sexual situations. Violence. English Adjusting TV Rating 1 Use the / keys to select TV Rating and press . 2 Use the / / / keys to select the desired rating and press Select the desired option and press to check or uncheck. 3 Press • . to save and exit the screen. MPAA Rating: Use this sub-menu to select the ratings of allowable movies.
SETUP MENUS Rating NC-17 47 English X Description May contain explicit sex scenes, an accumulation of sexuallyoriented language, and/or scenes of excessive violence. Suitable for adult audiences only. Rating does not signify that the film is obscene or pornographic. Contains extreme violence or explicit sex; suitable for adult audiences only.
SETUP MENUS Adjusting MPAA Rating 1 Use the / keys to select MPAA Rating and press . 2 Use the / / / keys to select the desired rating and press repeatedly to block or unblock. English 3 Press • to save and exit the screen. Canada English: Use this sub-menu to select the classification categories (based on Canadian ratings) of allowable TV programs and movies. Rating E C C8+ G PG 14+ 18+ 48 Description Exempt shows Suitable for viewing by children of all ages.
SETUP MENUS Adjusting Canada English Rating 1 Use the / keys to select Canada English Rating and press . 2 Use the / / / keys to select the desired rating and press repeatedly to block or unblock. to save and exit the screen. Canada French: Use this sub-menu to select the ratings of allowable TV programs and movies. These ratings are based on the classification categories determined by La Régie du cinéma du Québec.
SETUP MENUS Adjusting Canada French Rating 1 Use the / keys to select Canada French Rating and press . 2 Use the / / / keys to select the desired rating and press repeatedly to block or unblock. English 3 Press • to save and exit the screen. Channel Block: Channel Block allows you to block channels. 11.0 13.0 16.1 17.0 21.0 22.0 23.0 Adjusting Channel Block 1 Use the / keys to select Channel Block and press .
SETUP MENUS OSD Timeout Use OSD Timeout to adjust the OSD duration on the screen: 10 sec, 20 sec, or 30 sec. English en OSD Timeout 10 sec 20 sec 30 sec Adjusting OSD Timeout 1 Use the / 2 Press the sec. 3 Press keys to select OSD Timeout and press / . keys on the remote control to select 10 sec, 20 sec, or 30 to save and exit the screen. OSD Language Use OSD Language to select the language to display on the screen: English, French, or Spanish.
SETUP MENUS Power Settings Use this sub-menu to configure power-related settings for the LED TV. English The following options are available: • VGA port -DPMS: Use this setting to enable or disable VGA port -DPMS. • Backlight: Use this setting to select the backlight mode: Bright Room, Medium Room, or Dark Room. • Dynamic Contrast: Use this setting to enable or disable Dynamic Contrast. Adjusting Power Settings 1 Use the / 2 Use the 3 Use the 4 Press keys to select Power Settings and press / / .
SETUP MENUS Version Use this sub-menu to view the LED TV’s serial number and firmware version.
WALL MOUNT OPTION WALL MOUNT OPTION The LED TV has been fitted with VESA FPMPMI compliant mounting holes. These 200 x 200 mm mounting holes allow the unit to be mounted on a wall. Use the four M6 x 18 mm screws to wall mount the LED TV. English DC IN AUDIO IN VGA Y L R TUNER L R WALL MOUNT INSTALLATION REMINDERS • Remove the LED TV base first before mounting the unit on a wall. • To fix the AC to DC adapter to the LED TV: 1.
TROUBLESHOOTING TROUBLESHOOTING Corrective Action • Make sure the power indicator is illuminated blue. • Make sure the power cord is securely connected to the AC-in jack and is plugged into a functional AC outlet. You may want to plug in another electrical device to the power outlet to verify that it is supplying the proper voltage. No power Power is suddenly turned off. Forgotten PIN English Problem Make sure the sleep timer is turned off. Use Reset All in Settings menu to reset your password.
TROUBLESHOOTING Problem Corrective Action English No picture or the No • Make sure the VGA cable is properly connected to the LED TV’s VGA port. Signal message appears when a • Decrease the video resolution setting on the VGA cable is computer and try again. connected. • Adjust the display settings. Picture is cut off or appear in a sidebar Press to adjust the Aspect ratio. screen. • Check your antenna connection. If necessary, rotate the antenna and wait up to ten seconds for a signal.
TROUBLESHOOTING Problem Corrective Action Make sure the audio input cable is properly connected to the correct terminal, and that the correct input mode is enabled. • The volume may be muted, press or Vol+ key to turn on the volume. • Adjust the Bass, Treble, and Balance settings in Audio menu. • If you are using the TV speakers, make sure the TV Speakers option is set to On in Audio menu.
SPECIFICATIONS SPECIFICATIONS Specification LD-4655Vx Active Area 1018.08 (H) x 572.67 (V) (Diagonal, mm) Resolution 1920 (H) x 1080 (V) Brightness 250 (Nits, typ) Contrast Ratio 5000:1 (min) Response Time 6.5ms(g-g) (min) Aspect Ratio 1.77 (16:9) Display color 16.7M • HDMI x2 • AV with R/L Audio x1 • VGA with 3.
SPECIFICATIONS Item Specification With stand: 1098 x 722 x 200.8 mm 43.23 x 28.43 x 7.9 inch English Physical Specifications Dimensions (WxHxD) Without stand: 1098 x 683.6 x 54.4 mm Weight (Net) Weight (Gross) 43.23 x 26.91 x 2.14 inch 17.3 kg 21.56 kg NOTES: • These product specifications are subject to change without user notification. • Do not set your computer graphics card to exceed the unit’s refresh rates; doing so may cause damage to the LED TV.
www.westinghousedigital.