
Instruction Manual

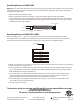

No Live Connection
Non-shunted Lampholder
Live
Neutral
LED Tube
LED Tube
LED Tube
LED Tube
AC Input
Westinghouse Lighting, Philadelphia, PA 19154-1029, U.S.A. www.westinghouselighting.com , WESTINGHOUSE, and INNOVATION YOU CAN BE SURE OF are
trademarks of Westinghouse Electric Corporation. Used under license by Westinghouse Lighting All rights reserved. Made in China
Retrotting xtures with ONE LAMP
NOTE:
Only one end of this LED tube receives power. The “powered” end is indicated with a sticker on the tube
itself. Before begining installation, determine which end of the xture will be the “powered” end and which
end will be the “dead” end.
1. Make sure AC power to xture is OFF
2. Make sure ground wire from AC supply is securely connected to ground screw inside xture.
3. Connect black (live) and white (neutral) lead wires from lamp holders on “powered” end to incoming AC
supply black (LIVE) and white (NEUTRAL) wires with approved wire connectors. If only one lamp is being
installed, proceed to step 4 below.
Retrotting xtures with MULTIPLE LAMPS
After completing steps 1 - 3 above, connect terminals on the “powered” lamp holder for rst lamp to
matching terminals on “powered” lamp holder for second lamp with black (live) and white (neutral) wires,
being sure to maintain polarity. Repeat this “daisy chain” connection for each additional lamp.
4.
When all connections are complete, place appropriate connectors/wire nuts on the end of any unused wires.
5. Replace wiring compartment cover.
6. Place sticker that is included with this product on wiring compartment cover or other conspicuous place
on or inside of xture. Sticker reads: “This xture has been modied. The ballast has been removed. DO
NOT install uorescent lamps in this xture”.
7. Place sticker that is included with this product somewhere near the “powered end” socket(s). Sticker
reads: “The socker(s) on this end of the luminaire are supplying line volatage. Be sure to install the
powered end of the LED tube(s) into the sockers on this end of the luminaire.”
8. Install LED tube(s), matching the end of the lamp that has the “L/N” sticker to the lamp holder that is
connected to the Live and Neutral wires.
9. Re-connect power to xture.
The luminaire wiring has now been modied and will no longer operate uorescent lamps.
Do not use with dimmers.
Suitable for dry locations only.
This device is not intended for use with emergency exits.