
Instructions / Assembly


Mini-Pendant Kit
Installation and Safety Instructions
Warning: Be sure the electricity to the wires you are working on is shut off; either the fuse is removed
or the circuit breaker is shut off.
GENERAL
You don't need special tools to install this fixture. Be sure to follow the steps in the order given. Under no
circumstances should a fixture be hung on house electrical wires, nor should a swag type fixture be installed on
a ceiling which contains a radiant type heating system. Read instructions carefully. If you are unclear as to
how to proceed, consult a qualified electrician.
INSTALLATION
Important: Do not attach fixture directly to outlet box.
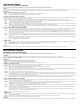
Step 1: Thread mounting screw (A) into the matching hole of mounting bar (B), as shown in the illustration.
Step 2: Secure the mounting bar (B) to outlet box (O) with outlet box screws (C) (not provided).
ADJUSTING LENGTH OF CORD IF NEEDED
These steps should only be performed by someone familiar with working with electrical wiring. Care must be taken when
adjusting the length of the cord to ensure insulation on internal wires is not damaged. If not familiar with these steps, seek
the aid of a qualified electrician.
Step 1: Remove Wire Connectors (P) connecting wires from the end of cord to wires from the outlet box (if applicable).
Note which colored wires are connected in each Wire Connector.
Step 2: Loosen the screw in strain relief (Q) until cord slides easily, being careful not to completely remove screw.
Slide canopy down cord until the fixture is the desired distance below the canopy. Tighten the screw in the
strain relief until cord does not slide.
Step 3: Cut excess cord approximately six to seven inches (6”-7”) above canopy.
Step 4: Leaving at least one inch (1”) of outer insulation above the canopy, carefully cut through outer insulation of
cord, being careful not to damage inner insulation. Remove outer insulation. Strip inner insulation from end of
both wires, leaving approximately 1/2 inch of wire exposed.
Step 5: For cords without differently colored inner insulation, identify the tracer lines on the new ends of the inner wires
to match the labels on the original ends and connect to house wiring as described in the appropriate step.
GROUNDING AND WIRING INSTRUCTIONS
Step 1: Insert the green grounding screw (G) into the hole with two raised dimples on the mounting bar (B). Wrap the
grounding wire (F) from the fixture canopy around the green grounding screw (G) on the mounting
bar (B) leaving enough excess wire. Thread the green grounding screw (G) into the mounting bar (B) but do
not tighten screw at this time.
Step 2: Connect th
e greenish grounding wire (with green label) or green grounding wire (F)
and excess grounding
wire from the fixture canopy with the grounding wire from outlet box by using a wire connector (P), then
wrap the wire connector with electrical tape for a more secure connection. WARNING: Never connect
grounding wire to black or white power supply wires.
Step 3: Connect the black house wire to the transparent wires with black label or the black wire with a wire
connector, and wrap the wire connector with electrical tape for a more secure connection.
Step 4: Con
nect the white house wire to the transparent wires with white label or the white wire
with a
wire
connector, and wrap th
e wire connector with electrical tape for a more secure connection.
Note: Try to gently pull the wire connectors off the wires. If you can pull the connector off, carefully repeat
steps 2, 3 and 4 above, and check again for a firm connection. Make sure no bare wires can be seen outside
wire connectors.
Step 5: Tighten grounding screw (G). Do not over tighten.
FINAL ASSEMBLY
Step 1: After wires are connected, tuck them carefully inside outlet box. Raise canopy (D) allowing the mounting
screw (A) to protrude through the hole in the canopy (D), and secure with ball nut (E).
Step 2: Install the shade (K) and support ring (M) onto the socket (J) and secure with screws (N) or retaining ring (L),
whichever is applicable.
Step 3: Install lamp. Please do not exceed the maximum capacity recommended on the socket.
CLEANING
To clean, wipe fixture with a soft cloth. Clean glass with a mild soap. Do not use abrasive materials such as scouring pads
or powders, steel wool or abrasive paper.
B
H
Q
G
I
A
P
O
*C
F
D
E
J
M
L
K
N
Westinghouse Lighting, Philadelphia, PA 19154-1029, U.S.A.
www.westinghouselighting.com
, WESTINGHOUSE, and INNOVATION YOU CAN BE SURE OF
are trademarks of Westinghouse Electric Corporation.
Used under license by Westinghouse Lighting.
All rights reserved.
Made in China
W-394
012816
*NOT SUPPLIED