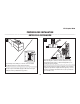
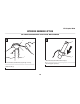
ETL-ES-Quince-WH10 PREPARING FOR INSTALLATION ANTES DE LA INSTALACIÓN 1 2 Unpack and inspect fan carefully to be certain all contents are included. Turn off power at fuse box to avoid possible electrical shock. Use metal outlet box suitable for fan support (must support 35 lbs). Before attaching fan to outlet box, ensure the outlet box is securely fastened by at least two points to a structural ceiling member (a loose box will cause the fan to wobble).
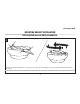
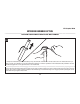
ETL-ES-Quince-WH10 MOUNTING BRACKET INSTALLATION INSTALACIÓN CON SOPORTE DE MONTAJE 3 2 1 1 2 Remove the screws from the two mating holes (1) on the canopy. Loosen (do not remove) the screws in the mating slots (2) on the canopy. Rotate the mounting bracket and remove from the canopy. Quite los tornillos de los dos orificios coincidentes (1) del dosel. Afloje (no quite) los tornillos de las ranuras coincidentes (2) del dosel. Gire el soporte de montaje y sepárelo del dosel.
ETL-ES-Quince-WH10 MOUNTING BRACKET INSTALLATION INSTALACIÓN CON SOPORTE DE MONTAJE MOUNTING OPTIONS OPCIONES DE MONTAJE 4 5 Choose a MOUNTING OPTION Elija una OPCIÓN DE MONTAJE NORMAL DOWNROD OPTION If installing downrod supplied with fan, proceed to page 9, step 6. OPCIÓN CON VARILLA VERTICAL PARA CIELORRASO NORMAL Si instala la varilla vertical incluida con el ventilador, proceda a la página 9, paso 6.
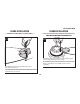
ETL-ES-Quince-WH10 NORMAL DOWNROD OPTION OPCIÓN CON VARILLA VERTICAL PARA CIELORRASO NORMAL 6 7 1 2 3 1 2 4 3 Insert downrod into downrod coupling. Make sure to align hole in downrod with the hole in downrod coupling. Install cross pin (1) through coupling and downrod. Insert keeper pin (2) into cross pin until it snaps into place. Tighten set screws (3) in coupling. Slide coupling cover (4) over the downrod coupling. PROCEEDTO PAGE 13, STEP 13.
ETL-ES-Quince-WH10 EXTENDED DOWNROD OPTION OPCIÓN CON VARILLA VERTICAL MÁS LARGA 8 9 3 2 1 1 2 Slide downrod ball (1) off of downrod and remove pin (2). Deslice la esfera de la varilla vertical (1) hasta separarla de la varilla vertical y quite el pasador (2). Loosen downrod ball (1) from downrod (2) by removing set screw (3). Afloje la esfera de la varilla vertical (1) de la varilla vertical (2) quitando el tornillo (3).
ETL-ES-Quince-WH10 EXTENDED DOWNROD OPTION OPCIÓN CON VARILLA VERTICAL MÁS LARGA 10 Re-install pin into extended downrod, and slide downrod ball up to the top of the downrod. Re-install set screw to secure ball to downrod. Note: Some extended downrods have a predrilled set-screw hole. If a pre-drilled hole is present in the extended downrod, tighten the set screw into the pre-drilled hole in the extended downrod.
ETL-ES-Quince-WH10 BLADE INSTALLATION INSTALACIÓN DE LAS PALETAS BLADE INSTALLATION INSTALACIÓN DE LAS PALETAS 11 12 1 2 3 Attach blade assembly to motor using the noise-dampening motor gaskets and motor screws provided. Tighten screws securely. Fije el conjunto de las paletas al motor usando las juntas reductoras de sonido del motor y los tornillos para el motor incluidos. Apriete los tornillos asegurándolos.
ETL-ES-Quince-WH10 MOUNTING MONTAJE 13 14 Carefully lift fan assembly onto mounting bracket. Rotate fan until notch on downrod ball (1) engages the ridge on the mounting bracket (2). This will allow for hands free wiring. With bracket holding fan assembly, make electrical connections using the following step for wiring instructions. Levante con cuidado el conjunto del ventilador hasta el soporte de montaje.
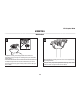
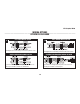
ETL-ES-Quince-WH10 WIRING OPTIONS OPCIÓN DE CABLEADO 15 PULL CHAIN WIRING OPTION 16 Follow diagram above to make wiring connections for fan pull chain control. WALL CONTROL WIRING OPTION Follow diagram above to make wiring connections for wall control operation. OPCIÓN DE CABLEADO PARA CONTROL DE PARED OPCIÓN DE CABLEADO PARA CADENILLA DE TIRO Siga las instrucciones del diagrama anterior para hacer las conexiones de cableado para el ventilador con control de pared.
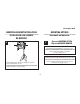
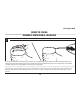
ETL-ES-Quince-WH10 SECURE TO CEILING ASEGURE EL VENTILADOR AL CIELORRASO 17 For downrod fans, slide the canopy up to the mounting bracket. Para ventiladores con varilla vertical, deslice el dosel hacia arriba hasta el soporte de montaje. 3 1 2 The canopy has two mating slots (1) and two mating holes (2). Position both slots on canopy directly under and in line with two screws in the mounting bracket (3). Lift the canopy, allowing the two screws to slide into the mating slots.
ETL-ES-Quince-WH10 LIGHT FIXTURE INSTALLATION INSTALACIÓN DEL ARTEFACTO LUMINOSO 18 19 1 2 Install light bulbs. Instale las bombillas de luz. Locate the indentations on the neck of the glass (2) and align with the protrusions from the light kit (1). Lift the glass up allowing the protrusions to engage the indentations on the glass, and twist the glass clockwise to lock into place. Localice las marcas en el cuello de la pantalla de vidrio (2) y alinéelas con las protuberancias del juego de luces (1).
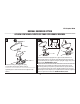
ETL-ES-Quince-WH10 20 Assemble decorative fob and extension chains from hardware bag to fan pull chains by inserting end of chain into chain coupling. Confirm chains are held by lightly pulling both chains in coupling. Sujetar las cadenas largas de tiro con las piezas finales correspondientes, a las cadenas del ventilador, introduciendo el extremo de la cadena larga en la pieza de unión. Asegúrese de que las cadenas están bien sujetas, tirando ligeramente de ambas cadenas en la pieza de unión.