
Owner's Manual


16
ASSEMBLY
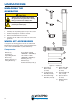
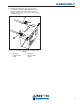
6. Install the lifting bracket using the hex bolts,
spacers and locknuts (see Figure 8).
1
2
3
4
Figure 8 – Installing Lifting Bracket
1 - Lifting Bracket
2 - Hex Bolt
3 - Spacer Sleeve
4 - Locknut
INSTALLING THE BATTERY
!
WARNING
To avoid electric shock:
• ALWAYS connect the positive (+)
battery cable (red boot) first when
connecting battery cables.
• ALWAYS disconnect the negative (-)
battery cable (black boot) first when
disconnecting battery cables.
• NEVER connect the negative (-)
battery cable (black boot) to the
positive (+) post on the battery.
• NEVER connect the positive (+)
battery cable (red boot) to the
negative (-) post on the battery.
• NEVER touch both battery posts
simultaneously.
• NEVER place a metal tool across
both battery posts.
• ALWAYS use insulated or non-
conducting tools when installing the
battery.
OTE:N The generator comes equipped with the
positive battery cable (red boot) already
attached.
1. Verify the positive (+) battery cable (red boot) is
securely tightened to the positiv
e (+) battery post.
Make sure boot is over battery post.
2. Carefully remove the protective wrapping around
the lug of the negative (-) battery cable (black boot).
3. Locate negative (-) cable attached to alternator
cable, remove tie and route to the negative (-)
battery post.