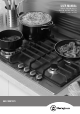
USER MANUAL GHP16S, GHP16W, GHP17S, GHP17W, GHP765S, GHP775S, GHP95S, GHP95W, GHP795S GAS COOKTOPS
contents congratulations contents Congratulations and thank you for choosing our Product. We are sure you will find your new cooktop a pleasure to use and a great asset to your cooking. Before you use the cooktop, we recommend that you read through the whole user manual which provides the description of the cooktop and its functions. Important safety instructions . . . . . . . . . . . . . . . . . . . . . 3 Installation and use summary . . . . . . . . . . . . . . . .
safety Important safety instructions Please read the user manual carefully and store in a handy place for later reference.
INSTALLATION & use installation USING YOUR COOKTOP NOTE: You must read these warnings carefully before Note: Gas controls turn anticlockwise from ‘Off’ and have limited movement. installing or using the cooktop. If you need assistance, contact your Customer Care Department. The manufacturer will not accept liability, should the instructions below or any other safety instructions incorporated in this book be ignored.
CLEANING & CARE Pots and pans All common pots and pans: aluminium, stainless steel, cast iron, ceramic, etc., may be used on your new gas model cooktop. Ensure that the pots or pans are steady and have flat bases to avoid dangerous spill-over of hot liquids and wasted energy. A wok support has been supplied with this appliance for use when cooking with a round-bottom wok. The support is not necessary when cooing with a flat-bottom wok.
TROUBLESHOOTING If you have a problem with the cooktop, check the table below. You may be able to solve the problem and this will save you from paying for a service call. You will have to pay for a service call even in the warranty period if the problem is one listed below. FAULT possible causes • Knob not held down long enough Burner will not light in ‘High’ position for flame safeguard even though the sparker (where fitted) to engage is working.
INSTALLATION INSTALLATION INSTRUCTIONS This appliance must be installed by an authorised person and in compliance with : 1. AS 5601 ‘Gas Installations’ (Australia) or NZS 5261 ‘Installation of Gas Burning Appliances and Equipment’ (New Zealand) or the relevant installation code for gas appliances of your country. 2. The local gas fitting regulations, municipal building codes, electrical wiring regulations and any other relevant statutory regulations. 3. The particular instructions as given below.
INSTALLATION INSTALLATION PROCEDURE 1. The bench cutout should be made as per cutout dimensions in Figure 4. 2. Adjacent walls, cupboards and protection for combustible materials. Ensure that the appliance is installed with Section 5.12.1 of AS 5601 (Australia) or section 14.1 of NZS 5261 (New Zealand), regarding clearances to combustible surfaces and materials, and clearances to rangehoods and exhaust fans.
INSTALLATION Figure 7 Figure 6–60cm models seal hob trivet benchtop 10mm clamp burner box screw 11mm Figure 8–60cm and 75cm models 11mm clamp location clamp location Figure 6–75cm models 10mm 86mm clamp location 86mm Bottom view clamp location Figure 8–90cm models Figure 6–90cm models possible clamp locations 10mm 26mm 26mm possible clamp locations Bottom view 9
GAS CONNECTION GAS CONNECTION OPERATION ON N.G./S.N.G. This appliance is supplied for use with Natural Gas. Regulator An appliance regulator is provided. The regulator must be positioned so that the pressure test nipple is accessible when the appliance is installed. Connect the gas supply to the ½” B.S.P. internal thread inlet of the regulator. Refer to ‘bench cutout’ (Figure 4) for connection point position. However, it can be converted for use with LPG. Refer to LP conversion on pages 12 and 13.
Checking the gas supply 1. Check the manometer zero point is correct. 2. Connect the manometer to the cooktop pressure point. This is located on the regulator. 3. Turn on the gas supply and electricity and try to ignite the gas. TIPS & INFORMATION NOTE! It will take additional time to light the gas for the first time as air needs to be purged from the pipes. 4.
LPG CONVERSION CAUTION This appliance is fitted with Natural Gas burner injectors. Please follow the procedure below if a conversion to suit LP gas is required. The conversion kit contains appropriate LPG injectors and 1 LPG sticker. To convert to LPG 1. Remove the hotplate burners to access the hotplate injectors. Replace the factory fitted NG injectors with the appropriate injectors, as supplied (see Table 2). 2. Unscrew the hex nut from the regulator.
ELECTRICAL CONNECTION (220-240 volts) Figure 10 Hex nut assembly, fully screwed down Hex nut assembly, removed from regulator and insert disassembled The appliance is supplied with a standard 7.5Amp service cord terminated by a 3-pin plug for connection to a standard household socket. The electrical supply is required to power the electronic ignition system. NOTE: It will be necessary for servicing purposes to disconnect the electrical power supply.
TESTING APPLIANCE OPERATION After installation, test the appliance and ensure that it operates correctly before handing it over to the customer. The following procedure is recommended: 1. Turn on the gas and electricity supply and attempt ignition on all burners, both separately and in combination. (For correct procedure, refer to page 4). Note that additional time needs to be allowed for the initial lighting as air has to be purged from the pipes. 2. Observe the flame appearance on each burner.
Warranty FOR SALES IN AUSTRALIA AND NEW ZEALAND APPLIANCE: WESTINGHOUSE 4 & 5 BURNER GAS COOKTOPS This document sets out the terms and conditions of product warranties for Electrolux branded appliances. It is an important document. Please keep it with your proof of purchase documents in a safe place for future reference should you require service for your Electrolux appliance. General Terms and Conditions 1.
For more information on all Westinghouse appliances, or for dimension and installation information, call into your retailer, phone or email our customer care team or visit our website: AUSTRALIA phone: 1300 363 640 fax: 1800 350 067 email: customercare@electrolux.com.au web: www.westinghouse.com.au NEW ZEALAND phone: 09 573 2384 fax: 0800 363 600 email: customercare@electrolux.co.nz web: www.westinghouse.co.