
User manual


5
OPERATION
SETTING THE TIME
If you have purchased a model fitted with an electronic
clock, you MUST set the time of day before you can
operate your appliance.
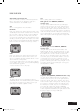
ELECTRONIC CLOCK
• After the appliance has been electrically connected
“12.00” will be displayed and the “clock” indicator
will flash.
• To set the time of day, press the – or + symbols. 5
seconds after the last change, the “clock” indicator will
disappear, confirming the time has been set.
NOTE: The clock has a 24-hour display.
• Please remove all internal boxes and bags from the oven
before operation.
• Please wipe out the oven interior prior to operation with
warm soapy water and polish dry with a soft clean
cloth. Do not close the oven door until the oven is
completely dry.
• If your appliance is fitted with a 2-hour “Auto Off” timer,
make sure it is set to “Off” marker for manual operation.
See image.
PREPARING YOUR APPLIANCE FOR THE FIRST TIME
Installing your oven accessories
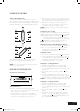
1. Side racks
The side racks that come with your oven can be attached to
either side of your oven.
• Insert the twin pegged side into the rear access holes
provided. See diagram.
• Then locate the front peg into the front access hole and
push in firmly.
BEFORE OPERATING YOUR APPLIANCE FOR THE
FIRST TIME
WMAN_GASBIO_Jun11.indd 5 14/07/11 3:24 PM