
Product Manual


Westinghouse Outdoor Power Equipment, LLC | 21
STORAGE
Proper storage preparation is required for trouble-free
operation and generator longevity.
NOTICE
Gasoline stored for as little as 30 days can deteriorate,
causing gum, varnish, and corrosive buildup in fuel lines,
fuel passages and the engine. This corrosive buildup
restricts the ow of fuel, which can prevent the engine
from starting after a prolonged storage period. The use
of fuel stabilizer signicantly increases the storage life of
gasoline. Full-time use of fuel stabilizer is recommended.
Follow the manufacturer’s instructions for use.
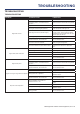
STORAGE TIME RECOMMENDED PROCEDURE
Less than 1 month No service required.
2 to 6 months
Fill with fresh gasoline and add
gasoline stabilizer. Drain the
carburetor oat bowl.
6 months or longer
Drain the fuel tank and carburetor
oat bowl.
SHORT TERM STORAGE
• Allow the generator to cool a minimum of 30 minutes
before storage.
• Replace all protective covers on the generator control
panel.
• Wipe the generator with a moist cloth. Clean any debris
from the air inlets on the front of the unit and mufer
cooling vents.
• Store the generator in a well-ventilated, dry location
away from sparks, open ames, pilot lights, heat, and
other sources of ignition such as areas with a spark-
producing electric motor or where power tools are
operated.
• Do not store the generator or gasoline near furnaces,
water heaters, or any other appliances that produce
heat or have automatic ignitions.
• With the engine and exhaust system cool and all
surfaces dry, cover the generator to keep out dust. Do
not use a plastic sheet as a dust cover. Non-porous
materials trap moisture and promote rust and corrosion.
LONG TERM STORAGE
Even properly stabilized fuel can leave residue and cause
corrosion if left long term. If storing the generator for two to
six months, drain the oat bowl to prevent gum and varnish
buildup in the carburetor.
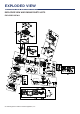
DRAINING THE FLOAT BOWL
1. Remove the engine service cover.
2. Locate the drain hose extending from the bottom of the
carburetor oat bowl.
3. Place the loose end of the hose outside the generator
into an approved gasoline container to catch the drained
fuel.
4. Loosen the oat bowl drain screw and allow the fuel to
drain. Tighten the oat bowl drain screw.
5. Route the drain hose between the air cleaner housing
and the engine service cover. Install the engine service
cover.
DRAINING THE FUEL TANK
If storing the generator for longer than six months, drain
the fuel tank to prevent fuel separation, deterioration, and
deposits in the fuel system.
1. Unscrew the fuel tank cap. Remove the fuel screen lter.
2. Using a commercially available gasoline hand pump
(not included), siphon the gasoline from the fuel tank
into an approved gasoline container. DO NOT use an
electric pump.
3. Reinstall the fuel screen lter and the fuel tank cap.
4. Start the generator and allow it to run until the generator
engine stops.
5. Remove the spark plug.
6. Put a teaspoon of engine oil into the cylinder and
pull the recoil handle until resistance is felt. At this
position the piston is coming up on its compression
stroke and both valves are closed. Storing the engine
in this position will help prevent internal corrosion.
Return the recoil handle gently.
7. Reinstall the spark plug. Leave the spark plug boot
disconnected to prevent accidental starting.
8. Install the engine service cover.
MAINTENANCE