
iGen-Manual


24 | Westinghouse Portable Power
STORAGE
WARNING
Never store an inverter with fuel in the
tank indoors or in a poorly ventilated
area where the fumes can come in
contact with an ignition source such
as a: 1) pilot light of a stove, water
heater, clothes dryer or any other gas
appliance; or 2) spark from an electric
appliance.
NOTICE
Gasoline stored for as little as 60 days can go bad,
causing gum, varnish and corrosive buildup in fuel
lines, fuel passages and the engine. This corrosive
buildup restricts the ow of fuel, preventing an engine
from starting after a prolonged storage period.
Proper care should be taken to prepare the inverter for
any storage
1. Clean the inverter as outlined in Cleaning the
Inverter.
2. Siphon all gasoline from the fuel tank as best as
possible.
3. Start the engine and allow the inverter to run until
all the remaining gasoline in the fuel lines and
carburetor is consumed and the engine shuts o.
4. Drain any remaining fuel from the oat bowl. See
Draining the Float Bowl on page 22.
5. Change the oil (see Changing Engine Oil on page
20).
6. Remove the spark plug (see Spark Plug
Maintenance on page 22) and place about 1
tablespoon of oil in the spark plug opening. While
placing a clean rag over the spark plug opening,
slowly pull the recoil handle to allow the engine to
turn over several times. This will distribute the oil
and protect the cylinder wall from corroding during
storage.
7. Replace the spark plug (see Spark Plug
Maintenance on page 22).
8. Move the inverter to a clean, dry place for storage.
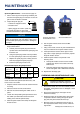
5. Insert a feeler gauge between the rocker arm and
the push rod and check for clearance (see Figure
16). See Table 2 for valve lash specications
Figure 16
(1) Push Rod, (2) Feeler Gauge Area
(3) Rocker Arm, (4) Jam Nut, (5) Adjusting Nut
Standard Valve Lash
Intake Valve Exhaust Valve
Valve Lash
0.06-0..10mm 0.08-0.12mm
Bolt Torque
8-12N.m 8-12N.m
6. If an adjustment is required, hold the adjusting nut
and loosen the jam nut.
7. Turn the adjusting nut to obtain the correct valve
lash. When the valve lash is correct, hold the ad-
justing nut and tighten the jam nut to 106 in-lb (12
N•m).
8. Recheck the valve lash after tightening the jam nut.
9. Perform this procedure for both the intake and
exhaust valves.
10. Install the rocker arm cover, gasket and spark plug.
CLEANING THE INVERTER
It is important to inspect and clean the inverter before
every use.
Clean All Engine Air Inlet and Outlet Ports – Make
sure all engine air inlet and outlet ports are clean of any
dirt and debris to ensure the engine does not run hot.
MAINTENANCE
1
2
3
4
5