USER MANUAL BUILT-IN COOKING APPLIANCES POR663, PORS663L/R, POR667, POR668, PORS668L/R, POR783, POR881, POR883, PPR776, PGR657, PGR659, PXR688, PXR698, PDR790, PDR794
congratulations contents Dear customer, Important safety instructions............................................................... 3 Description of your appliance.............................................................. 5 POR663........................................................................................ 5 PORS663...................................................................................... 5 POR667.................................................................................
Important safety instructions Please read the user manual carefully and store in a handy place for later reference.
Important safety instructions WARNING Grill WARNING cooktops The grill door must be left fully open whilst grilling in a separate grill wall oven. Do not allow pots to boil dry, as damage to both pan and cooktop may result. The grill drawer must be left approximately two finger widths ajar whilst grilling in a separate grill underbench oven. Do not operate the cooktop for an extended period of time without a utensil on the hot plate.
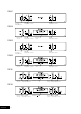
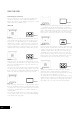
POR663 PORS663 Function selector Oven/Grill temperature selector 80 80 60 60 90 minute‘Auto Off’ timer POR667 Function selector Electronic clock Oven/Grill temperature selector Function selector Electronic clock Oven/Grill temperature selector POR668 PORS668 POR783 Programmable controller POR881 Function selector Electronic clock Temperature selector POR883 Programmable controller PPR776 Left front Left rear Right rear Right front Function Oven/Grill selector temperature selecto
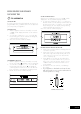
PGR657 PGR659 80 80 60 60 90 minute ‘Auto Off’ timer Function selector Oven temperature selector Oven temperature selector Grill temperature selector Electronic clock Grill temperature selector PXR688 PXR698 80 80 60 60 90 minute ‘Auto Off’ timer Function selector Oven temperature selector Oven temperature selector Grill temperature selector Electronic clock Grill temperature selector PDR790 Function selector Oven/Grill temperature selector Electronic clock Function selector O
BEFORE OPERATING YOUR APPLIANCE FOR THE FIRST TIME TIPS & INFORMATION Setting the time If you have purchased a model fitted with an electronic or programmable timer, you must set the time of day before you can operate your appliance. Electronic Clock • After the appliance has been electrically connected “12.00” will be displayed and the “clock” indicator will flash. • To set the time of day, press – or +.
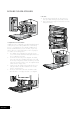
INSTALLING YOUR OVEN ACCESSORIES 2. Side racks • Insert the twin pegged side into the rear access holes provided, ensuring pegs are fully inserted. • Then locate the front peg into the front access hole and push in firmly. 1. Catalytic liners (on selected models) Catalytic liners are coated with a specially formulated enamel coating. This porous coating enables the “self cleaning” process – see page 27 for more details.
INSTALLING YOUR OVEN ACCESSORIES • When locating the side racks into the small oven or grill ensure the left pegs go into the lower two access holes. (Refer Fig. 1) Fig. 1 3. Shelves and trays (excluding POR881) (Refer Fig. 2) The shelves are designed so that they have maximum travel but cannot be accidentally pulled right out. The trays are designed the same way and fit straight into the side racks. • Locate the rear edge of the shelf/tray in between 2 guide rails of the side rack – see diagram.
USING YOUR OVEN Understanding your oven functions Your oven will have a selection of the following functions; description and touch control symbol illustrated below. Refer to “Description of your appliance” (page 5) to confirm what functions are available to you. LARGE OVEN Function 1 Rapid Heat Heat comes from the element surrounding the fan as well as the smaller element above the food. This allows you to preheat your oven 30% quicker than on standard “bake”.
USING YOUR OVEN Function 7 Defrost The “defrost” function uses low temperature air that is circulated by the fan. You can defrost (thaw) your food before you cook it. You can also use “defrost” to raise your yeast dough and to dry fruit, vegetables and herbs. Function 8 Fan Grill “Fan grill” offers you the benefits of both “bake” and traditional “grill” functions. The grill element turns on and off to maintain the set temperature while the fan circulates the heated air.
USING YOUR OVEN Small Oven Grill The “grill” directs radiant heat from the powerful upper element onto the food. You can use the “grill” function for tender cuts of meat, steak, chops, sausages, fish, cheese toasties and other quick cooking foods. Grill with the grill door open for PXR688 and PXR698. Preheat your grill for 3 minutes to get the best results. This will help seal in the natural juices of steak, chops etc. for a better flavour.
USING YOUR OVEN Pre-heating your appliance For best results when baking it is recommended that you preheat your oven for 30 minutes. Preheat the grill for 3 minutes to obtain best results. Pre-heating your appliance allows it to reach the required temperature quickly and efficiently. With “rapid heat” For electric multifunction appliances preheat your oven by selecting the “rapid heat” function. This function allows your oven to reach the preset temperature quicker than any other cooking function. 1.
USING YOUR COOKTOP CAUTION The ceramic cooktop is made from ceramic glass, a tough durable material that withstands heating and cooling without breaking. However, it must be remembered that as it is GLASS, it may break. Treat it accordingly! Should you have any questions about the glass in your new appliance, please contact the Customer Care Centre by phoning 1300 363 640. The heating elements are concealed under the smooth glass surface which has a pattern to show the location of the elements.
USING YOUR COOKTOP Dealing with cooktop problems Problem Possible cause What to do Heating elements not working 1 Power not switched on • Check cooktop is plugged in and power is on • Check correct knob turned for element • Replace household fuse 2 Controls incorrectly set 3 Household fuse blown If the fuse continues to blow, contact the Service Centre Benchtop becoming too hot and/or beginning to discolour 1 Wrong type of cooking pot 2 Pot may overhang cooktop Food taking too long to cook
COOKING WITH YOUR TIMER OPERATING THE ELECTRONIC CLOCK 90 minute “Auto Off” timer The 90 minute timer features an automatic oven “cut off”. A cooking period of up to 90 minutes can be used. When the timer has counted back to “Auto Off” a ding will sound and the oven will automatically switch off. Electronic Clock Touch Control (selected models only) Once automatic baking is complete, return to manual operation by setting the timer to the “O” mark.
MODEL POR783 & POR883 PROGRAMMABLE CONTROLLER 4. Set the cooking duration you want by using – or +. 5 seconds after the last change, the “cook time” indicator I will stop flashing, and the time of day will be displayed. Note: Do not forget to add preheating time if necessary. Setting the cooking end time 1. Check the clock displays the correct time of day. 2. Select the desired oven function and temperature. The oven indicator light will glow and the heating source will come on. 3.
MODEL POR783 & POR883 PROGRAMMABLE CONTROLLER Setting the cooking time 1. Select the desired oven function and cooking temperature. 2. Press the “Timer” as often as necessary, until the “cook time” ➔❘ symbol appears. 3. Set the desired cooking time by using the – or +, whilst the “timer arrow” is flashing. After 5 seconds from the last time adjustment the “timer arrow” will disappear and your appliance is now programmed. 4. When the set time has elapsed, a signal will sound.
MODEL POR881 Electronic Clock General features Your 5 button touch control clock has the following features: • TIMER – allows you to set a countdown time that will beep when the set time has elapsed. • The TEMP. button allows the current temperature of the oven to be displayed. • Elapsed time display Setting the time of day You must set the time of day before you can operate your appliance. When power is supplied to your oven “12.00“ will be displayed on the clock and the display will flash. 1.
MODEL POR881 Electronic Clock Setting the timer 1. Press TIMER button until the display begins to flash. 2. Set the countdown time you want by using – and +. Commence with setting the number of seconds first. The minutes and hours can then be set by subsequently pressing the TIMER again and adjusting using the – and + buttons. 5 seconds after the last change the timer will stop flashing, confirming the timer has been set. 3. To cancel the timer press the timer button until the display flashes.
OVEN SHELF LOCATION • Select the correct shelf location for food being cooked. • Make sure dishes will fit into the oven before you switch it on. • Keep edges of baking dishes at least 40mm from the side of the oven. This allows free circulation of heat and ensures even cooking. • Do not open the oven door more than necessary. • Do not place foods with a lot of liquid into the oven with other foods. This will cause food to steam and not brown.
COOKING GUIDE Choosing the best oven settings The following table is intended as a guide and experience may show some variation in cooking times necessary to meet individual requirements. It may be necessary to change some cooking times and temperatures from your previous oven. For best baking results preheat oven for 30 minutes.
Roasting Meat 1. Place the meat in the oven and set the temperature between 180°C and 200°C. (It is recommended to wrap your meats in an oven roasting bag or foil to prevent fats and oils from splattering, making it easier to clean your oven.) 2. Use the grill/oven dish and smokeless grill insert. Place the meat on the insert. 3. Do not pierce the meat, as this will allow juices to escape. 4.
GRILLING GUIDE Grilling hints Guide to better grilling TIPS & INFORMATION Steak 15 – 20 minutes NOTE: Always clean the grill/oven dish after every use. Excessive fat build up may cause a fire. Chops 20 – 30 minutes Fish 8 – 10 minutes Depending on your model of appliance you will grill: • With the door open, if you are grilling in the separate grill wall-oven compartment. • With the drawer approximately two finger widths ajar, if you are grilling in the PGR657 and PGR659.
DEALING WITH COOKING PROBLEMS (see also pg.37) Problem Causes Remedies Uneven cooking: • Incorrect shelf position. • Oven tray too large. • Trays not centralised. • Air flow in oven uneven. • Grill dish affecting thermostat. – Select shelf that puts food in the centre of the oven. – Experiment with other trays or dishes. – Centre trays. – Rotate food during cooking. – Remove grill dish from oven on bake modes. Baked products too brown on top: • Oven not preheated.
CLEANING YOUR APPLIANCE TIPS & INFORMATION • Always make sure that the oven is electrically isolated before cleaning. This can be done via the functional switch located nearby. Do not use steam cleaners. • Do not line the bottom of the oven or grill with foil or cookware. Enamel • Rub persistent stains vigorously with a nylon scourer or creamed powder cleansers. NOTE: You can also use household oven enamel cleaners – follow the manufacturer’s instructions carefully.
CLEANING YOUR APPLIANCE CATALYTIC LINERS (where fitted) Cleaning your oven accessories Some models come with Catalytic liners. These models contain: 2 Catalytic side liners (to be fitted by you) 1 Catalytic fan cover (already fitted) NOTE: If your oven does not have catalytic liners and you wish to purchase them, they are available from the Customer Care Centre. Removing the trays and shelves from your appliance • Slide the dish and grill tray towards you until they reach the front stop.
CATALYTIC LINERS (where fitted) Removing the catalytic liners • Remove Side Racks. • Lift the liner up to disengage the hooks. • The liners should now be free to be pulled in towards the centre of the oven. • Refer to page 8 for re-installing your side liners. Removing and replacing the catalytic fan baffle (where fitted) CAUTION The oven must be switched off before removing the fan baffle, and the fan baffle must be replaced in accordance with instructions.
CLEANING YOUR APPLIANCE Replacing the oven top light (POR883 model only) WARNING Make sure the appliance is turned off before you remove or replace parts, to avoid the possibility of electric shock. WARNING Turn the appliance off at the main switch to make sure there is no power to the oven. • The top light is positioned behind the grill deflector at the top of the oven. • To remove the globe the shelves should first be removed from the oven.
CLEANING YOUR APPLIANCE Cleaning oven door (except models POR883 & POR881) WARNING • Grasp the oven door with a hand each side of the door and remove it from the oven by pulling it towards you. Do not lift the door by the handle. Rough handling will cause glass to break. Removing the oven door Your oven is equipped with a door that can be disassembled in order to clean all the panes of glass. Remove the door before cleaning.
CLEANING YOUR APPLIANCE Re-assembling door glass panels • Insert the smaller clear glass panel (when fitted) first from above and at an angle to the profile of the door. Cleaning door glass panels WARNING Do not to use harsh abrasives on the glass panes as the reflective surface plays a role in the function of the oven. Do not place glass in dishwasher. Hand wash only with a soft cloth and warm soapy water. When dry polish with a soft cloth and ensure the glass is dry before reassembly.
CLEANING YOUR APPLIANCE Re-assembling top door trim • Take hold of the top door trim at each side and position it to the inside edge of the glass. • Push the trim down with its top edge over glass panel until the clip snaps in on each side of the trim. • Open the door fully to access the hinges then rotate the ‘stirrups’ (see image below) until they lock into the hook. The oven door may now be closed.
CLEANING YOUR APPLIANCE Removing side open door glass panel WARNING R ough handling, especially around the edges can cause the glass to break. • Take hold of the black bordered glass panel with a hand on its upper and lower edge. Lift and rotate the glass around the retainer to remove it from the guide. Cleaning side open door glass panels WARNING Do not to use harsh abrasives on the glass panes as the reflective surface plays a role in the function of the oven. Do not place glass in dishwasher.
CLEANING YOUR APPLIANCE Cleaning the pyrolytic oven door (POR883 & POR881 modelS only) Replacing top door trim • Take hold of the top door trim at each side and position it to the inside edge of the glass. • Push the trim down with its top edge over glass panel until the clip snaps in on each side of the trim. Your pyrolytic oven is equipped with an oven door that can be disassembled in order to clean all the panes of glass.
Removing the glass panes • Remove the 3 panes of glass starting with pane 1. • When removing pane 3 ensure that the 2 rubber supports are removed before cleaning. Do not misplace them! Cleaning the glass panes Clean with a damp cloth. Do not use scouring agents or abrasive sponges as these could damage the reflective surface. Dry thoroughly before reassembly. Replacing the glass panes • Replace the glass panes back into the door starting with pane 3.
pyrolytic cleaning of the oven cavity (POR883 & POR881 modelS only) Operation If your oven has the Pyrolytic self-cleaning function, it cleans by burning off the spatters and accumulated dirt and grease from the oven cavity, at high temperature. This process produces ash which can then be wiped out of the oven cavity. CAUTION During the pyrolytic cleaning process the oven becomes extremely hot.
Solving problems Faults If there is a problem with the oven and/or grill, please: • Check the points listed below before calling for service. It may be possible to avoid a call by fixing the problem yourself – and so continue cooking. • For cooking problems refer to page 25. NOTE: We may charge for service even in the guarantee period if your problem is due to the causes listed below. Data Plate When you need information, service or replacement parts please: • Tell us the 1. Model, 2.
INSTALLING YOUR APPLIANCE WARNING USE AN AUTHORISED PERSON As stated in the local municipal building codes and other relevant statutory regulations. • Wiring connections must be in accordance with AS/NZS 3000 Wiring Rules and any particular conditions of the local authority. • Refer to data plate for rating information and circuit diagram. The data plate is positioned behind the bottom of the oven door. The circuit diagram is positioned on the top panel of the appliance.
Hard Wiring Detail 1. Remove terminal cover plate from rear panel of appliance. 2. Fit wires through hole in cover plate and make connections to terminals. 3. Engage wires into plastic clip. Secure plastic clip with two long silver screws (supplied in separate bag). 4. Replace cover plate onto rear panel. Second active wire only required (optional) for multi-phase products.
Underbench Ovens and Side Opening Door Ovens Your underbench oven looks best when the control panel is directly under the benchtop. An upper infill panel may have to be added if the cooktop placed above the benchtop is too deep. Refer to cooktop installation instructions for required clearance between cooktop and oven.
Separate Grill Underbench Ovens GAS TYPE A B C Flush fit 600 731 581min Proud fit 565 723 560min A B C A 725 725 B mounting holes mounting holes C 596 596 Recommended Cabinet Design NOTE TO INSTALLER: For Separate Grill Underbench Installations where a Cooktop is installed directly above the appliance, a minimum clearance distance of 10mm must be allowed for between the bottom of the cooktop & the top of the Separate Grill Underbench Oven.
INSTALLATION Double Ovens GAS TYPE A B C Flush fit 600 1086 581min Proud fit 565 1078 560min 561mm use 25mm black installation screws (as supplied) A mounting holes B C use 15mm black installation screws (as supplied) 650mm min mounting holes 596mm Cooktop cut-out dimensions (combo models) COOKTOP DIMENSIONS Overall Cooktop Dimensions Width 610mm Depth 515mm Depth of base 45mm COOKTOP cut-out DIMENSIONS Cooktop A B 560mm 490mm A minimum gap of 40mm must be maintained between th
Warranty FOR SALES IN AUSTRALIA AND NEW ZEALAND APPLIANCE: BUILT-IN OVEN, COOKTOP AND FREESTANDING COOKER This document sets out the terms and conditions of the product warranties for Electrolux Appliances. It is an important document. Please keep it with your proof of purchase documents in a safe place for future reference should you require service for your Appliance. 1.
For more information on all Westinghouse appliances, or for dimension and installation information, call into your retailer, phone or email our customer care team or visit our website: AUSTRALIA phone: 1300 363 640 fax: 1800 350 067 email: customercare@electrolux.com.au web: www.westinghouse.com.au NEW ZEALAND phone: 09 573 2384 fax: 0800 363 600 email: customercare@electrolux.co.nz web: www.westinghouse.co.