OWNER’S MANUAL 540 UPRIGHT COOKING APPLIANCES
congratulations Contents Congratulations and thank you for choosing our Westinghouse upright cooker. We are sure you will find your new appliance a pleasure to use and a great asset to your cooking. Before you use the appliance, we recommend that you read through the whole user manual which provides a description of the product and it’s functions. General safety......................................................................................
An important read to avoid an electric shock or fire Meanings of symbols used in this manual are shown below: This symbol indicates never to do this This symbol indicates always do this This appliance is not intended for use by persons (including children) with reduced physical, sensory or mental capabilities, or lack of experience and knowledge, unless they have been given supervision or instruction concerning use of the appliance by a person responsible for their safety.
An important read to avoid an electric shock or fire Installation, Cleaning and Servicing An authorised person must install this appliance. (Certificate of Compliance to be retained) Before using the appliance, ensure that all packing materials are removed from the appliance. In order to avoid any potential hazard, the enclosed installation instructions must be followed. Ensure that all specified vents, openings and airspaces are not blocked.
Description of electric cooker with separate grill Fan Forced & Conventional Oven 1. Hob 2. Removable Spill Tray (Radiant Hotplate Models Only) 3. Removable Grill Dish Side Support 4. Grill Door 5. Removable Shelf 6. Oven Inner Door Glass (where fitted) 7. Oven Door 8. Control Panel 9. Flue Vent 10. Grill Element & Removable Grill Element Reflector 11. Removable Grill Dish & Rack 12. Oven Element (conventional models only) 13. Fan & Element Cover (fan forced models only) 14.
Description of gas cooker 1. Hotplate Burner Control Knob • Sets the hotplate cooking temperature. 2. Grill Burner Control Knob • Sets the grilling temperature. 3. Oven Burner Control Knob • Sets the baking temperature. 4. Electronic Igniter Switch (where fitted) • Ignites the hotplate burners, grill burner and oven burner Note: The appropriate burner control knob has to be set first. 5. Fan Switch (where fitted) • Turns oven fan on/off. 6. Light Switch (where fitted) • Turns oven light on/off.
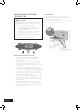
Description of electric cooker with grill in oven Conventional Oven 1. Control Panel 2. Hob 3. Removable Inner Door Glass 4. Oven Door 5. Power Outlet 6. Power Outlet Switch 7. Flue Vent 8. Grill and Oven Elements 9. Removable Grill Dish & Rack 10. Removable Shelf 11. Hidden Oven Element 12. Rear Adjustable Feet 13. Anti-tilt Plate 14. Removable Kick Panel 15. Front Adjustable Feet 1. 5. 6. 2. 7. 8. 9. 10. 3. 4. 11. 12. 13. 14. 15.
Before operating your appliance for the first time WARNING Setting the time If you have purchased a model fitted with a 3 button programmable timer, you must set the time of day before you can operate your appliance. Fitting oven shelves 1. Ensure shelf orientation is correct (refer picture). 2. Slide into oven at an angle until raised back of shelf is past the stop on side runners. 3. Lower front of shelf and push in until stop is reached. NOTE: The top ledge is not a shelf position.
Using the oven WARNING Oven safety warnings • ALWAYS follow the instructions for putting the shelves and fittings into the oven, to avoid accidents. • DO NOT line the oven with foil, it will damage the enamel. • DO NOT use polyunsaturated oil when cooking in the oven. This type of oil can cause heavy deposits inside the oven. • DO NOT place cookware or anything else on the bottom of conventional oven model as trapped heat will damage the oven.
Using the oven Using the oven of your gas cooker Baking • With conventional oven models heat comes from the burner below the food at rear of oven. • The burner is controlled by the thermostat which sets the oven temperature. • There is a variation in temperature between the bottom and the top of the oven. The bottom shelf is the coolest and the top shelf is the hottest. Igniting the Gas Oven 1. Press the oven burner control knob and turn it a quarter of the way. 2.
Oven cooking guide The following is intended as a guide and experience may show some slight variation to be necessary to meet individual requirements. Where the gas models vary from electric, details for gas cooking is shown in brackets. For best results when baking, preheat your oven for 30 minutes.
Handling baking problems Problem Causes What to do Uneven cooking Incorrect shelf position Select shelf that puts food in centre of oven Oven tray too large Try other trays or dishes Trays not in centre Put trays in centre Air flow in oven uneven Rotate food during cooking Grill tray affecting thermostat Remove grill tray from oven on bake modes Oven not preheated Preheat the oven Baking tins too large for recipe Use correct size tins Baking tins not evenly spaced Stagger baking tins at l
Using the grill WARNING Grill safety warnings • ALWAYS turn off the grill immediately after you have finished cooking. Fat left in the grill can catch fire. • ALWAYS leave the grill door fully open when grilling in a separate grill model. • ALWAYS close the oven door when grilling in a grill in oven model. • ALWAYS make sure that grill trays are fitted into the grill according to instructions. • DO NOT line the grill rack with foil. • DO NOT leave the grill unattended.
Using the grill Grill in oven model • To operate set function control knob to GRILL and set thermostat knob to the required temperature. • The grill directs heat onto food from the powerful upper element. • The grill is suitable for tender cuts of meat, steak, chops, sausages, fish, toasted cheese and other foods which cook quickly. • The grill should be preheated for 3 minutes before cooking to seal natural juices of meat. • The oven door MUST be left closed during grilling.
Using the hotplates of your cooker WARNING Hotplate safety warnings • DO NOT leave the hotplate on with no pot or pan on top. • DO NOT use pots and pans which are unsteady, as these could overbalance. • DO NOT use mats, heat diffusers or wok stands. These will cause a temperature build-up which can damage the cooktop. • DO NOT allow pots or pans to boil dry. This could damage the hotplate and/or the cooktop. • DO NOT let cooking utensils get too close to the hotplate control knobs.
Using the hotplates of your electric cooker Check the hotplates on your cooker against the diagrams below before you use your cooker for the first time. Radiant hotplates • The high-speed radiant hotplates heat rapidly from a cold start. This saves power. Front control models • The hotplates have a tray underneath the hob which collects spilt liquids. The radiant elements can swivel and the trim rings can be removed for cleaning of this tray.
Using the hotplate burners of your gas cooker Manual Ignition Models To light these hotplates: Electronic Ignition Models To light these hotplates: 1. Choose the hotplate you want to use 2. Turn the hotplate burner control knob to “Hi”. 3. Light with a hand held lighter eg. match. 1. Choose the hotplate you want to use. 2. Turn the hotplate burner control knob to “Hi”. 3 Press electronic igniter switch to release spark to the burner.
Operating the programmable clock WARNING The clock must be set to operate oven General features Your 3 button programmable timer has the following features: • Timer – your 3 button programmable timer allows you to set a countdown time that will beep when the set time has elapsed. • Cooking duration – You can set a cooking duration. A timer will count down the preset cooking time, beep when the time has elapsed and turn the oven off. • End cooking time – you can set a cooking finish time.
Operating the 60 minute ringer timer To set the timer, simply turn the knob clockwise to the required number of minutes. get to know your oven Get to know your new oven with this ‘Simple Test Cake’ Although we strive for a perfect performing oven, it’s possible that there will be some variation in colour when baking. Therefore, we suggest this simple, easy and delicious to make Simple Test Cake, it can help you understand your new oven.
Service fuse & oven light replacement Service Fuse location – Models with Power Point only This product is fitted with a Power Outlet at each end of the Control Panel. The Outlets are protected by a replaceable 15 Amp Fuse located at the rear of the product. WARNING Before servicing the Fuse, ensure that all Power to the product is switched off. To access fuse, unscrew fuse housing and remove from appliance (see diagram).
Fitting oven accessories and cleaning WARNING Safety warnings about cleaning • ALWAYS make sure that the cooker is turned off before cleaning. • ALWAYS clean cooker immediately after use. • DO NOT use steam cleaners. These may cause moisture build-up. • DO NOT use caustic based cleaners. These will damage aluminium parts. Cleaning the enamel: • Keep enamel clean by wiping it with a soft cloth dipped in warm soapy water. • Rub difficult stains with a nylon scourer or creamed powder cleanser.
Fitting accessories and cleaning Cleaning the Gas Hob Removing the trivets (Refer Figure 1) • The trivets locate in the recessed area of the hob. • They can be removed for cleaning by carefully lifting them from the hob. • Clean by washing in warm soapy water. • Take care when replacing the trivets as dropping them onto the hob may damage the enamelled surface. • For wok burners only use the trivet suited to the wok burner.
Cleaning the Grill Compartment Clean the Grill Compartment with hot soapy water. If stronger action is needed use a nonabrasive oven cleaner applied with a nylon scourer. Airwash door The door on your cooker is designed to allow cool air to pass up through the middle and out through the vent in the top of the door. (See diagram below) NOTE: You can also use household oven enamel cleaners but follow the manufacturer’s instructions carefully.
Solving Problems If you have a problem with your appliance, check the table below before calling service. You may be able to avoid a service call by fixing the problem yourself and so continue cooking. For cooking problems refer to Handling Baking Problems. Note: You may be charged for the service call even in the guarantee period if the problem is due to the causes listed below. When you need information, service or replacement parts please quote: 1. Model Number 2.
Problem Causes Electronic clock flashing on display Power failure or interruption (electric cooker only) Household fuse blown or power supply is off What to do Reset time of day Check fuses, power supply Note: if the household fuse continues to blow, call the Service Centre Unit smoking when first used Protective oils being removed Turn grill on high for 10 mins Turn oven on at 180˚ C for 2–4 hours Condensation building up Too much water used when cooking Reduce amount of water Leave door open afte
Installing your new cooker WARNING Safety warnings about installation • The cooker MUST be installed and serviced only by an authorised person. • A Certificate of Compliance MUST be supplied to be kept by the customer. • The packing materials MUST be removed before you install the cooker. • You MUST follow the installation instructions in this booklet. • The surrounding kitchen cabinets MUST be able to withstand 85°C.
Fitting the anti-tilt plate & stabilising bolt Cooker Stability Note: To ensure cooker stability, both the anti-tilt plate and stability bolt MUST be installed on all cookers (electric and gas). Installation Sequence 1. The cooker is delivered with the anti-tilt plate attached to the back panel. Unscrew from back panel and locate the anti-tilt plate against the rear wall. If locating between 2 cupboards, then fit the plate in the centre of the space.
Installing your electric cooker Wiring requirements The cooker MUST be installed in compliance with: • wiring connections in AS/NZS 3000 Wiring Rules • local regulations, municipal building codes and other statutory regulations • For New Zealand Only: The cooking range must be connected to the supply by a supply cord fitted with the appropriately rated plug that is compatible with the socket-outlet fitted to the final sub-circuit in the fixed wiring that is intended to supply this cooking range.
Installing the gas cooker REQUIREMENTS This appliance must be installed by an authorised person, according to all codes and regulations of: • the Australian/New Zealand Standard AS/NZS 5601.1 (particular attention to clause 6.10.1 and figure 6.3 on page 97, and clause 6.10.1.11) • local gas fitting regulations, municipal building codes and other statutory regulations. Unpacking When packaging is removed from product you will notice there are several items nested in the packaging base.
Gas Connection Point 150mm 650mm 150mm Installing the gas cooker 650mm NG Regulator Gas connection Read these points before connecting to the gas supply: • The gas connection point is a 1/2” BSP external thread located at the rear of the appliance as shown in the Rear View. • A regulator is supplied for natural gas appliances which must be fitted in the supply line to the appliance. For LPG appliances a test point fitting must be fitted to the supply line.
Testing the operation of the gas cooker NOTE: You MUST test the cooker after installation, before you hand it over to the customer. You MUST have a manometer and a connecting tube. Checking gas supply 1. Check the manometer zero point is correct. 2. Connect the manometer to the cooker pressure test point. This is located on the regulator or LPG inlet fitting. 3. Turn on the gas supply and the electricity (if applicable) and try to ignite the gas.
Notes Notes 32
Warranty FOR SALES IN AUSTRALIA AND NEW ZEALAND APPLIANCE: BUILT-IN OVEN, COOKTOP AND FREESTANDING COOKER This document sets out the terms and conditions of the product warranties for Electrolux Appliances. It is an important document. Please keep it with your proof of purchase documents in a safe place for future reference should you require service for your Appliance. 1.
For more information on all Westinghouse appliances, or for dimension and installation information, call into your retailer, phone or email our customer care team or visit our website: AUSTRALIA phone: 1300 363 640 fax: 1800 350 067 email: customercare@electrolux.com.au web: www.westinghouse.com.au NEW ZEALAND phone: 09 573 2384 fax: 0800 363 600 email: customercare@electrolux.co.nz web: www.westinghouse.co.