USER’S MANUAL MANUEL DE L’UTILISATEUR MANUAL DEL USUARIO TX-52F480S 1080p HDTV TVHD 1080p
English If you have any questions or concerns, Please call our toll free number 1-866-287-5555 Owner’s Record The model and serial numbers are located on the back of the TV. Keep a record of the numbers in the spaces provided below. Refer to them whenever you call upon your Westinghouse Digital dealer regarding this product. Model No.____________________________ Serial No.
CONTENTS English WELCOME Package Contents Contacting Westinghouse Digital 1. PRODUCT SAFETY Important Notice Concerning Power Cord Selection FCC Compliance Statement Product Safety Instructions —Other Notices Antenna Installation Safety —Outdoor Antenna Grounding —Lightning —Power Lines 2.
. HDTV OPERATION 5.
English WELCOME Congratulations on the purchase of your High Definition LCD TV—and thank you for choosing Westinghouse. This User Manual was created to ensure simple, safe setup and use of all the features offered by your new HDTV.
English 5
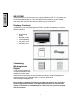
English PLEASE READ FIRST: 1. PRODUCT SAFETY WARNING: This device must be operated with the original power supply, part number DPS-210 EP 2 C. CAUTION: The power supply outlet should be located near High Definition LCD TV and should be easily accessible. Always use the appropriate AC cord that is certified for your specific country. Some examples are listed below: USA..................UL Switzerland ..... SEV Canada.............CSA Britain ............. BASE/BS Germany..........VDE Japan ...............
x FCC Warning To assure continued FCC compliance, the user must use a grounded power supply cord and the provided shielded video interface cable with bonded ferrite cores. If a BNC cable is used, use only a shielded BNC (5) cable. Also, any unauthorized changes or modifications not expressly approved by Westinghouse Digital will void the user's authority to operate this device. 7 English x Connect the equipment into an outlet on a circuit different from that to which the receiver is connected.
1. PRODUCT SAFETY English Follow and obey all warnings and instructions marked on the High Definition LCD TV. For your safety, please read all of the following safety and operating instructions before you operate the High Definition LCD TV—and keep this User’s Manual for future reference. Important Safety Instructions 1. Never use your HDTV near water. 2. Clean only with dry cloth. 3. Never block any ventilation openings; install in accordance with the manufacturer’s instructions. 4.
1. Outdoor Antenna Grounding If an outside antenna or cable system is connected to the High Definition LCD TV, be sure the antenna or cable system is grounded to prevent voltage surges and built-up static charges. Article 810 of the National Electrical Code, ANS/NFPA 70, provides information on proper grounding of the mast and supporting structure, grounding of the lead-in wire to an antenna discharge unit, connection to grounding electrodes, and requirements for the grounding electrode.
English 2. INTRODUCTION: THE BASICS Digital Television (DTV) Television broadcasting is changing. By February of 2009, traditional analog TV transmissions (the standard since TV’s inception) will cease to exist, in compliance with a federal mandate requiring all U.S. television stations to convert from analog to the new digital television (DTV) standards.
2. INTRODUCTION: THE BASICS Your new Westinghouse High Definition LCD TV has a built-in HDTV/NTSC tuner, meaning it can receive both analog and digital broadcasts from your antenna, cable or satellite service. But because not all broadcasters have converted to the new DTV standards, it’s important to understand some fundamentals of the digital television picture. The elements that make up onscreen images are pixels.
2. INTRODUCTION: THE BASICS English About Digital Channels Currently, all broadcasters have an analog TV channel and a digital TV channel. The digital bandwidth has the capability of accommodating more than one program stream because each broadcaster’s assigned digital channel carries a 19.39-megabit-per-second (Mbps) digital data stream. This allows the broadcaster the option of broadcasting a single program or dividing the digital data stream into multiple programming streams.
INTRODUCTION: The Basics The Electronic Program Guide (EPG) Your Westinghouse High Definition LCD TV features an on-screen interactive Electronic Program Guide (EPG) that allows you to review program information, as well as navigate through current and future programming options by channel or genre to plan viewing and recording. To access the EPG, push the “Guide” button on the lower left side of your remote, scroll the “EPG” feature in the On Screen Display’s (OSD) TV menu.
English 2. INTRODUCTION: CONTROLS AND CONNECTIONS Front View Use buttons on the right front side of your HDTV (or remote control on remote control) for On Screen Display (OSD), volume adjustment, channel selection, source, and turning power on or off. m LED INDICATOR/ CONTROLS 1. n 2. “IR” RECEIVER 3. SPEAKERS 4. 5.
2. INTRODUCTION: CONTROLS AND CONNECTIONS RIGHT SIDE CONNECTORS 1 2 1. 2. 4 3 5 3. 4. 5. 6.
English sidebar: Quick Reference: HDTV Connection YPbPr The “Y” stands for the luminance of the signal; Pb and Pr refer to the color difference signals (“b” for blue, “r” for red). Provides improved color bandwidth over S-Video or composite video connections. DVI-HDCP (Digital Visual Interface/High-bandwidth Digital Content Protection) Provides superior level of digital video quality, typically used in cable/satellite receivers or DVD players.
2. INTRODUCTION: Controls and Connections 1. 2. 3.
2. INTRODUCTION: CONTROLS AND CONNECTIONS English Remote Control Features 1. POWER Switch the power On/Off 2. PIP Display sub picture On/Off (not available) 3. MUTE Turn the sound On/Off 4. SWAP Switch between PIP and Main Picture (not available) 5. BACKLIGHT Shortcut to adjust backlight adjustment 6. CC Turn Closed Caption On/Off 7. SLEEP Set sleep timer 8. FAVORITE CHANNEL A / B / C Jump to favorite channels (Hold button for 3 seconds to program favorite channel). 9.
HDTV/ACCESSORY SETUP Now that you’re familiar with the basics of digital television and the various controls and connections for your HDTV, you’re ready to enjoy its superb picture quality and sound, along with the ultimate convenience of connecting your game consoles, VCR, DVD, audio devices or personal computer. NOTE: If you have already performed the steps in the Quick Setup Guide, skip to the instructions specific to the accessory you want to connect.
English Determining Available Channels x When connected to an antenna, cable or other RF (radio frequency) source, you’ll need to run “Autoscan”—available in the “TV” menu of the OSD (see page 26 for more information)—in order for all available channels to be received —Use the up/down arrow keys to scroll below “Tuner” to “Auto Scan” —Press “Enter” to start scanning for channels (identification of all analog and digital channels may take several minutes) NOTE: Depending on your area, some channels shown ma
3. HDTV/ACCESSORY SETUP Before making any connections, make sure all equipment is turned off.
3. HDTV/ACCESSORY SETUP English Connecting Other Accessories Following are the recommended connections to ensure optimal enjoyment of your accessory equipment with your HDTV. Before making any connections, make sure all equipment is turned off.
4. HDTV OPERATION Your HDTV’s On Screen Display (OSD) conveniently integrates all functions required for setup and operation. There are two ways you can access the OSD— either by pressing the remote control’s “Menu” button (located just below the volume controls on the left side of the remote), or by pressing the “Menu” button on the HDTV’s right-side control panel. You can select amongst any of the seven menus by using your remote’s W/X buttons.
4. HDTV OPERATION English OSD Menus and Features Video Menu The “Video” menu allows you to adjust the properties of the image you see on the screen by adjusting the display’s brightness, contrast, color intensity and hue, picture clarity and sharpness. You can also adjust the backlight’s intensity and, if necessary, restore the factory default video settings.
4.
4. HDTV OPERATION English TV Menu The “TV” menu provides a broad array of functions you’ll use during setup, as well as customizing various features such as closed captioning, favorite channels and parental controls.
4. HDTV OPERATION English Add or delete additional TV Channels Use the OSD to access the TV Menu Feature Select Add Channel Add a channel by enter the physical channel number or a range. Select Delete Channel Delete a channel from the current list of viewable channels available 2 1 1. Channel Number o Scroll to highlight a channel number from the list of available channels and press Enter to delete the channel. The OSD Menu has to be fully exit in order to delete the channel 2.
4. HDTV OPERATION English About Parental Controls The Parental Controls feature allows you to block TV programs based on various ratings systems, as well as to lock out the HDTV’s right side-mounted controls. The first time you enter the “Parental Control” menu, you will be taken to the password sub-menu to set up your four-digit password, which is required for using this feature.
4.
4. HDTV OPERATION English Parental Controls US TV Ratings & Content This sub-menu allows you to block programming according to US TV Ratings as well as content type.
English 4.
English 4. HDTV OPERATION PC (VGA only) Menu The “PC” menu lets you adjust image and phasing.
HDTV OPERATION Audio Menu The “Audio” menu let’s you precisely configure your audio preferences to optimize your listening experience.
English 4. HDTV OPERATION Power Menu The “Power” menu allows you to manage various power-related functions to simplify your viewing experience and save power.
4. HDTV OPERATION The “Setting” menu integrates still more choices that allow you to optimize your HDTV experience, from language selection to pertinent system and installation information.
4. HDTV OPERATION English Calibration Menu The “Calibration” menu integrates advanced choices that allow you to optimize your HDTV experience, especially for Video setting and individual color adjustments. Settings Menu Features Deinterlace Function Descriptions Turns on/off Deienterlace. Turns on/off 3D Comb Filter. In on mode, the picture quality is 3D Comb Filter better.
HDTV OPERATION Color Temperature The section Color Temp in the “Calibration” menu allow you to adjust each color temperature (Warm, Neutral, Cool) individually. In case of miss adjustment it can be Reset to factory default. 37 English 4.
4. HDTV OPERATION English Input Menu To change the Main Picture source, press the Input button on the remote to display the Main Picture (MP) input menu. When the input menu is open, press the Input button again to switch to the next input or use the up/down arrows to scroll through the inputs and the press enter to switch to the highlighted input. The input menu will timeout after 5 seconds and switch to the input that is currently highlighted.
5.APPENDIX: 52-inch High Definition LCD TV Specifications Panel Type 52” TFT (Thin Film Transistor), Active Matrix LCD, 1920 x 1080 vertical stripe; anti-glare coating Color 16.7 million colors Aspect Ratio 16:9 176° H) / 176° (V) Viewing Angles Input Signal Video/Audio RGB( Analog * 1 (75 ohms, 0.
English 5. APPENDIX: Troubleshooting No Power x x x x Make sure power cord is securely connected to the “AC In” jack on the back of the High Definition LCD TV. Make sure AC power cord is securely connected to the AC socket. Plug another electrical device (such as a radio) to the power outlet to verify that the outlet is supplying the proper voltage. When set to E. Saver, the TV will take longer to turn on. Change the Power menu setting to Normal to improve power on time.
x x Check VGA cable connection. Lower the video resolution on the computer and try again.
5. APPENDIX: Troubleshooting English Picture is cut off/with sidebar screen. x x Use “Auto Adjust”. Make sure the aspect ratio is set correctly. Blocky images appear in TV mode. x x x Check your antenna connection. If necessary, rotate the antenna and wait up to 10 seconds for signal. Reduce signal splitters and excessively long cables. Replace poor antenna cables and/or connectors to improve signal quality.
5. APPENDIX: Cleaning the High Definition LCD TV x x MAKE SURE THE HIGH DEFINITION LCD TV IS TURNED OFF NEVER SPRAY OR POUR ANY LIQUID DIRECTLY ONTO THE SCREEN OR CASE To clean the screen: 1. Wipe the screen with a clean, soft lint-free cloth. This removes dust and other particles. 2. If still not clean, apply a small amount of non-ammonia, non-alcohol based glass cleaner onto a clean, soft lint-free cloth and wipe the screen. To clean the case: 1. Use a soft, dry cloth. 2.
English 5. APPENDIX: Wall mount and Base removal for the 52” HD LCD TV The TV has been fitted with two sets of VESA mounting holes. The holes are spaced 100 mm and 200 mm equally apart for the 52” product. These mounting location are provided strictly as an option to the user for wall mounting. It is the responsibility of the user to use a UL Listed Wall Mount Unit rated to support the weight of this TV. Please consult authorized service personnel for the installation of this Unit.
Brackets Anti-tip over option: This TV has two small metal brackets on the back side of the TV. These two brackets have a circular cut out in the center. The brackets are to serve as an "anti-tipover" option and/or theft deterrent. If used as an “anti-tip over” aid, it is the responsibility of the user to securely anchor the brackets to a surface that can support the weight of the TV. (Note: at no time do we advocate using these brackets to support the entire weight of the TV.
www.wde.
,/ ~ Quick Connection Reference \, SK/TX Series Source Devices Overthe-air Cable/ Satellite DVD Game VHS PC HDMI N/A Best Best Best N/A N/A YPbPr+ LR Audio N/A Better Better Better NA NA VIDEO + N/A Good Good Good Good N/A NA Good Good Good Best NA VGA+ Audio Mini Jack N/A f\J/A ~/A N/A N/A Best ANT Best NA NA NA N/\ NA Connector Type TV Input Notes Verify Box Contents Power cable, remote control, two batteries, user manual and warranty card Identify Con
/Reference de Connexion Rapide • Referencia de Conexi6n Rapida .
est-n ouse Di ital Electronics Garantia Limitada de un Ano Para tamafios de 46 pulgadas 0 mayores Westinghouse Digital Electronics garantiza este monitor de TV contra defectos en materiales de 1 (UN) ana a partir de la fecha de compra.
Westinghouse Digital Electronics Westinghouse Digita Elect onic One Year Limited Warranty For sizes 46-inch or greater Garantie Limitee d'un An Dimensions a partir de 46 pouces Westinghouse Digital Electronics warrants this TV against defects in material or workmanship for a period of one (1) year from the original date of purchase, subject to the following terms and conditions: Westinghouse Digital Electronics garantit que ce TV n'a aucun defaut materiel ou de main-d'muvre, et ceci pendant une periode