Westinghouse Light Duty Commercial Electric Water Heaters Lair: Use and Care Manual Installation Start-Up Maintenance Parts Warranty a2 e Perform steps in the given ponder.
+ o = The following defined terms are used throughout this manual to bring attention to the presence of hazards of various risk levels or to Important product Information. ' DANGER indicates an imminently hazardous situation which, if not avoided, will result in serious personal injury or death. WARNING indicates a potentially hazardous situation which, if not avoided, could result in personal injury or death.
Installer Read all instructions in this manual before installing. Perform steps in the given order. User This manual is for use only by a qualified heating installer / service technician. Have this water heater serviced / inspected annually by a qualified service technician. FAILURE TO ADHERE TO THE GUIDELINES ON THIS PAGE CAN RESULT IN SUBSTANTIAL PROPERTY DAMAGE, SEVERE PERSONAL INJURY, OR DEATH. NOTE: If the water heater is exposed to the following, do not operate.
ing the Water Heater Locate the water heater where any leakage from the relief valve, related piping, tank, or connections will not result in damage to surrounding areas or lower floors of the building. The water heater should be located near a floor drain or installed in a drain pan. Leakage damages ARE NOT catered by warranty. This water heater is certified for Indoor use only, DO NOT INSTALL OUTDOORS. Outdoor installations ARE NOT covered by warranty.
If you suspect that your water is contaminated in any way, discontinue use of the appliance and contact an authorized technician or licensed professional. + Water pH between 6.5and 8.5 » pH levels below 6.5 can cause an increase in the rate of corrosion. higher can potentially cause lime scale build-up « Maintain water pH between 6.5 and 8.5. Check with litmus paper or have it chemically analyzed by a local water treatment company. » If the pH is not between 6.5 and 8.
Part Piping A.Plumbing Iris mandatory that all plumbing be done In accordance with federal, local, and state plumbing codes and practices. Failure to properly install the water heater WILL VOID the warranty. It is also necessary to use both thread tape and pipe sealing compound on all mechanical plumbing connections. Iris recommended touche unions on the hot and cold water connections to easily disconnect the water heater for servicing.
To avoid water damage or scalding due to relief valve operation: « Discharge line must be connected to relief valve outlet and| run to a safe place of disposal. Terminate the discharge Inning in a manner that will prevent possibility of severe burns of property damage should the relief valve discharge. « Discharge line must be as short as possible and the same| size as the valve discharge connection throughout its entire length.
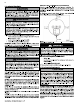
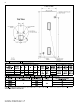
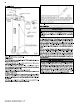
H. Applications 7 L R HOT IR Gty FRED BEAT RIAL SR %m? 3 RIVE! IS TANGIBLE VAR AR O BENETTON AR ORE DEAN Figure 4 Piping Detail NOTE: Drawing is meant to demonstrate system piping concept. Heat traps are optional, PIPING NOTES: The following notes are applicable to all of the piping applications demonstrated on this page. 1. Minimum pipe size should match connection size. Upside pipe accordingly If greater flow Is required. 2.
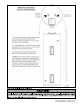
WIRE @ NUTS FACTORY WIRING GREEN _ FIELD WIRING UPPER THERMOSTAT AND HIGH TEMP LIMIT RED OR WHITE RED OR WHITE UPPER HEATING ELEMENT YELLOW LOWER THERMOSTAT D, RED OR WHITE SL5099 Figure-Dual Element Model Wiring Detail, Non-Simultaneous Element Operation Green Wire for Grounding the Water Heater 11 Part 5 Installation Checklist Water Hunter Location Close to area of heated water demand No Indoors and protected from freezing temperatures Area free of flammable vapors Provisions made to protect area from wat
Replace insulation and the black access cover. Tum on power to the heater. Failure to disconnect the power from the water heater before attempting to adjust or reset the thermostat(s) will resulting property damage, severe personal injury, or death. IF YOU NEED TO ADJUST THERMOSTAT(S) OR RESET THE ECO (RED RESET BUTTON) STEP #1 Turn off power to the water heater by removing fuse or shutting off at circuit breaker. STEP #2 Remove the two screws that hold the access cover in place. Remove the |& cover.
NOTE: Repeat Taps Necessary for Multiple Elements Step #8 Open the main cold water inlet. If the water heater has been Isolated from the system, open the valves, Refill the tank with cold water. Open a hot water faucet high in the system to bleed any air pressure from the system, Water will flow freely when air is completely bled. When filling the water heater, open a hot water tap to release air in the tank and piping.
T&P Relief Valve Maintenance Instruction: » Annually: Certain naturally occurring mineral deposits may adhere to the valve, blocking waterways and rendering the valve inoperative. The T&P Relief Valve lever must be operated to ensure the waterways are clear. If waterways are clear, hot water will discharge from the valve. Take precautions to avoid personal injury and property damage from contact with hot water.
Part 8 Troubleshooting 15 Problem Reason Remedy Manual disconnect switch turned off Turn switch on 1. Blown fuse or circuit breaker tripped 1. Replace fuse or reset breaker 2. Shorted or improper wiring 2. *Replace, repair, or rewire per detail 3. Circuit overloaded 3. *Provide adequate circuit to reduce load No Hot Watt 4. Grounded element or thermostat 4. “Replace o r Manual Reset High Limit (ECO) open Refer to Part 6, this manual. 1. Thermostat(s) defective or out of calibration 1.
Light Duty Commercial Stainless Steal Electric Water Hardhat Limited Warranty Westinghouse warrants each light duty commercial stainless steel electric water heater and its components to be free from defects in materials and workmanship according to the following terms, conditions, and time periods. UNLESS OTHERWISE NOTED THESE WARRANTIES COMMENCE ON THE DATE OF INSTALLATION.
10. Failure or performance problems caused by improper sizing of the water heater, expansion device, piping, electric service voltage, wiring or fusing. 11. Damages, malfunctions, or allures caused by improper wiring conversion. 12. Damages, malfunctions, or allures resulting from vacuum conditions. 13. Damages, malfunctions, or allures caused by operating the water heater with modified, altered, or unapproved components, or any component / attachment not supplied by Westinghouse, 14.
Customer Installation Record Form The following form should be completed by the Qualified Installer / Service Technician for you to keep as a record of the installation in case of a warranty claim. After reading the important notes at the bottom of the page, please also sign this document.