Electric Water Heaters Use and Care Manual Installation Start-Up Maintenance Parts Warranty Staged Operation Models This manual must only be used by a qualified installer / service technician. Read all instructions in this manual before installing. Perform steps in the given order. Failure to do so could result in substantial property damage, severe personal injury, or death.
The following defined terms are used throughout this manual to bring attention to the presence of hazards of various risk levels or to important product information. DANGER indicates an imminently hazardous situation which, if not avoided, will result in serious personal injury or death.
Part 1 - General Safety Information This water heater is approved for indoor installations only and is not intended for use as a pool heater. Clearance to combustible materials: 0” top, bottom, sides, and back. Heater must have room for service: 24” front, 6” top, and 6” sides are minimum recommended service clearances. (A combustible door or removable panel is acceptable front clearance.) This water heater has been approved for closet installation and installation on combustible flooring.
Part 2 - Prepare the Water Heater Remove all sides of the shipping crate to allow the heater to be moved into its installation location. Incorrect operating conditions can lead to damage to the heating system and put safe operation at risk. Ensure that the installation location adheres to the information included in this manual. Failure to do so could result in property damage, serious personal injury, or death.
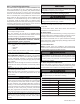
Top View Figure 2 - Dimensional Drawing - Staged Operation Specifications and Dimensions Residential Models Storage Capacity WER052C2X*** 52 Light Commercial Models Storage Capacity A WEC080C2X*** 80 6 1/2” WEC100C2X*** 100 A Water Temperature Ratings Shipping Weight (Lbs. Est.) Min. Delivered Temp. Max. Delivered Temp. High Temp. Limit UL 174 118 110oF (43.3 C) 150oF (65.5 C) 170oF (76.6 C) Safety Listing Shipping Weight (Lbs. Est.) Min. Delivered Temp. Max. Delivered Temp.
NOTE: In the State of California, the water heater must be braced, anchored, or strapped to avoid moving during an earthquake. Contact local utilities for code requirements in your area. Visit http://www.dsa.dgs.ca.gov or call 1-916-445-8100 and request instructions. However, applicable local codes shall govern installation. For residential water heaters of a capacity of greater than 52 gallons, consult the local building jurisdiction for acceptable bracing procedures. 3. Check area around water heater.
Part 3 - Piping A. Plumbing It is mandatory that all plumbing be done in accordance with federal, local, and state plumbing codes and practices. Failure to properly install the water heater WILL VOID the warranty. It is also necessary to use both thread tape and pipe sealing compound on all mechanical plumbing connections. It is recommended to use unions on the hot and cold water connections to easily disconnect the water heater for servicing.
F. Scalding To avoid water damage or scalding due to relief valve operation: • Discharge line must be connected to relief valve outlet and run to a safe place of disposal. Terminate the discharge line in a manner that will prevent possibility of severe burns or property damage should the relief valve discharge. • Discharge line must be as short as possible and the same size as the valve discharge connection throughout its entire length.
When filling the water heater, open a hot water tap to release air in the tank and piping. The tank must be full of water before the heater is turned on. Failure to ensure the water heater is full before turning it on could result in damage to the water heater and other property damages. Such damages ARE NOT covered by water heater warranty. H. Applications Part 4 - Wiring Tank must be full of water before the power is turned on.
Part 5 - Installation Checklist Water Heater Location Yes No Yes No Yes No Yes No Close to area of heated water demand Indoors and protected from freezing temperatures Area free of flammable vapors Provisions made to protect area from water damage and control thermal expansion Sufficient room to service heater Relief Valve Temperature and Pressure Relief Valve properly installed and discharge line run to open drain Discharge line protected from freezing Wiring Power supply voltage agrees with w
stopped heating, measure the water temperature at a hot water outlet in the structure. There are two thermostats on dual element heaters. If Step #9 - If the water heater is operating properly and the water temperature adjustment is necessary, TURN OFF POWER temperature is satisfactory, adjustment is complete. TO HEATER, remove black access cover and insulation. The thermostat protective cover SHOULD NOT be removed. Set temperature indicator to desired temperature.
to the heater during flushing operation, so the elements will not be damaged. Failure to shut off the heater when draining may damage the heating elements. Operating a partially filled / empty water heater could lead to damage from “dry-firing”. Failures due to such damage ARE NOT covered by warranty. Figure 6 - Heating Element Detail NOTE: Repeat Steps 3 - 6 as Necessary for Multiple Elements Step #7 - Open the main cold water inlet.
The maintenance activities described below are only to be performed by the Installer / Qualified Service Provider. These maintenance items should be performed during T&P Relief Valve Maintenance Instructions: • Annually: Certain naturally occuring mineral deposits recommended annual service and any service calls. may adhere to the valve, blocking waterways and 1. Ask the owner / user if there have been any issues with the rendering the valve inoperative. The T&P Relief Valve water heater.
Part 8 - Troubleshooting Problem Reason Remedy Manual disconnect switch turned off No Hot Water Not Enough Hot Water Water Too Hot or Not Hot Enough 1. 2. 3. 4. Turn switch on Blown fuse or circuit breaker tripped Shorted or improper wiring Circuit overloaded Grounded element or thermostat 1. 2. 3. 4. Replace fuse or reset breaker *Replace, repair, or rewire per detail *Provide adequate circuit to reduce load *Replace Manual Reset High Limit (ECO) open 1.
Stainless Steel Electric Water Heater Limited Warranty For Residential and Commercial Use Westinghouse warrants each residential stainless steel electric water heater to be free from defects in materials and workmanship according to the following terms, conditions, and time periods. The number of replacement water heaters is limited to one (1) per original unit purchased. Replacement parts will be warranted for 90 days. UNLESS OTHERWISE NOTED THESE WARRANTIES COMMENCE ON THE DATE OF INSTALLATION.
ordinances or good plumbing and electrical trade practices. 8. Damages, malfunctions, or failures resulting from improper installation, failure to operate the water heater at pressures not exceeding the working pressure shown on the rating plate, or failure to operate and maintain the water heater in accordance with the manufacturer’s provided instructions. 9. Damages, malfunctions, or failures caused by operating the water heater with modified, altered, or unapproved parts. 10.
Customer Installation Record Form The following form should be completed by the installer for you to keep as a record of the installation in case of a warranty claim. After reading the important notes at the bottom of the page, please also sign this document.