
Use and Care Manual


16
WHL-003 REV. 7.14.14
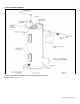
STEP #5 – Put a small
amount of NSF approved
lubricant and sealant on the
O-Ring.
STEP #6 – Screw the
element clockwise into tank,
and tighten with the 1 ½”
socket wrench or element
tool. Be sure O-ring seats
properly.
NOTE: REPEAT STEPS
3 – 6 AS NECESSARY
FOR MULTIPLE
ELEMENTS
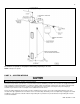
STEP #6 – Open the main cold water inlet. If the water heater has been isolated from the system, open the valves. Refill the tank with
cold water. Open a hot water faucet high in the system to bleed any air pressure from the system. Water will flow freely when air is
completely bled.
When filling the water heater, open a hot water tap to release air in the tank and piping. The tank must be full of water before the heater
is turned on. Failure to ensure the water heater is full before turning it on will result in damage to the water heater, and could result in
property damage, serious personal injury, or death. Such damages ARE NOT covered by water heater warranty.
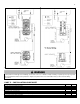
STEP #7 – Pressure check the tank for leaks around element. If no leaks are found, connect wires from the element to the thermostat.
STEP #8 - Turn power back on to the water heater.
Failure to refill the tank before restoring power to the water heater will result in damage to the heating elements and property damage.
Such damages ARE NOT covered by warranty.
PART 7 – MAINTENANCE
MAINTENANCE CONSIDERATIONS
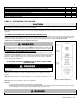
To avoid electric shock, disconnect electrical supply before performing maintenance.
To avoid severe burns, allow heater to cool before performing maintenance.
NOTE: In addition to the routine maintenance detailed in this manual, this water heater should be inspected annually by a qualified
service technician to assure that all the equipment is operating safely and efficiently. The owner should make necessary arrangements
with a qualified heating contractor for periodic maintenance of the heater. Installer must also inform the owner that lack of proper care
and maintenance may result in a hazardous condition, premature heater failure, and void the warranty.
Routine preventative maintenance ensures the water heater operates safely and efficiently over its service life. The Owner/User may
perform the maintenance activities described below.
Monthly (Every two weeks in hard water locations)
It is recommended that a few quarts of water be drained from the heater. This will flush sediment deposits from the bottom of the heater
and lengthen the heater’s service life. Turn off power to the heater during flushing operation, so the elements will not be damaged.
Failure to shut off power to the heater when draining may damage the heating elements. Operating a partially filled/empty water heater
could lead to damage from “dry-firing”. Failures due to such damage are NOT covered by warranty.
To flush the tank, attach a hose to the field installed drain valve in the cold water supply line. Close supply line shut-off valve. Open
drain line valve and hot water faucet(s) to vent heater while draining. Direct the flow of water to a drain or bucket where it will not cause
damage.
Figure 7 – Heating Element Detail