WTB4600, KTM4602, WTB5400, KTM5402, WBE4500, KBM4502, WBE5300, KBM5302, WFB4204, WRB5004 Refrigeration IK008 Integration kit Installation manual
electrolux.com.au CONGRATULATIONS CONTENTS Congratulations and thank you for choosing our integration kit. Before you install the integration kit, we recommend that you read through the entire installation manual. General warnings .....................................................2 To avoid the risks that are always present when you install an electrical appliance, it is important that the integration kit and appliance are installed correctly.
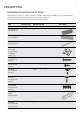
DESCRIPTION REFRIGERATOR INTEGRATION KIT ITEMS Because this kit is common to a variety of models, you need to select the items required to suit your model. The items required for the models covered in this instruction booklet are shown below. Those items not required on your particular model should be discarded.
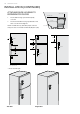
electrolux.com.au DIMENSIONS CUPBOARD DIMENSIONS IMPORTANT! Pages 4, 5, 6, and 7 should be given to the person responsible for cupboard design and construction. The cupboard dimensions required for each model are shown on page 5, 6 & 7. 1. All sizes are internal and measured in millimetres. 2. It is important to ensure that the correct cupboard sizes are used to ensure adequate air flow around the refrigerator. 3. Cupboard hinges should be a 120° opening type. (Use hinges supplied). 4.
NOTE: All sizes are internal and measured in millimetres. For ‘lettered’ dimensions refer to the table on page 4.
electrolux.com.au DIMENSIONS (CONTINUED) When positioned in a corner the clearance of Dim G on the hinge side of the cabinet will allow the doors to be opened enough to enable the removal of the crisper bins. Clearances When installed the refrigerator needs to have adequate air ventilation. It is important to ensure there is good airflow from the front to underneath and up the rear to the top of the cabinet (see diagrams).
INSTALLATION INSTALLATION OF 120˚ HINGE Please follow the instructions below to install the 120º hinge. Preparation 1. Unpack refrigerator, removing foam packing. 2. Lay the refrigerator down on its back on a piece of soft packing material. Use caution and two people while laying the appliance down. 3. Remove top door stopper if fitted (Figure 1). 4. Place adjustable rollers in the fully retracted position by screwing height adjusting screw fully anticlockwise (Figure 2).
electrolux.com.au INSTALLATION (CONTINUED) ATTACHING THE REAR ROLLERS A set of adjustable back feet/rollers is provided in the kit. These are required to ensure that the product is levelled correctly, failure to fit these may result in the poor operation of door opening. Once fitted turn the adjusting nut on each roller assembly anti-clockwise three full turns, this will raise the cabinet at the rear by approximately 12mm (ensure that the nut is completely wound up before turning). 1.
ATTACHING THE TOP HINGE BRACKET Figure 4 1. Remove top hinge cover (Figure 3), cover clips off. 2. Remove the three (3) top hinge screws. 3. Elevate hinge. 12mm 4. Slide the top hinge bracket into position below the hinge. 5. Re-attach hinge and screws ensuring that refrigerator door is still correctly positioned. IMPORTANT! You must ensure that the refrigerator door is: • Parallel with sides and top of cabinet.
electrolux.com.au INSTALLATION (CONTINUED) ATTACHING SLIDE-HOUSING TO REFRIGERATOR DOORS slide housing protuding edge 1. Ensure slide-housing is positioned squarely as shown. 100mm 2. Ensure that the slide-housing is positioned on the door as shown in the diagrams. NOTE: The slide-housing ‘protruding edge’ side must always be closest to the door handle side (diagram right). door handle 360mm 100mm 235mm 235mm 235mm 100mm 235mm 100mm 2 door bottom freezer 2 door top freezer ...
NOTE: For single door models, the door handle must be completely removed to provide clearance to the cupboard door and the resulting handle mounting holes hidden with a cover. Installer must use a tape or plastic cover that suits the installation appearance (not supplied). 3. While the slide-housing is taped in position, punch a small hole in the refrigerator door skin corresponding to the four (4) holes in the housing (Figure 5). 4.
electrolux.com.au INSTALLATION (CONTINUED) REFRIGERATOR ALIGNMENT Figure 9a - Hinge side Position the refrigerator in the cupboard so that: 1. Top hinge bracket is against cupboard wall (Figure 8). 2. Front of refrigerator cabinet (with doors open) is parallel to and approximately 100mm from the front of the cupboard (Figure 9). 3. Position bottom location brackets as shown (Figures 9 & 9a). Fit foot in appropriate hole as shown and level refrigerator.
SECURING THE REFRIGERATOR IN THE CUPBOARD ATTACHING SLIDE-BAR TO THE CUPBOARD DOOR NOTE: When attaching all screws to cupboard, first drill a 2mm pilot hole in the correct position. This will allow easy hand insertion of self tapping screw. 1. Now that the refrigerator is correctly positioned: 1. Screw in top hinge bracket to the cupboard wall using 4 cupboard screws provided. This will secure the top of the refrigerator (Figure 12). 2.
electrolux.com.au INSTALLATION (CONTINUED) 5. Rotate slide-bar to lower alignment, mark a line on cupboard door (Figure 16). Figure 16 6. Remove slide-bar and draw line to indicate central alignment (Figure 17). Figure 17 7. Replace slide-bar and align to centre line marked in previous operation (Figure 18).
NOTES
Electrolux Home Products Australia telephone: 1300 363 640 fax: 1800 350 067 email: customercare@electrolux.com.au web: electrolux.com.au Electrolux Home Products New Zealand telephone: 0800 436 245 fax: 0800 225 088 email: customercare@electrolux.co.nz web: electrolux.co.nz To add a touch of professional inspiration to your home, visit electrolux.com.au or electrolux.co.nz P/No. A04633101 © 2015 Electrolux Home Products Pty Ltd. ABN 51 004 762 341 EMAN_IK008_Sep15 shop.electrolux.com.