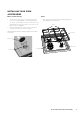
USER MANUAL 540MM AND 600MM SLOT-IN UPRIGHT RANGE COOKER WFE517, WFE547, WFE616, WFE619 WFE642, WFE647, WFG617
CONGRATULATIONS CONTENTS Congratulations and thank you for choosing our cooker. We are sure you will find your new appliance a pleasure to use and a great asset to your cooking. Before you use the appliance, we recommend that you read through the whole user manual which provides a description of the product and its functions.
IMPORTANT SAFETY INSTRUCTIONS WARNING WARNING • This appliance is not intended for use by persons (including children) with reduced physical, sensory or mental capabilities, or lack of experience and knowledge, unless they have been given supervision or instruction concerning use of the appliance by a person responsible for their safety. • Children should be supervised to ensure that they do not play with the appliance. • During use, this appliance becomes hot.
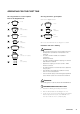
DESCRIPTION OF YOUR APPLIANCE Grill indicator Oven indicator lamp lamp Model WFE517 Hotplate controls Grill temperature selector Oven temperature selector Grill indicator Oven indicator lamp lamp Model WFE547 Dual ring hotplate control Hotplate controls Grill temperature selector Oven temperature selector Model WFE616 Hotplate controls Model WFE619 Hotplate controls 4 DESCRIPTION 2 hour timer 2 hour timer Grill/Oven indicator lamp Grill/Oven selector Grill/Oven temperature selector Gril
Grill/Oven indicator lamp Model WFE642 Dual ring hotplate control Hotplate controls Grill/Oven selector Grill/Oven temperature selector 2 hour timer Grill indicator Oven indicator lamp lamp Model WFE647 Dual ring hotplate control Hotplate controls Grill temperature selector Oven temperature selector 2 hour timer Model WFG617 Oven fan button Oven light button Hotplate controls Grill temperature 2 hour selector timer Hotplate controls Oven temperature selector Ignition button DESCRIPTION
BEFORE OPERATING YOUR APPLIANCE FOR THE FIRST TIME Preparing your appliance for the first time Grill in oven • Please remove all internal boxes and bags from the oven before operation. (refer to Fitting Oven Shelves) The grill dish with wire insert can be used in any of the two upper height positions (shelf positions 4 and 5) between the runners. • Please wipe out the oven interior prior to operation with warm soapy water and polish dry with a soft clean cloth.
INSTALLING YOUR OVEN ACCESSORIES Burner crowns and caps Trivets • The burner crown must be fitted correctly into the burner cup or damage will occur during operation. • Take care when placing the trivets as dropping them may damage the hob or trivet. • To do this, ensure that the 2 ribs on either side of the spark plug hole are positioned into the 2 slots on the burner cup (see diagram). trivets • Burner cap and burner crown must be clean and located correctly for the burner to light.
USING THE HOTPLATE Hotplate dos and dont’s Ceramic hotplates • The cooktop is made from ceramic glass, a tough, durable material that withstands heating and cooling without breaking. It is strong enough to hold the heaviest utensils. However, it must be remembered that as it is GLASS, it may break. Treat it accordingly! Do not place heat resistant mats, wire mats or aluminium foil under pots and pans. • Do not allow pots and pans to boil dry, as damage to both pan and hotplate may result.
OPERATING FOR THE FIRST TIME Choosing utensils for electric hotplates Refer to the diagram below. Choosing utensils for gas hotplates Refer to the diagram below. Good Good Bad (recessed base) Bad (undersize) Bad (convex base) Bad (undersize) Bad (oversize) Do not use utensils which are too large or too small.
USING THE GAS COOKER Lighting gas hotplate, grill and oven Gas hotplate Ensure burner caps, crowns and trivets are properly assembled. Burner Cap Burner Crown Electronic ignition (For models WFE616, WFE619 and WFE517) These hobs are fitted with mains powered electronic ignition. When the appliance has been connected and the power is on, depressing any knob will release sparks to all burners.
USING THE GAS COOKER Gas hotplates (Energy rating) 1 1 2 3 4 Medium heat burner (9.0 MJ/h) Used for normal cooking and simmering with mid size cookware items. 2 High heat burner (12.1 MJ/h) Used for fast heating with large size cookware items. 3 Intense heat wok burner (14.2 MJ/h) Used for very fast heating with woks and other large size cookware items. Use wok support provided when cooking with a wok. 4 Low heat burner (5.1 MJ/h) Used for simmering and for use with small cookware items.
GENERAL HINTS AND TIPS General hints For best baking results preheat oven for 30 minutes. he material and finish of baking trays and dishes used T will affect the way foods are baked, especially base browning. • Enamelware, anodised aluminium, dark bakeware or non-stick interiors and coloured exteriors will assist in maintaining or reducing the baking time and increase base browning. • Ovenproof glassware or ceramics are poor conductors of heat.
GUIDE TO BETTER GRILLING WARNING CAUTION Using the Grill Separate Grill Grill In Oven Grill with door open. No definite times can be given for grilling because this depends on your own taste and the size of the food. These times should only be used as a guide and remember to turn the food over halfway through the cooking process. rill dish must be located on slides. G Slides must be fully pushed in while grilling. Steak 15 – 20 minutes Chops 20 – 30 minutes Grill with door closed.
OPERATING THE 120 MINUTE MECHANICAL RINGER TIMER (WHERE SUPPLIED) Operating your 120 minute ringer timer To set the timer, simply turn the knob clockwise to the required number of minutes. Note: For any time below ten minutes, turn the knob past the thirty minute mark, then turn it back to the required number of minutes.
USING THE OVEN Fan baking Cooking guide The temperature in the oven is controlled by a thermostat. The fan distributes the heat throughout the oven compartment. This allows: • Select the correct shelf location for food being cooked. • Baking on all shelves at the same time with little variation in browning or cooking. • Cooking at slightly lower temperatures. • Cooking from a cold start so there is no need to preheat the oven – this is good for casseroles and fruit cakes.
OVEN GUIDE The following is intended as a guide. Cooking variation is natural and to be expected. You should experiment with times, temperatures and recipes to obtain the best results to your own taste. Get to know your oven before making a service call. Where the gas models vary from the electric models, details for gas cooking is shown in brackets. For best results when baking, preheat your oven for 30 minutes.
GET TO KNOW YOUR NEW OVEN WITH THIS ‘SIMPLE TEST CAKE’ Roasting Meat • You can use the grill tray and grill tray insert for roasting meat in the oven. • Place the meat in the oven and set the temperature between 180°C and 200°C. (It is recommended to wrap your meats in an oven roasting bag or foil to prevent fats and oils from splattering, making it easier to clean your oven.) • Do not pierce the meat, as this will allow juices to escape.
DEALING WITH COOKING PROBLEMS PROBLEM CAUSES WHAT TO DO Uneven cooking Incorrect shelf position Select shelf that puts food in centre of oven Oven tray too large Try other trays or dishes Trays not in centre Put trays in centre Air flow in oven uneven Rotate food during cooking Grill tray affecting thermostat Remove grill tray from oven on bake modes Oven not preheated Preheat the oven Baking tins too large for recipe Use correct size tins Baking tins not evenly spaced Stagger baking tins
CLEANING THE COOKER Ovens and hotplates are made from steel and enamel. Do not use abrasives and harsh scourers as they may scratch the surface. Enamel • Keep enamel clean by wiping it with a soft cloth dipped in warm soapy water. • Rub difficult stains with a nylon scourer or cream powder cleanser. • DO NOT use abrasive cleaners, powder cleaners, steel wool or wax polishes. • If you use an oven cleaner, follow the instructions on the product carefully.
CLEANING THE COOKER (CONTINUED) WARNING WARNING Grill • Always keep the grill tray and grill tray insert clean, as any fat deposits may catch fire. CLEANING YOUR OVEN ACCESSORIES Cleaning the grill Grill tray and grill pan • WARNING WARNING Gas Burners • Flame port blockages should be removed with a small metal cake skewer or nylon brush. Wash the grill tray and grill pan in hot soapy water. Always keep the grill pan clean as any fat left in it may catch fire.
SOLVING PROBLEMS Faults Further information If there is a problem with the oven and/or grill, please: If you need more information, service, replacement parts or have a warranty enquiry, please contact the Customer Care Centre: • Check the points listed below before calling for service. It may be possible to avoid a call by fixing the problem yourself – and so continue cooking. • For cooking problems, refer to “Dealing with cooking problems”.
INSTALLING THE APPLIANCE (600mm wide product) Cabinet requirements Recommended cabinet design This appliance has been designed to ‘slot-in’ to a 600mm wide gap built-in standard kitchen cabinets. As such the appliance can be installed to suit the height of the benches 600mm Clearance to side wall (refer notes) 600mm minimum This allows the cooker to integrate well into contemporary kitchens. The cooker may also be installed at the end of a line of benches or with a free space on either side.
Fitting the anti-tilt plate & stabilising bolt Rear cover Cooker Stability NOTE: To ensure cooker stability, both the anti-tilt plate and stability bolt MUST be installed on all cookers (electric and gas). Installation Sequence 48mm to side of plate 1. The cooker is delivered with the anti-tilt plate. Locate the anti-tilt plate against the rear wall. If locating between 2 cupboards, then fit the plate in the centre of the space.
INSTALLING THE APPLIANCE (540mm wide product) Cabinet Requirements This appliance has been designed to ‘slot-in’ to a 540mm wide gap built-in standard kitchen cabinets. As such the appliance can be installed to suit the height and depth of benches and behind the kick rail of the cabinets. This allows the cooker to integrate well into contemporary kitchens. The cooker may also be installed at the end of a line of benches or with a free space on either side.
WIRING REQUIREMENTS CONNECTING TO SERVICES AND COMMISSIONING The cooker MUST be installed in compliance with: This appliance must be installed by an authorised person, according to all codes and regulations of: • Wiring connections in AS/NZS 3000 Wiring Rules • Local regulations, municipal building codes and other statutory regulations • For New Zealand Only: The cooking range must be connected to the supply by a supply cord fitted with the appropriately rated plug that is compatible with the socket
650mm INSTALLATION Wiring connection for gas cooker Operation on SNG (WFG617 models only) To allow for disconnection of the appliance after installation, the plug must be accessible after installation. • If the cooker is to be used with SNG, then the grill burner MUST be modified by the replacement of the shutter, which fits into the throat of the grill burner.
INSTALLATION Gas requirements This appliance must be installed by an authorised person, according to all codes and regulations of: • AS/NZS 5601.1 (particular attention to clause 6.10.1 and figure 6.3 on page 97, and clause 6.10.1.11) The cookers come in two gas types: Natural gas and Universal LPG. Before installation check that the cooker is suitable for the gas supply. To do this check the gas type on the carton sticker or on the data plate behind the bottom of the oven door.
LPG CONVERSION DONG YANG – IMPORTANT (MODELS WFE517, WFE616 AND WFE619 ONLY) This appliance is fitted with Natural Gas burner injectors. The conversion kit contains 5 injectors and 1 LPG sticker. 9. One by one, turn the knobs to minimum and screw in the bypass screw (accessible when the knob is removed) until a small stable flame results. Turn the knob to maximum and then back to minimum to ensure that the correct minimum flame is maintained. 1.
LPG CONVERSION CHANT – IMPORTANT (MODELS WFE517, WFE616 AND WFE619 ONLY) This appliance is supplied set up for Natural Gas usage. A conversion kit is included with the product for Universal LPG usage. The conversion kit contains 5 injectors and 1 LPG sticker. Please follow the procedure below if a conversion to suit UNIVERSAL LPG is required: 1. Remove the hotplate trivets, burner caps and burner crowns to access the hotplate injectors.
TESTING THE OPERATION OF THE GAS COOKER NOTE: You MUST test the cooker after installation, before you hand it over to the customer. You MUST have a manometer and a connecting tube. Checking gas supply 1. Once these checks have been completed, if the regulator still fails to perform in a satisfactory manner it should be replaced. Check the manometer zero point is correct. 2. Connect the manometer to the cooker pressure test point. This is located on the regulator or LPG inlet fitting. 3.
Warranty FOR SALES IN AUSTRALIA AND NEW ZEALAND APPLIANCE: BUILT-IN OVEN, COOKTOP AND FREESTANDING COOKERS This document sets out the terms and conditions of the product warranties for Electrolux Appliances. It is an important document. Please keep it with your proof of purchase documents in a safe place for future reference should you require service for your Appliance. 1.
For more information on all Westinghouse appliances, or for dimension and installation information, call into your retailer, phone or email our customer care team or visit our website: AUSTRALIA phone: 1300 363 640 fax: 1800 350 067 email: customercare@electrolux.com.au web: westinghouse.com.au NEW ZEALAND phone: 0800 436 245 fax: 0800 225 088 email: customercare@electrolux.co.nz web: westinghouse.co.