
User Manual


11INSTALLING YOUR OVEN ACCESSORIES
INSTALLING YOUR OVEN ACCESSORIES
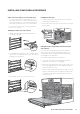
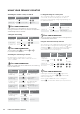
Slides (telescopic runners) (on selected models)
1.
The selected models are supplied with a set of
slides and instructions on how to assemble. Ensure
the rack and slides are of the same hand. E.g. left
hand slide should be fitted on the left hand rack.
2.
The instructions also show recommended slide
positions on the rack.
Installing the slides (telescopic runners)
1.
Obtain left hand side rack and left hand slide –
see image to identify
2. The shaded wires indicate the wire the slide can be
mounted on. Fit slide rear clips to the rear of wire at
an angle as shown below.
3. Push slide front clip over wire until secured.
CLICK!
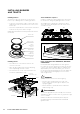
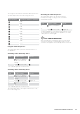
Installing the side racks
1.
Insert the rear peg into the rear access hole provided,
ensuring peg is fully inserted.
2
.
Then locate the front peg into the front access hole and
push in firmly.
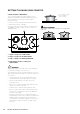
Fitting the shelves and grill dish carrier between the
side rack wires
The shelves are designed so that they have maximum
extension but cannot be accidentally pulled right out.
The grill dish carrier is designed the same way and can
slot straight into the side racks.
T
o fit a shelf or grill dish carrier to side racks:
1.
Locate the rear edge of the shelf/carrier in between
guide rails of the side rack - see diagram.
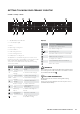
2.
Ensure the same rail positions on both sides of the oven
are being engaged. With the front edge raised, begin to
slide the shelf into the oven.
3.
Once the detents have passed the front edge of the side
rack, the shelf can be pushed completely in. When fully
inserted the shelf/carrier should not interfere with the
closed oven door.
L = Left hand side
R = Right hand side
1
2
3