USER MANUAL INDUCTION COOKTOPS WHI634BA, WHI644BA, WHI645BA, WHI744BA, WHI745BA ,WHI954BA
CONGRATULATIONS CONTENTS Dear customer, Important safety instructions.........................................................3 Congratulations on the purchase of your new cooktop. Before you use the cooktop, we recommend that you read through the whole user manual which provides the description of the cooktop and its functions.
IMPORTANT SAFETY INSTRUCTIONS Installation TIPS & INFORMATION IMPORTANT Check for any damage or marks If you find the cooktop is damaged or marked, you must report it within 7 days if you wish to claim for damage/ marks under the manufacturer’s warranty. This does not affect your statutory rights. ENVIRONMENT ENVIRONMENTAL TIPS Information on disposal for users • All of the packaging materials are recyclable.
IMPORTANT SAFETY INSTRUCTIONS Electrical connection • Users with a pacemaker must keep a distance of minimum 30 cm from the induction cooking zones when the appliance is in operation. WARNING WARNING Risk of fire and electrical shock. • All electrical connections must be made by a qualified electrician. Before wiring make sure the mains terminal is not live. • Make sure the appliance is installed correctly. Loose and incorrect plug and socket connections can make the terminal become too hot.
INSTALLATION INSTRUCTIONS Built-in appliances • Only use the built-in appliances after you assemble the appliance into correct built-in units and work surfaces that align to the standards. WARNING WARNING Refer to “Safety information” chapter. TIPS & INFORMATION IMPORTANT Connection cable • Use the correct mains cable of type H05BB-F Tmax 90°C (or higher) for a single phase or two phase connection. Before the installation, note down the serial number (Ser. Nr.
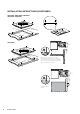
INSTALLATION INSTRUCTIONS (CONTINUED) WHI634BA, WHI644BA, WHI645BA, WHI744BA, WHI745BA R 5mm 600mm = 490 +1mm 560 +1mm = WHI954BA min. 20mm min. 5mm min. 20mm R5mm = 600mm 490 +1mm 880 +1mm Make sure a ventilation space of 5mm directly below the benchtop is included in the installation and is kept free. The warranty does not cover functional failures caused by the lack of adequate ventilation = min. 38mm min.
SPECIFICATIONS Technical data WHI634BA WHI644BA WHI645BA WHI744BA WHI745BA WHI954BA PNC 949 163 281 949 163 282 949 163 283 949 163 284 949 163 285 949 163 286 Product dimensions (w x d) mm 590 x 520 590 x 520 590 x 520 700 x 520 700 x 520 910 x 520 Cut-out dimensions (w x d) mm 560 x 490 560 x 490 560 x 490 560 x 490 560 x 490 880 x 490 Voltage (volts) 220-240 220-240 220-240 220-240 220-240 220-240 Cycles (Hz) 50-60 50-60 50-60 50-60 50-60 50-60 Total power (Watts)
PRODUCT DESCRIPTION WHI634BA 1 2 1 Induction cooking zone 1800 W, with Power function 2800 W (minimum cookware diameter =140 mm). 180 2 Induction cooking zone 3600 W, with Power function 5200 W (minimum cookware diameter =180 mm). 280 3 Control panel 140 4 Induction cooking zone 1400 W, with Power function 2500 W (minimum cookware diameter =125 mm). 4 3 WHI644BA 1 2 1 Induction cooking zone 1400 W, with Power function 2500 W (minimum cookware diameter =125 mm).
WHI744BA 1 2 1 Induction cooking zone 1400 W, with Power function 2500 W (minimum cookware diameter =125 mm). 140 180 2 Induction cooking zone 1800 W, with Power function 2800 W (minimum cookware diameter =145 mm). 3 140 3 Induction cooking zone 1400 W, with Power function 2500 W (minimum cookware diameter =125 mm). 210 4 4 Control panel 5 Induction cooking zone 2300 W, with Power function 5 3200 W (minimum cookware diameter =180 mm).
PRODUCT DESCRIPTION (CONTINUED) Control panel layout - WHI644BA & WHI744BA 6 1 2 3 4 5 2 3 4 7 8 6 Control panel layout - WHI634BA 1 10 6 9 6 5 7 10 7 6 6 8 5 4 7 9 6 5 4 Control panel layout - WHI645BA & WHI745BA 11 1 10 2 3 PRODUCT DESCRIPTION 6 4 5 6 10 7 8 9 7 6 6 5 4
Control panel layout - WHI954BA 2 1 6 3 4 5 6 10 7 8 5 9 6 7 4 6 6 5 4 Use the sensor fields to operate the appliance. The displays, indicators and sounds tell which functions operate.
OPERATING INSTRUCTIONS Activation and deactivation Touch for 1 second to activate or deactivate the appliance. Automatic switch off The function deactivates the appliance automatically if: • All cooking zones are deactivated ( ). • You do not set the heat setting after you activate the appliance. 1. Touch . The symbol comes on in the display. 2. Immediately touch adjacent to the element you want to control. The symbol comes on in the display. adjacent to the element you 3.
Timer Lock (models with independent lock button) Use the Count Down Timer to set how long the cooking zone operates for only this one time. Set the Timer after the selection of the cooking zone. When the cooking zones operate, you can lock the control panel, but not . It prevents an accidental change of the heat setting. You can set the heat setting before or after you set the timer. First set the heat setting. To start this function touch The symbol comes on for 4 seconds. The Timer stays on.
HELPFUL HINTS AND TIPS The noises during operation TIPS & INFORMATION IMPORTANT Use the induction cooking zones with correct cookware. Cookware for induction cooking zones If you can hear • crack noise: cookware is made of different materials (Sandwich construction). • TIPS & INFORMATION IMPORTANT histle sound: you use one or more cooking zones w with high power levels and the cookware is made of different materials (Sandwich construction).
CARE AND CLEANING Care and cleaning Clean the appliance after each use. Always use cookware with clean bottom. TIPS & INFORMATION IMPORTANT Scratches or dark stains on the glass ceramic have no effect on how the appliance operates. To remove the dirt: 1. Remove immediately: melted plastic, plastic foil, and food with sugar. If not, the dirt can cause damage to the appliance. Use a special scraper for the glass . Put the scraper on the glass surface at an acute angle and move the blade on the surface.
TROUBLESHOOTING PROBLEM POSSIBLE CAUSE AND REMEDY REMEDY Red rings, limescale or water rings, shiny metallic or other discolouration, scratches/ shadows, bubbles or other miscellaneous marks or stains on ceramic glass cooktop surface. Cooktop surface has not been cleaned correctly. Cleaning/ maintenance of the cooktop surface is not covered under warranty. If a service call is placed to clean the cooktop you will be charged for the visit. Use a ceramic glass cleaner such as Cerapol.
PROBLEM POSSIBLE CAUSE AND REMEDY REMEDY The residual heat indicator does not comes on. The cooking zone is not hot because it operated only for a short time. If the cooking zone should be hot, speak to the service centre. The Automatic Heat Up function does not operate. • There is still residual heat on the cooking zone. • Let the cooking zone become sufficiently cool. • The highest heat setting is set. • The highest heat setting has the same power as the Automatic Heat Up function.
NOTES 18 NOTES
Warranty FOR SALES IN AUSTRALIA AND NEW ZEALAND APPLIANCE: BUILT-IN OVEN, COOKTOP AND FREESTANDING COOKERS This document sets out the terms and conditions of the product warranties for Electrolux Appliances. It is an important document. Please keep it with your proof of purchase documents in a safe place for future reference should you require service for your Appliance. 1.
For more information on all Westinghouse appliances, or for dimension and installation information, call into your retailer, phone or email our customer care team or visit our website: AUSTRALIA phone: 1300 363 640 fax: 1800 350 067 email: customercare@electrolux.com.au web: www.westinghouse.com.au NEW ZEALAND phone: 0800 436 245 fax: 0800 225 088 email: customercare@electrolux.co.nz web: www.westinghouse.co.