USER MANUAL SINGLE DOOR REFRIGERATOR WRB3504S, WRB3504W
CONGRATULATIONS CONTENTS Dear customer, General warnings.................................................................................3 Congratulations on the purchase of your new refrigerator. Important safety instructions........................................................ 4 Before you use the refrigerator, we recommend that you read through the whole user manual which provides the description of the microwave and its functions. Installing your refrigerator...................................
GENERAL WARNINGS lease read the user manual carefully and store in a handy P place for later reference. Pass the user manual on to possible new owners of the appliance. Read the following carefully to avoid damage or injury. Note! You must read these warnings carefully before installing or using the appliance. If you need assistance, contact your Customer Care Department.
GENERAL WARNINGS Read the following carefully to avoid damage or injury It is important to use your refrigerator safely. Check these safety points before using your refrigerator. • Keep ventilation openings in the appliance enclosure or in the built-in structure clear of obstruction. • When installed correctly, your refrigerator should: - Have adequate space at the back and sides for air circulation (refer to page 5).
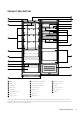
PRODUCT DESCRIPTION 12 1 13 2 14 15 3 16 17 18 4 19 5 20 6 7 8 9 21 10 22 11 1 Upper cover 9 Humitidity control slider 17 Egg tray (inside) 2 Block cover 10 Moisture fresh crisper 18 Small door bin 3 LED light 11 19 Handle 4 Glass shelf 12 Control panel 20 Lower door bin 5 Cabinet 13 Hinge cover 21 Fridge door 6 Small glass shelf 14 Corner cover 22 Gasket 7 15 Dairy lid Crisper box 8 Crisper cover Adjustable bottom feet 16 Dairy body Note! Your refrigerato
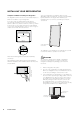
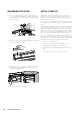
INSTALLING YOUR REFRIGERATOR Adequate ventilation around your refrigerator. The diagram below shows the recommended airspace to allow for ventilation of your refrigerator. If you don’t have a cupboard with a rear gap, the recommended clearance area on top increases from 50mm to 90mm (x) and from 32mm to 72mm (y). When positioned in a corner area, spacing of at least 350mm on the hinge side will allow the doors to open enough to enable the removal of bins and shelves.
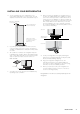
INSTALLING YOUR REFRIGERATOR 4. Check the alignment of the refrigerator to the surrounding cupboards to see if it is level. You can adjust the level with the rollers as detailed in step 3. aligned to cupboards ie. even gap top of refrigerator is level ie. horizontal 8. When you have the appliance in its final position, it needs to be stablisied. Wind the stability foot down to the floor until it just makes contact with the floor.
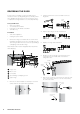
REVERSING THE DOOR If the position your fridge occupies would be better suited to a reverse opening arrangement, carefully follow these diagrams and instructions. The reversing of doors or replacement of light bulbs is not covered by warranty. 3. Using the 8mm wrench, unscrew and remove the hinge axis. hinge axis Tools you will need: • • • • 8mm socket driver Cross-shaped screwdriver Putty knife or thin-blade screwdriver 3mm allen key Precautions • • Turn off the appliance Unplug the power cable 1.
REVERSING THE DOOR (CONTINUED) 8. Change handle to the desired side and reinstall it as shown below. 10. Unscrew the washers and remove the lower hinge axis from the far hole and screw it into the near hole as per the picture below. Replace the washer. washer hinge access 9. Detach door stopper and limit block as shown and reinstall on the opposite side of the door. 11. Swap the positions of the the front foot fixed board and the right lower hinge and re-attach.
REVERSING THE DOOR INITIAL START-UP 13. Move the refrigerator door to the correct position next to the cabinet and attach with the upper hinge. Screw the hinge into place then fix with the left hinge cover (supplied). Refrigerators work by transferring heat from the food inside to the outside air. This operation makes the back and sides of the refrigerator (particularly at start-up) feel warm – which is normal. left hinge cover A cooling coil is located behind the rear wall of the freezer section.
ELECTRONIC CONTROLS All functions and controls of the unit are accessible from a control panel conveniently located on the roof of the cabinet. A display circuit board allows easy configuration of features and settings in a simple and intuitive manner. TIPS & INFORMATION IMPORTANT When the refrigerator is energized, all the pilot lights will turn on for 3 sec and you will also hear a long “beep”. The display board consists of four buttons and eight pilot lights.
FEATURES OF YOUR REFRIGERATOR Features Crisper bin sliding block This section tells you how to make the most of the many useful features - cleaning instructions can be found on page 15. SpillSafe™ glass shelves Spillsafe™ glass shelves keep spills on the shelf. A shelf retaining system minimises accidental movement of shelves and they can be adjusted to various heights. Spillsafe™ glass shelves are not to be used as slide out shelves.
CARE AND MAINTENANCE LED lighting WARNING CAUTION Your refrigerator is fitted with long life LED lighting. In the unlikely event the LED lights should fail, then the LED lights should be serviced by the manufacturer, it’s service agent or similarly qualified technician. Refer to the warranty page for contact details. When the door is left open for 15 minutes, the LED light will dim to 50% brightness to conserve energy and prolong the life of the LED.
FOOD STORAGE TIPS Storing food Meat, fish and poultry Refrigeration reduces the rate of food spoilage. To maximise the shelf life of perishable food products, ensure that the food is of the freshest possible quality. The following is a general guide to help promote longer food storage. Fruit and vegetables To minimise moisture loss, fruit and vegetables should be loosely enclosed in a plastic material (e.g. wrap, bags) and placed in the Vegetable crisper or the Chilled compartment.
TROUBLESHOOTING If you think something may be wrong with your refrigerator, you can carry out some easy checks before calling for service. You may locate the problem, sparing yourself from inconvenience, saving time and money. PROBLEM SOLUTION Refrigerator is not operating • Check that the power cord is plugged into the power outlet properly and that the outlet is switched ‘ON’. • Try running another appliance from the power outlet.
TROUBLESHOOTING If the temperature in the refrigerator is too warm If the temperature in the refrigerator is too cold If water drips on the floor If the doors will not close When temperature is hot/ warm on the outside and rear side of the refrigerator • Check that the appliance has enough clearance at the sides, back and top. Refer to the installation instructions on page 7. • Refer to ‘Controlling the temperature’ on pages 11. • You may have kept the door open too long or too frequently.
NOTES NOTES 17
NOTES 18 NOTES
Warranty FOR SALES IN AUSTRALIA AND NEW ZEALAND APPLIANCE: REFRIGERATION This document sets out the terms and conditions of the product warranties for Electrolux Appliances. It is an important document. Please keep it with your proof of purchase documents in a safe place for future reference should you require service for your Appliance. 1.
For more information on all Westinghouse appliances, or for dimension and installation information, call into your retailer, phone or email our customer care team or visit our website: AUSTRALIA phone: 1300 363 640 fax: 1800 350 067 email: customercare@electrolux.com.au web: westinghouse.com.au NEW ZEALAND phone: 0800 436 245 fax: 0800 225 088 email: customercare@electrolux.co.nz web: westinghouse.co.