user manual Dishwasher WSF6602
westinghouse Electrolux. Thinking of you. Westinghouse. We are part of the Electrolux family. Share more of our thinking at www.electrolux.
westinghouse 3 • Always close the door when you do not use the appliance to prevent injury and not to stumble over the open door. • Do not sit or stand on the open door. CHILD SAFETY • This appliance is not intended for use by young children or infirm persons unless they have been adequately supervised by a responsible person to ensure that they can use the appliance safely. • Children should be supervised to ensure that they do not play with the appliance. • Keep all the packaging away from children.
westinghouse PRODUCT DESCRIPTION 9 1 8 2 7 6 3 4 1 2 3 4 5 Upper basket Air vent Detergent dispenser Rinse aid dispenser Rating plate 5 6 7 8 9 Filters Lower spray arm Upper spray arm Worktop
westinghouse 5 CONTROL PANEL 1 2 8 1 2 3 4 5 6 7 8 3 7 6 4 5 On/off button Program indicators Display Indicators START indicator START button DELAY button PROGRAM button Indicators Button LOCK indicator. It comes on when the 'Button LOCK' function is activated. Rinse Aid indicator. It comes on when it is necessary to fill the rinse aid dispenser. 1) 1) When the rinse aid dispenser is empty, the related indicator does not come on while a washing program operates.
westinghouse to 'Setting and starting a washing program'. • To set and start a delay start. PROGRAM BUTTON Press this button repeatedly to set a washing program. Each time you press this button, a symbol that is related to a washing program comes on. Refer to 'Washing programs' chart. SETTING MODE The appliance must be in setting mode for these operations: • To set and start a washing program. Switch on the appliance. The appliance is in setting mode when: • All the program indicators come on.
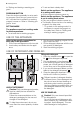
westinghouse 7 Rinse aid makes it possible to dry the dishes without streaks and stains. Rinse aid is automatically added during the last rinsing phase. Follow these steps to fill the rinse aid dispenser: Filling with rinse aid 1. Press the release button 6 to open the lid 5 of the rinse aid dispenser. 2. Fill the rinse aid dispenser 3 with rinse aid. The mark 'max' shows the maximum level. 3. Remove the spilled rinse aid with an absorbent cloth to prevent too much foam during the washing program. 4.
westinghouse LOADING THE CUTLERY BASKET Warning! Do not put long-bladed knives in a vertical position. Arrange long and sharp cutlery horizontally in the upper basket. Be careful with sharp items. Forks and spoons should be placed in the removable cutlery basket with the handles facing downwards and the knives with their handles facing upwards XXL 9 x 34 cm XXL Mix spoons with other cutlery to prevent them from nesting together. For best results we recommend you use the cutlery grids.
westinghouse 9 LOADING THE UPPER BASKET The upper basket is for plates, saucers, salad bowls, cups and glasses. Arrange the items to let water touch all surfaces. Put glasses with long stems in the cup racks with the stems up. For longer items, fold the cup racks up.
westinghouse ADJUSTING THE HEIGHT OF THE UPPER BASKET If you put large plates in the lower basket, first move the upper basket to the upper position. 24 28 cm cm 25 30 cm 28 Follow these steps to move the upper basket to the upper position: 1. Pull the basket out until it stops. 2. Carefully lift the two sides until the mechanism is engaged and the basket is stable. cm cm Follow these steps to move the upper basket to the lower position: 1. Pull the basket out until it stops. 2.
westinghouse 11 SETTING AND STARTING A WASHING PROGRAM STARTING THE WASHING PROGRAM WITHOUT DELAY START 1. Close the appliance door. 2. Switch on the appliance. Make sure that the appliance is in setting mode. 3. Set a washing program. Refer to 'Washing programs'. • The related program indicator comes on. • All other program indicators go off. • The time of the program flashes in the display. • The START indicator flashes. 4. Press the START button. The washing program starts.
westinghouse • There can be water on the sides and door of the appliance. Stainless steel becomes cool more quickly than the dishes.
westinghouse 13 WASHING PROGRAMS Program Type of soil Type of load Program description RINSE Use this program to quickly rinse the dishes. This prevents the remaining food to bond on the dishes and bad odours to come out from the appliance. Do not use detergent with this program.
westinghouse CARE AND CLEANING TO REMOVE AND CLEAN THE FILTERS Warning! Switch the appliance off before you carry out any cleaning operation. Dirty filters decrease the washing results. Although the maintenance is very low with these filters, we recommend that you regularly check the filters and clean them if necessary. 1. To remove filter (A), turn it counterclockwise and remove it out from filter (B). 7. Put filter (B) to its initial position.
westinghouse 15 FROST PRECAUTIONS Caution! Do not install the appliance where the temperature is below 0 °C. The manufacturer is not responsible for damage caused by frost. 2. Close the water tap. 3. Remove the appliance and the hoses. 4. Do not tilt the appliance during transport. MOVING THE APPLIANCE 1. Disconnect the mains plug from the mains socket. WHAT TO DO IF… The appliance does not start or stops during operation. If there is a fault, first try to find a solution to the problem yourself.
westinghouse After the check, switch on the appliance. The program continues from the point of interruption. If the malfunction occurs again, contact your Customer Care Centre. If the display shows an alarm code, not described in the chart, contact your Customer Care Centre. When you contact the Customer Care Centre you will need to give some details of the appliance that can be found on the rating plate (e.g. model number, serial number, product number). We recommend that you record these details.
westinghouse 17 TECHNICAL DATA Dimensions Width Height Depth Electrical connection Voltage Overall power Fuse Frequency Water supply pressure min. max. Capacity Place settings 596 mm 850 mm 620 mm 220-240 V 2200 W 10 A 50 Hz 50 kPa (7 psi) 800 kPa (116 psi) 13 INSTALLATION FITTING UNDER A KITCHEN COUNTER Warning! Make sure that the mains plug is disconnected from the mains socket during installation. Put the appliance adjacent to a water tap and to a water drain.
westinghouse If the door does not close correctly, loosen or tighten the adjustable feet to level the appliance. WATER CONNECTION WATER INLET HOSE Connect the appliance to a cold water supply. Connect the inlet hose to a water tap with an external BSP thread spout of 3/4”. Once connected the inlet hose to the water tap, turn the tap on and check that there are no leaks. Inlet water supply • Cold water pressure: 800 kPa max - 50 kPa min. • Water flow rate 10 L / minute min.
westinghouse 19 ELECTRICAL CONNECTION Warning! • The manufacturer accepts no liability for failure to observe the below safety precautions. • Safety standards require the appliance to be earthed. • Prior to using the appliance for the first time, ensure that the rated voltage and type of supply on the rating plate match that of the supply where the appliance is to be installed. • The fuse rating can be found on the rating plate and in 'Technical data'.
westinghouse WARRANTY FOR SALES IN AUSTRALIA AND NEW ZEALAND APPLIANCE: DISHWASHER This document sets out the terms and conditions of the product warranties for Electrolux Appliances. It is an important document. Please keep it with your proof of purchase documents in a safe place for future reference should you require service for your Appliance. 1.
westinghouse 21 7. You may not make a claim under this warranty unless the defect claimed is due to faulty or defective parts or workmanship.
westinghouse FOR SERVICE or to find the address of your nearest state service centre in Australia Please call 13 13 4 9 For the cost of a local call (Australia on- SERVICE AUSTRALIA ELECTROLUX HOME PRODUCTS www.electrolux.com.
westinghouse 23
www.westinghouse.com.