USER MANUAL DISHWASHER WSF6606XA, WSF6606KXA
CONGRATULATIONS CONTENTS Dear customer, General warnings 3 Congratulations on the purchase of your new Westinghouse dishwasher Safety instructions 4 Before you use the dishwasher, we recommend that you read through the whole user manual which provides the description of the dishwasher and its functions To avoid the risks that are always prese
GENERAL WARNINGS lease read the user manual carefully and store in a handy P place for later reference. Pass the user manual on to possible new owners of the appliance. Read the following carefully to avoid damage or injury. WARNING WARNING It is important to use your appliance safely. Check these safety points before using your appliance. Note: You must read these warnings carefully before installing or using the appliance. If you need assistance, contact your Customer Care Department.
SAFETY INSTRUCTIONS WARNING WARNING Risk of fire and electrical shock. Electrical connection WARNING WARNING Dangerous voltage • the water inlet hose is damaged, immediately If disconnect the mains plug from the mains socket. Contact the Authorised Service Centre to replace the water inlet hose. • The appliance must be earthed. • Make sure that the electrical information on the rating plate is the same as the power supply. If not, contact an electrician.
PRODUCT DESCRIPTION 1 10 2 6 3 4 8 9 5 7 1 Worktop 2 Upper spray arm 3 Lower spray arm 4 Filters 5 Rating plate 6 Air vent 7 Rinse aid dispenser 8 Detergent dispenser 9 Lower basket 10 Upper basket 11 11 Super Active Drying2 TECHNICAL SPECIFICATIONS WSF6606KXA- built under Capa ty He t He t hout worktop) dth WSF6606XA - built under 15 place sett s 850mm 820mm 598mm Depth Net ght Electr y nput Current Total power 598mm 56kg 220-240 V, 50 Hz 10 A 1900W 570mm 56kg 220-240 V, 5
CONTROL PANEL 1 9 8 7 2 6 3 4 1. On/Off Button Switch the machine on by pressing the On/Off button. The On/Off lamp lights as long as the machine is on. 2. Program Selection Button Select a suitable program by pressing the program button. 3. Delay Button You can delay the start time of the program for 1-2...24 hours by pressing the delay button (3) before the program starts. If you want to change the delay time,first press the Start/Pause button and then the delay button to select a new delay time.
CONTROL PANEL NOTE: By selecting the half load option ,three sorts of washing can be executed: both baskets, upper basket and lower basket. These options are ideal for smaller loads, allowing the dishwasher to perform smaller washes with reduced consumption. NOTE: Select the Tablet option when using combined detergent that contains rinse aid and extra functions.
CONTROL PANEL NOTE: Child lock is activated/deactivated by pressing the select button (5) for about 3 seconds. When it is activated, all leds blink and “CL” is shown on the Re NOTE: If you switch the machine to off position after selecting the delay time and the program has started, the delayed time is cancelled. Changing a program If you would like to change the program when the machine is already running. Press the Start/Pause button for 3 seconds. During cancellation, the End light blinks.
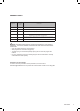
PROGRAM TABLE Program Prewash Fast 30' Duration (min) 15 Description To rinse heavily soiled dishes before a wash program. 30 Quick wash program for lightly soiled dishes. Delicate 74 For lightly soiled delicate dishes. Eco 50°C 155 Standard program for normally soiled daily using dishes with reduced energy and water consumptions. 50 A faster program for dishes which are used daily but are not heavily soiled. TimeSave 50' Heavy 122 For heavily soiled dishes.
HINTS AND TIPS If one of program monitor lights is on and start/pause light is flashing • Your machine’s door is open, shut the door to continue. If the program won’t start • Check if the plug is connected. • Check your indoor fuses. • Check that the water inlet tap is turned on. • Check that you have closed the machine door. • Check that you switched off the machine by pressing the power on/off button. • Check that the water inlet filter and the machine filters are not clogged.
INSTALLATION Positioning the machine WARNING When considering the location for the dishwasher, ensure that there is adequate space to enable loading and unloading of the dishes. Only turn the locking nut to secure hose – do not turn the hose. • Do not put your machine in any location where the ambient temperature can fall below 0°C. • The first time you use the appliance, make sure that there is no leakage.
INSTALLATION Water drain hose If you connect the water drain hose to a trap spigot Remove under the sink, remove the entire internal membrane plastic membrane. If you do not remove the entire membrane, remaining food can cause blockage in the drain hose spigot. Ensure a hose clamp is used to secure the hose to the spigot. Water drain hose The water drain hose can be connected either directly to the water drain hole or to the sink outlet spigot.
INSTALLATION Timber wedging piece 1 Filler piece cut to suit installation Bench top 3mm gap 570m m m 0m . 60 min 2 596 598 4 850 820 3 5 97 85 46 57 5 0 1. towards the rear and lift it. 2. Adjust the machine feet according to the slope of the floor.ARNING 3. Fit your machine by pushing it undercounter without letting the hoses get crushed or bent. WARNING After removal of worktop, ensure the opening for the dishwasher is according to the following dimensions.
PREPARING FOR USE Detergent usage Use a detergent specifically designed for use in domestic dishwashers You can find powder, gel and tablet detergents in the market that have been designed for household dishwashers Detergent should be put into the compartment prior to starting the machine Keep your detergents in cool, dry places out of reach of children Do not fill detergent into the detergent compartment more than required; otherwise it may cause scratches on your glasses as well as lead to a poorly di
PREPARING FOR USE W CAUTION In order to set rinse aid level, follow below steps: • Turn on the machine by pressing On/ Off button. • Solubility of the tablet detergents produced by different companies can vary depending on the temperature and time. Therefore, it is not recommended to use such detergents in short programs. It is more suitable to use powder detergents in such programs. Press Program button at least for 5” immediately after machine is turned on.
LOADING YOUR DISHWASHER If your dishes are correctly placed in the dishwasher, you will be using it in the best way in terms of energy consumption, washing and drying performance There are two separate baskets for you to load your dishes into your machine You can load into the lower basket such round and deep items as pots with long handles, pot lids, plates, salad plates, cutlery sets The upper basket has been designed for tea plates, dessert plates, salad bowls, cups and glasses When placing long-stem
LOADING YOUR DISHWASHER Alternative basket loads Lower Basket Top Basket ARNING LOADING YOUR DISHWASHER 17
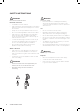
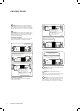
LOADING YOUR DISHWASHER Four Folding Racks The folding racks are designed so that large items, such as pots and pans, can be easily placed in the dishwasher. Each section can be folded separately. The racks can be folded down or raised up, as shown in the images below.
LOADING YOUR DISHWASHER Alternative basket loads Lower Basket * Illustration only Top Basket IMPORTANT TIPS & INFORMATION Examples of incorrect loading LOADING YOUR DISHWASHER 19
MAINTENANCE AND CLEANING . TIPS & INFORMATION IMPORTANT Cleaning the machine in regular intervals prolongs the machine’s service life 1 c 3 Oil and lime may accumulate in the machine’s washing section.
TROUBLESHOOTING Error code Possible cause and solution F1 Overfill Control • Power off your machine and close the tap. • Contact the customers services centre. • Water discharge hose is clogged. • Water drainage hose kinked, check installation. F2 Not draining • The filters of your machine might be clogged. • Power off–on your machine and activate the program cancellation command. • If the error continues, contact the Customer Care Centre. F3 Inlet valve faulty • Close the tap.
Warranty FOR SALES IN AUSTRALIA AND NEW ZEALAND APPLIANCE: WESTINGHOUSE DISHWASHERS This document sets out the terms and conditions of the product warranties for Westinghouse Appliances. It is an important document. Please keep it with your proof of purchase documents in a safe place for future reference should there be a manufacturing defect in your Appliance. This warranty is in addition to other rights you may have under the Australian Consumer Law.
NOTES NOTES 23
For more information on all Westinghouse appliances, or for dimension and installation information, call into your retailer, phone or email our customer care team or visit our website: AUSTRALIA service: spare parts: email: web: 13 13 49 13 13 50 customercare@electrolux.com.au westinghouse.com.au NEW ZEALAND service: 0800 10 66 10 spare parts: 0800 10 66 10 email: customercare@electrolux.co.nz web: westinghouse.co.nz and WESTINGHOUSE are trademarks of Westinghouse Electric Corporation.