
User Manual


INSTALLATION
12
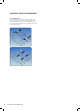
Waterdrainhose
If you connect the water
drain hose to a trap spigot
under the sink, remove the
plastic membrane. If you
do not remove the entire
membrane, remaining food
can cause blockage in
the drain hose spigot. Ensure a hose clamp is used to
secure the hose to the spigot.
Waterdrainhose
The water drain hose can
be connected either directly
to the water drain hole or to
the sink outlet spigot. Using
a hose hook (if available),
the water can be drained
directly into the sink by
positioning the hose hook
over the edge of the sink.
This connection should be at a minimum of 50cm
and at a maximum of 110cm above the base of the
dishwasher.
WARNING
Maximumdrainhoselengthis4m.Longerhose
lengthwillpreventcorrectdraining,
andresultinpoorwashperformance.
ElectricalConnection
The plug of your machine should be connected to an
earthed outlet that supplies suitable voltage and current.
If there is no earthing installation, have a competent
electrician carry out an earthing installation. In case of
usage wit
hout earthing installed, our company will not be
responsible for any loss of usage that might occur.
The indoor fuse current value should be 10-16 A.
Your machine is designed for 220-240 V. The machine
should not be plugged in during installation.
• Always use the molded plug supplied with your
machine.
• Running in low voltage will cause a decline in
washing quality.
• The machine’s electrical cable should be replaced
by an authorised service or an authorised electrician
only. Failure to do so may lead to accidents.
• For safety purposes, always make sure to
disconnect the plug when a wash program
is nished.
• I n order not to cause an electric shock, do not
unplug when your hands are wet.
• When disconnecting your machine from the mains
supply, always pull from the plug. Never pull the
cord itself.
Fittingthemachineundercounter
If you wish to t your machine undercounter, check
whether you have sucient space under your
countertop and whether the wiring-plumbing is suitable
to do so.
1. To ensure the stability of the dishwasher for
an underbench installation, if the underbench
dimension is greater than 820mm, any gap between
the dishwasher and the underside of the benchtop
should be bridged with a packing piece. This may
be achieved by wedging a piece of timber between
the dishwasher and the benchtop as shown
2. I f required, remove the worktop as shown in the
illustration.
3. To remove the worktop, remove the screws that
hold the worktop which are located at the rear of
the machine; then push the front panel 1cm from
the front
Remove
entire internal
membrane
WARNING
INSTALLATION